Let's integrate our UIKIT in few minutes

Quick Start#

SDK UIKit for React Native#

Mirrorfly UIKit Sdk is a set of prebuilt UI components that allows you to easily integrate an in-app chat with all the essential messaging features.

Requirements#

The requirements for chat SDK for React Native Mobile App are:

  • React Version 17.0 or above
  • React-Native 0.69.0 or above
  • Node Version v18 or above

Things to be Noted Before Making a Start#

SDK License Key#

Before integrating CONTUS MirrorFly Chat SDK, you need to have a SDK license key for your MirrorFly application. This SDK needs to be authenticated by the MirrorFly server using the license key for further processing.

To get the License Key,#

Step 1: Register here to get a MirrorFly User account. Registration is subject to verification and would take up to 24 hours.

Step 2: Login to your Account

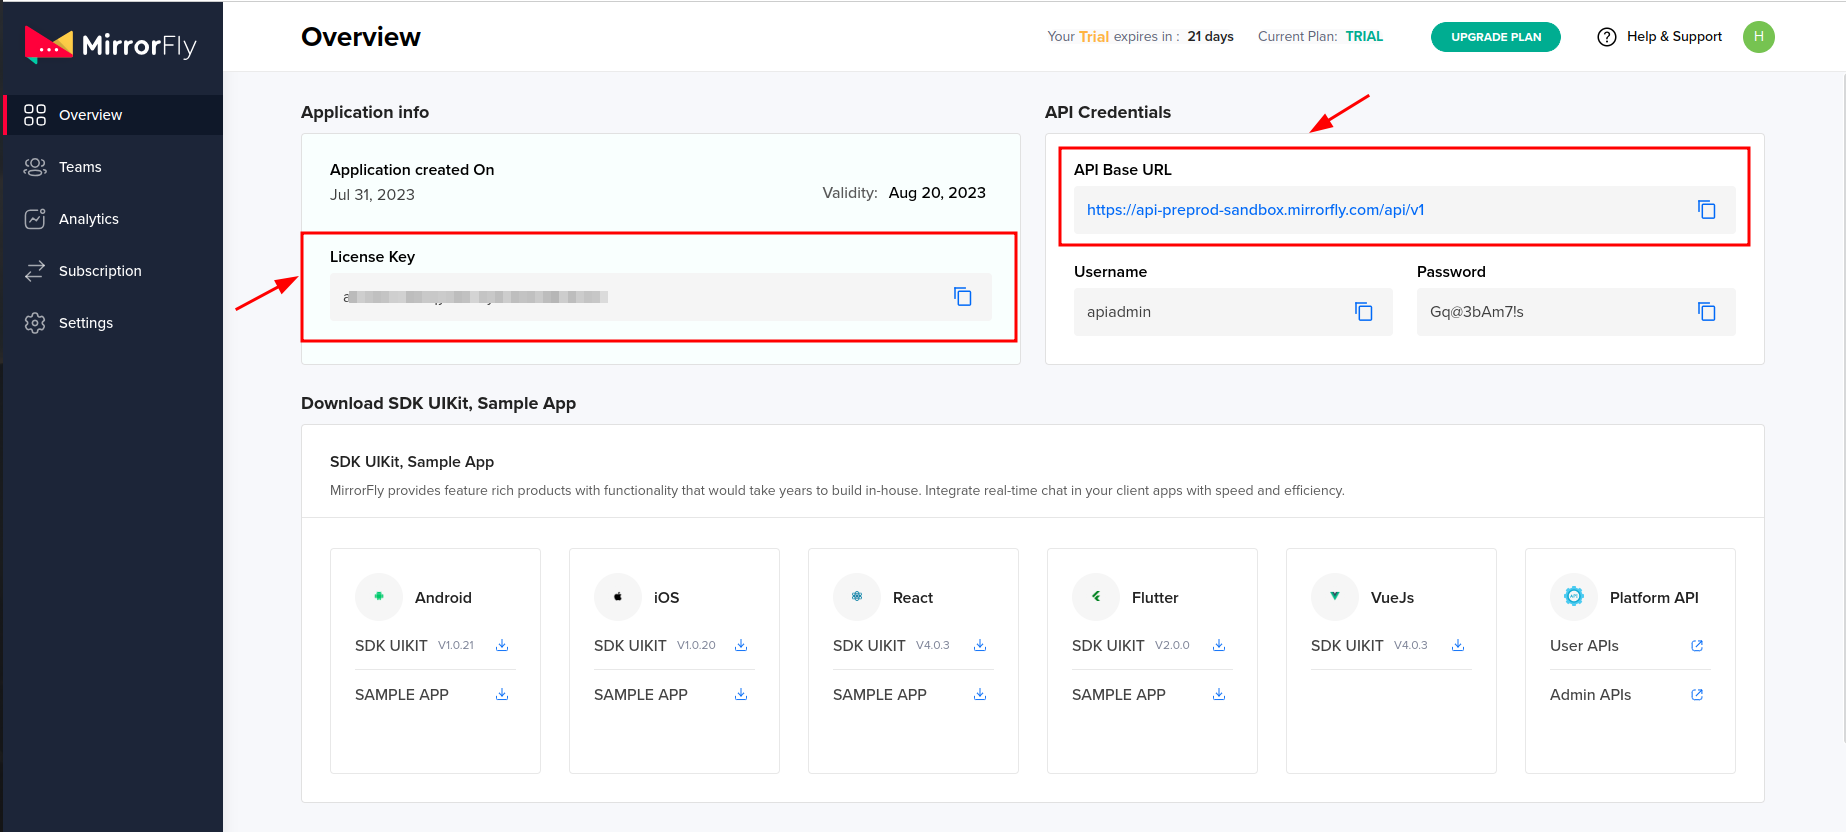
Step 3: Get the License key from the application Infoโ€™ section

license-key

Integration#

Install mirrorfly-uikit-react-native (https://www.npmjs.com/package/mirrorfly-uikit-react-native) npm package by terminal command 'npm i mirrorfly-uikit-react-native'. Now the node_modules will have a mirrorfly-uikit-react-native folder and package.json is added with the mirrorfly-uikit-react-native dependency.

Step 1: Create a new React Native project or Open an existing project.

Adding dependencies#

Note : Before installing the patch-package need to download the patch files and paste that files in root folder.

Download Patch Files
Download

Step 2: Open terminal and install patch-package with npm command 'npm i patch-package -f' and check package.json whether the dependency is added.

"dependencies": {
"patch-package": "^8.0.0",
}

Step 3: After installing the patch-package add the below lines in package.json under scripts

"scripts": {
...
"postinstall": "patch-package"
}

Step 4: Open terminal and install mirrorfly-uikit-react-native with npm command 'npm i mirrorfly-uikit-react-native' and check package.json whether the dependency is added.

"dependencies": {
"mirrorfly-uikit-react-native": "^1.4.1",
"mirrorfly-reactnative-sdk": โ€œ^1.0.2โ€,
"react-native": "0.69.12",
"react": "^17.0.0",
}

Step 5: Open the metro.config.js and update the code as mentioned below.

const {getDefaultConfig} = require('metro-config');
module.exports = (async () => {
const {
resolver: {sourceExts, assetExts},
} = await getDefaultConfig();
return {
transformer: {
getTransformOptions: async () => ({
transform: {
experimentalImportSupport: false,
inlineRequires: true,
},
}),
},
resolver: {
assetExts: assetExts.filter(ext => ext !== 'svg'),
sourceExts: [...sourceExts, 'svg', 'cjs'],
},
};
})();

Step 6: Install required dependencies enter the following code on the command line for adding the below dependencies in package.Json.

Note : realm@10.8.0 must use the realm version 10.8.0 in v 0.69.12,
if errors occurs like this > Task :realm:send FAILED, Add the following line in this file <app>/android/settings.gradle

startParameter.excludedTaskNames.add(':realm:send');

Note : if errors occurs like this > could not invoke RNAndroidLocationEnabler.promptForEnableLocationIfNeeded. found interface com.google.android.gms.location.settingsclient, but class was expected (declaration of 'com.google.android.gms.location.SettingsClient' appears in /data/app/~~dQIJYPyV_0zb5PG-2RsSMg==/applicationId-s0 mk9yoRtp0KWm9j-w-wQ==/ base.apk),

Add the following line in this file <app>/android/build.gradle

allprojects {
repositories {
...
//** add this line
configurations.all {
resolutionStrategy {
force "com.google.android.gms:play-services-location:21.0.1"
}
}
}
}

Step 7: Install all the dependencies in terminal

npm i react-redux@8.0.5 \
react-native-fs@2.18.0 \
rn-fetch-blob@0.12.0 \
realm@10.8.0 \
fbjs@3.0.5 \
native-base@3.4.28 \
@react-native-camera-roll/camera-roll@6.0.2 \
@react-native-community/checkbox@0.5.16 \
react-native-svg@13.10.0 \
react-native-video@5.2.1 \
react-native-sound@0.11.0 \
moment@2.29.4 \
react-native-screens@3.14.1 \
prop-types@15.8.1 \
react-native-camera@4.2.1 \
react-native-image-zoom-viewer@2.2.14 \
react-native-compressor@1.6.1 \
react-native-document-picker@9.0.1 \
@react-navigation/native@6.0.8 \
emoji-datasource@15.0.1 \
@react-navigation/native-stack@6.9.13 \
@react-native-async-storage/async-storage@1.17.7 \
react-native-mov-to-mp4@0.2.2 \
react-native-image-crop-picker@0.38.0 \
react-native-safe-area-context@4.3.1 \
@react-native-community/netinfo@8.0.0 \
react-native-permissions@3.8.0 \
@react-native-clipboard/clipboard@1.11.2 \
@react-native-firebase/messaging@18.3.0 \
@react-native-firebase/app@18.3.0 \
@types/react@18.0.24 \
react-native-convert-ph-asset@1.0.3 \
react-native-create-thumbnail@1.6.4 \
react-native-file-viewer@2.1.5 \
react-native-get-random-values@1.8.0 \
react-native-push-notification@8.1.1 \
react-native-slider@0.11.0 \
react-native-svg-transformer@1.1.0 \
@react-native-community/push-notification-ios@1.11.0 \
react-native-maps@1.7.1 \
react-native-geolocation-service@5.3.1 \
react-native-geocoder@0.5.0 \
react-native-pager-view@6.2.0 \
react-native-tab-view@3.5.1 \
@notifee/react-native@7.8.2 \
react-native-audio-recorder-player@3.6.0 \
react-native-gesture-handler@2.9.0 \
react-native-progress@5.0.0 \
react-native-geocoding@0.5.0 \
react-native-contacts@7.0.6 \
react-native-incall-manager@4.1.0 \
react-native-callkeep@4.3.12 \
react-native-silentmode-detector@0.1.2 \
react-native-material-menu@2.0.0 \
react-native-keep-awake@4.0.0 \
react-native-webrtc@118.0.2 \
react-native-background-timer@2.4.1 \
react-native-raw-bottom-sheet@2.2.0 \
react-native-headphone-detection@1.3.0 \
react-native-keyevent@0.3.2 \
react-native-ringer-mode@2.0.0 \
react-native-voip-push-notification@3.3.2 -f

Note: Follow the installation instruction for the @react-native-firebase package

Step 8: You can check here about what are the permissions.

Change Android dependency#

Step 9: Add the below lines in android app folder build.gradle file under android defaultConfig.

android {
...
defaultConfig {
...
//Add these below lines
missingDimensionStrategy 'react-native-camera', 'general'
multiDexEnabled true
}
}

Step 10: Change the below lines to your root build.gradle file in your Android folder.

buildscript {
ext {
...
//Update the existing value of the below properties
buildToolsVersion = "33.0.0"
compileSdkVersion = 33
targetSdkVersion = 33
}
}

Change iOS dependency#

Step 11: Add the below lines in ios app folder Podfile file under target 'app_name' do.

config = use_native_modules!
$RNFirebaseAsStaticFramework = true <== Add this line
use_frameworks! :linkage => :static <== Add this line
# :flipper_configuration => FlipperConfiguration.enabled, <== if this line exists comment it

Step 12: After installing the react-native-permissions add the below lines in package.json and run the command npx react-native setup-ios-permissions

"reactNativePermissionsIOS": [
"AppTrackingTransparency",
"BluetoothPeripheral",
"Calendars",
"Camera",
"Contacts",
"FaceID",
"LocationAccuracy",
"LocationAlways",
"LocationWhenInUse",
"MediaLibrary",
"Microphone",
"Motion",
"Notifications",
"PhotoLibrary",
"PhotoLibraryAddOnly",
"Reminders",
"Siri",
"SpeechRecognition",
"StoreKit"
],

Step 13: Import ChatApp component from the mirrorfly-uikit-react-native.

The apiUrl and licenseKey details can get it from the 'Overview' section in the mirrorfly Console dashboard.

license-key

Initialize MirrorFly React Native UIKit#

To initialize the mirrorfly, place the below code in your App.js file inside useEffect.

import { mirrorflyInitialize } from "mirrorfly-uikit-react-native"
function App() {
React.useEffect(() => {
(async () => {
const initializeResponse = await mirrorflyInitialize({
apiBaseUrl: API_URL,
licenseKey: LICENSE_KEY,
isSandbox: true,
callBack: res => {
console.log(res);
},
});
})();
}, []);
return(
<>
<YourComponent/>
</>
)
}
export default App;
ArgumentTypeDescription
LICENSE_KEYStringset your licence key
API_URLStringset your base url
callBackfunctionCall back function
import { ChatApp } from "mirrorfly-uikit-react-native"
function YourComponent() {
return (
<ChatApp />
);
}
export default YourComponent;

Note : Great!!! We are now end of the Quick Start section. For Advanced options. Click Here