Let's Integrate Our Android Chat UI Design in Few Minutes
Mirrorfly UIKit Sdk is a set of prebuilt UI components that allows you to easily integrate an in-app chat with all the essential messaging features. Our development kit includes light and dark themes, text fonts, colors and more. You can customize these components to create an interactive messaging unique interface.
Requirements#
The requirements for chat SDK for Android are:
- Android Marshmallow 6.0 (API Level 23) or above
- Java 8 or higher
- Gradle 4.1.0 or higher
Note : If you're utilizing UIKit SDK version 1.0.34 or higher, it's necessary to adjust the target SDK version to 34. This is due to the migration of Chat SDK to Android 14.
Things to be Noted Before Making a Start#
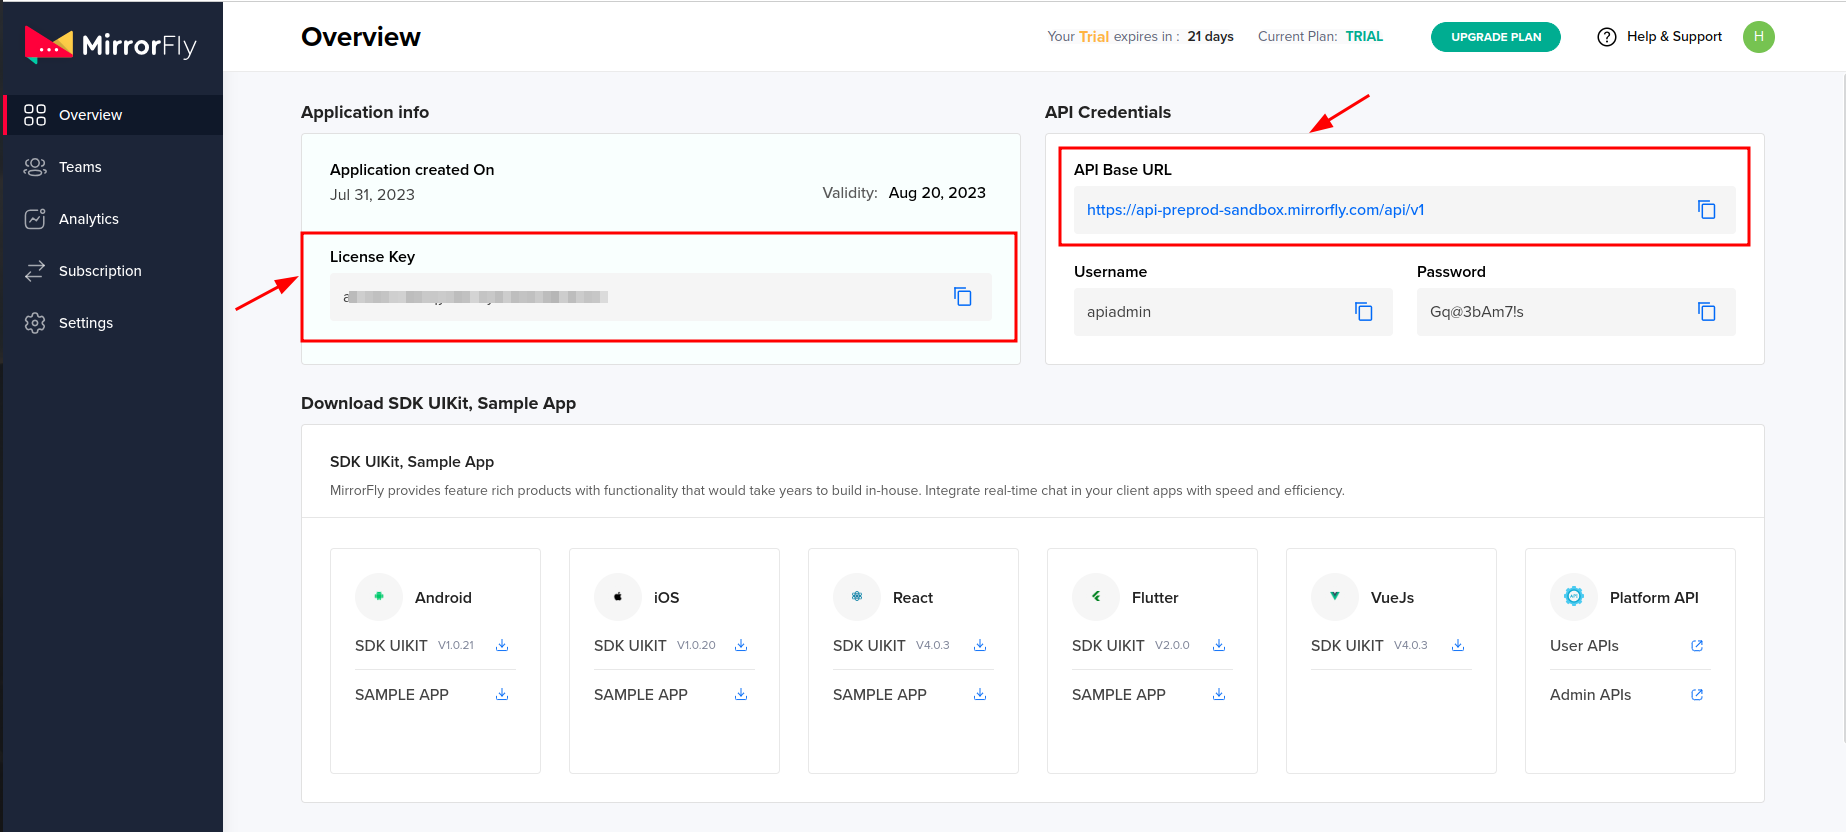
SDK License Key#
Before integrating CONTUS MirrorFly Chat SDK, you need to have a SDK license key for your MirrorFly application. This SDK needs to be authenticated by the MirrorFly server using the license key for further processing.
To get the License Key,#
Step 1: Register here to get a MirrorFly User account. Registration is subject to verification and would take up to 24 hours.
Step 2: Login to your Account
Step 3: Get the License key from the application Info’ section
Integration#
Step 1: Create a new project or Open an existing project in Android Studio
Step 2: Add the below code in the app/build.gradle file.
Note : In case "The 'kotlin-android-extensions' Gradle plugin is no longer supported" then remove the 'kotlin-android-extensions' from app/build.gradle plugins".
Step 3: If using Gradle 6.8 or higher, add the following code to your settings.gradle file. If using Gradle 6.7 or lower, add the following code to your root build.gradle file. See this release note to learn more about updates to Gradle.
- Gradle 6.8 or higher
- Gradle 6.7 or lower
Step 4: Add the following dependencies in the app/build.gradle file.
Step 5: Add the below dependencies required by the SDK in the app module/build.gradle file.
Note : Use 'kotlin-gradle-plugin' version '1.6.21' and above.
Step 6: Add the below line in the gradle.properties file, to avoid imported library conflicts.
Step 7: Open the AndroidManifest.xml and add below permissions.
Initialization#
To integrate and run Mirrorfly UIKit in your app, you need to initialize it first. You can initialize the MirrorFlyUIKit instance by passing the MirrorFlyUIKitAdapter instance as an argument to a parameter in the MirrorFlyUIKit.init() method. The MirrorFlyUIKit.init() must be called once in the onCreate() method of your app’s Application instance.
Step 1: Add the below line in the application class file.
Then provide your APP_NAMEand APPLICATION_ID to setup your application
This isCallEnabled isGroupEnable isContactEnable isLogoutEnable isOtherProfileEnable isOwnProfileEnable setGoogleTranslationKey and onlyOnetoOneChat methods are optional used to customize application.
| Argument | Type | Description |
|---|---|---|
| YOUR_APP_NAME | String | set your application name |
| YOUR_APPLICATION_ID | String | set your application id |
| onlyOnetoOneChat | Boolean | set true or false |
| isLogoutEnable | Boolean | set true or false |
| setGoogleTranslationKey | String | set your Translation key |
| isContactEnable | Boolean | set true or false |
| isCallEnabled | Boolean | set true or false |
| isGroupEnable | Boolean | set true or false |
| isOwnProfileEnable | Boolean | set true or false |
| isOtherProfileEnable | Boolean | set true or false |
| loginActivity | Class<*> | set LoginActivity used in your application to redirect to login while user logout application |
Step 2: Add the below line in the Launcher class file.
This LICENCE_KEY can be obtained from 'Overview' section from the Console dashboard.
| Argument | Type | Description |
|---|---|---|
| YOUR_LICENCE_KEY | String | set your licence key |
| redirectToDashBoard | fun | SDK Configuration callback to redirect dashboard |
| redirectToLogin | fun | SDK Configuration callback to redirect login screen |
| flyError | fun | SDK Configuration callback for error handling |
| SplashActivity | Class<*> | set your SplashActivity while licence expire it redirect to splash for configuration |
Add BaseApplication#
Add the created BaseApplication to AndroidManifest.xml.
Note : Use the "Theme.MaterialComponents.DayNight.NoActionBar" in the style.xml or themes.xml to avoid the app bar in the call screen.
Registration#
The below method to register a user.
info
Unless you log out the session, make a note that should never call the registration method more than once in an application.
Note : Use the Mirrorfly UIKIt SDK registration function after your application login process.
| Argument | Type | Description |
|---|---|---|
| USER_IDENTIFIER | String | A Unique Id to Register the User. We accept only the AlphaNumeric String |
| FIREBASE TOKEN | String | Firebase Token for Message and Call Push Notification |
Note : Unique ID assigned for each user Ex: 12345678 (any alphanumeric). The below characters is not allowed in userId: U+0022 (") U+0026 (&) U+0027 (') U+002F (/) U+003A (:) U+003C (<) U+003E (>) U+0040 (@) userID should follow below specification: https://xmpp.org/extensions/xep-0106.html
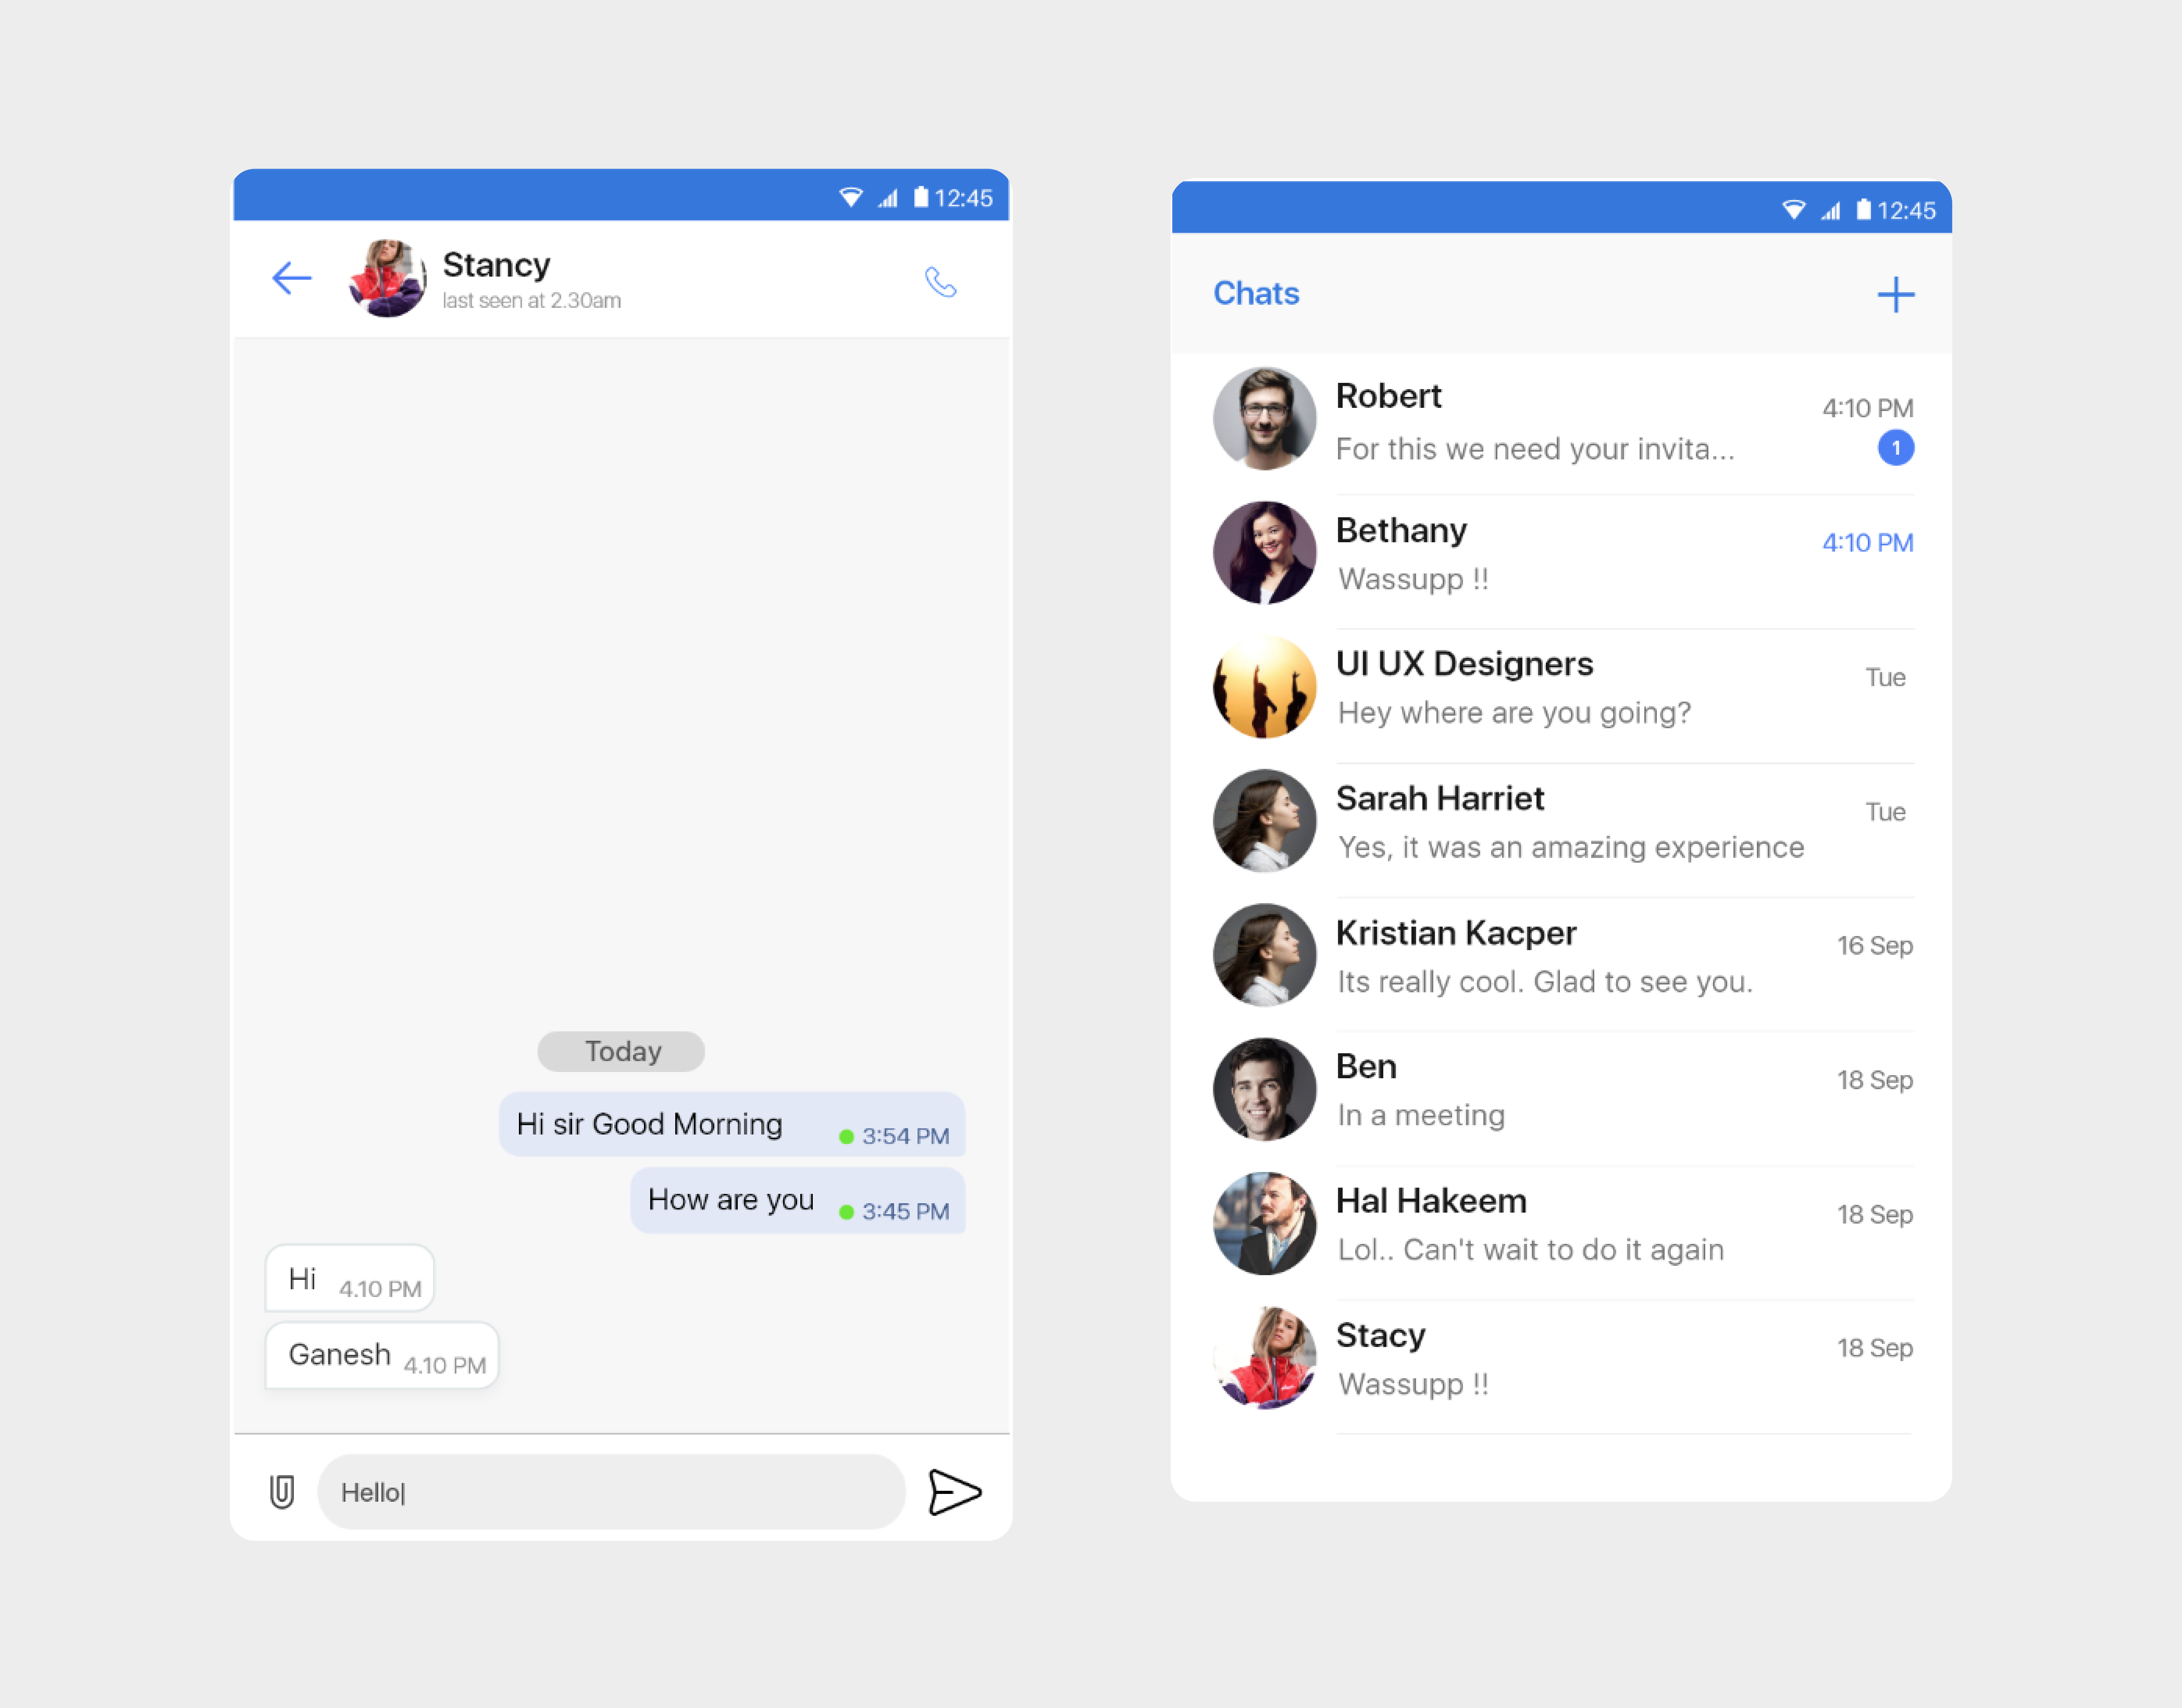
Display Recent Chat and Call list#
DashBoardActivity is the starting point for launching UIKit in your application. By implementing the code below, you will see a complete list of recent chats that you're made with single and group conversation.
Note : Use
DashBoardActivityonly when you have done the registration.
Sending a message#
You can now run the application on an emulator or a plugged-in device. To send a message, you must first start a conversation by clicking on the icon in the top-right corner. Then, you can select the user you wish to chat. Once navigated to user chat screen, type your first message and press send.
Recent & Single Chat#