This tutorial provides step-by-step instructions on how to add video calls to your iOS apps with responsive UIs. You will learn how to create an Xcode project and then configure the iOS app with video call functionalities using MirrorFly SwiftUI SDKs.
Before diving right into the steps, let’s check out the requirements:


Follow the below steps to get your license key:
Step 1 : Go to the MirrorFly console. Create an Account. If you already have an account with MirrorFly, go to step 3.
Step 2 : Follow the account creation instructions in the console page. Once you've created the account, validate your account using the verification link sent to your email ID.
Step 3 : Login to your account here
Step 4 : In the Overview page, under Application Info section - copy the license key
Step 1 : Open Xcode

Step 2 : Go to File > New > Project
Step 3 : Create a New Project
Step 4 : Set up the app as belows
Now, a project to develop the iOS app is created. The next step is to set up your UI kit.
Step 1 : Download the UI kit
Step 2 : Import the xcframeworks from the downloaded package
Step 3 : Next, download the MirrorFly SDKs
Step 4 : Import them into your iOS project
                              Goto Project ->  Target -> General -> Frameworks,libraries and Embedded Content ->
 Select Embed & Sign for all the Chat SDK's xcframeworks

Step 1 : Go to Project
Step 2 : Select Build Settings
Step 3 : Search ‘Bitcode’
Step 4 : Against ‘Bitcode’, choose ‘No’ from the dropdown menu
Goto Project -> Build Settings -> Filter the term `Bitcode` -> and select No from the dropdown

Step 1 : If you do not have any pods initiated before for your project, initiate one.
Step 2 : Choose the necessary pods required for the SDK.
Step 3 : Initialize them.
                                  pod 'Alamofire'
                                 pod 'XMPPFramework/Swift'
                                 pod 'Toaster'
                                 pod 'Firebase/Auth'
                                 pod 'Firebase/Crashlytics'
                                 pod 'Firebase/Analytics'
                                 pod 'Firebase/Messaging'
                                 pod 'SDWebImage'
                                 pod "BSImagePicker", "~> 3.1"
                                 pod 'libPhoneNumber-iOS'
                                 pod 'NicoProgress'
                                 pod 'SocketRocket'
                                 pod 'Socket.IO-Client-Swift', '~> 15.2.0'
                                 pod 'GoogleWebRTC' # WebRTC for Calls
                                 pod 'RealmSwift', '10.20.1'
Step 4 : At the end of the pod file, add the below pod hook file
Step 5 : Install the pods
                         post_install do |installer|
                             installer.pods_project.targets.each do |target|
                                 target.build_configurations.each do |config|
                                 config.build_settings['IPHONEOS_DEPLOYMENT_TARGET'] = '12.1'
                                 config.build_settings['ENABLE_BITCODE'] = 'NO'
                                 config.build_settings['APPLICATION_EXTENSION_API_ONLY'] = 'No'
                                 config.build_settings['BUILD_LIBRARY_FOR_DISTRIBUTION'] = 'YES'
                                 end
                             end
                             end
Step 1 : Go to Project
Step 2 : Select Target
Step 3 : Click on Signing & Capabilities
Step 4 : Click on the + symbol at the top left corner of the page
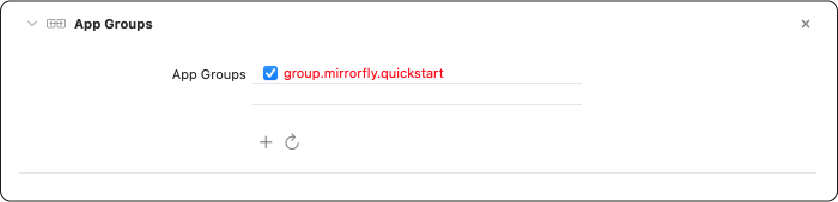
Step 5 : Under Capabilities, find App Groups and Background Modes
In App Groups, enable group.mirrorfly.quickstart
Next, below Background modes, you need to enable the below capabilities:

In your project plist, you need to set up the Microphone Privacy as below:
Next, you need to set up the camera privacy as mentioned below:

Add the caller tone and reconnection tune in the mp3 format, to your iOS project

In your info.plist, add the Photo library usage description

Through your view controller, intialize the MirrorFlyUI instance using the func intialize () as mentioned below:
                     import UIKit
                         import FlyUIKit
                         class ViewController: UIViewController {
                             override func viewDidLoad() {
                                 super.viewDidLoad()
                                 self.initialize()
                         }

                         func initialize () {
                                     FlyUIKitSDK.shared.initialization (userID: userId, licenseKey: licenseKey) {(isSuccess, error) in

                                     if isSuccess {
                                         self.getRecentChat()
                                     }
                                     else {
                                         print (error)
                                     }
                                 }
                             }
                         }
                         func initialize () {

                                 FlyUIKitSDK.shared.initialization(userID: userId, licenseKey: licenseKey) {(isSuccess, error) in
                                     if isSuccess{
                                         self.getRecentChat()
                                     } else {
                                         print(error)
                                     }
                                 }
                             }
Follow the below steps to implement the Screen display during an Audio call

To create and display call screen view, you need to use the MFUICallScreenModule and its components in the MFUICallScreenViewController class.
ChatManager.shared.messageEventsDelegate = self
The module consists of five components:
Follow the below steps to set up the screen of an ongoing video call:

To create and display call screen view during a video chat, you need to use the MFUICallScreenModule and its components.
Step 1 : The components of the Video Call Modules include:
Step 2 : In the MirrorFly UIKit's view life cycle, add the module components to the setupView() method by calling the loadView() method of the view controller.
Once you've completed the above steps,
To send a message,
Congratulations! you've created a video chat app with instant messaging capability!
Through this tutorial, you learnt how to build an iOS video calling app with responsive UI elements, using MirrorFly Chat SDKs. You also learned how to develop a Group Chat App in Kotlin and deploy them on the MirrorFly servers.
Wishing you happy app development!
Add HD, AI-enhanced video calling to your SwiftUI app instantly with just a few lines of code.
Start IntegrationHere's how you can implement video calling in iOS,
Step 1: Opt for the most reliable SDK provider like MirrorFly, Agora, or Twilio.
Step 2: Install the SDK and add it to your project.
Step 3: Initialize the SDK with your app's credentials.
Step 4: Set up permissions for the camera and microphone.
Step 5: Design the user interface for carrying out a video call.
Step 6: Deploy and test.
Nope. SwiftUI was created by Apple as a cross-platform framework that would help developers to build apps for all Apple platforms like iOS, macOS, watchOS, and tvOS using a single codebase.
Absolutely yes, SwiftUI is the future of iOS development majorly for its declarative syntax framework that helps build visually impressive iOS apps. Additionally, it offers code efficiency and code reusability.
Yes, SwiftUI may be faster than UIkit in certain scenarios primarily for its declarative syntax that fastens development process and streamlines building of UIs. However, in the minds of developers UIkits still remain as the better option for its optimization capabilities.
Yes, you can build with SwiftUI. Because, SwiftUI offers declarative syntax that makes it possible for developers to build visually appealing user interfaces for all types of Apple ecosystems like iOS, macOS, watchOS, and tvOS. Additionally, there are a lot of resources available for SwiftUI covering basic and advanced topics.
Choosing SwiftUI or Flutter completely depends on your project requirements. While SwiftUI is ideal for developing apps on all Apple platforms like macOS, tvOS, iOS, and more. Flutter, on the other hand is best for building cross-platform apps for both Android and iOS with a single codebase.
Drive 1 billion + conversations on any Android, iOS, or Web app with 500+ chat features & 100+ UI components.