Are you tired of the same old, boring chat apps? Have you ever wished to build your own app with exclusive messaging features and cutting-edge capabilities?
Great! You are at the right place.
In this tutorial, you’ll learn how to enable chat features in your Android app using Java. We will use MirrorFly SDK to perform this.
Now, it’s time to get started!
When you integrate MirrorFly SDK into your chat app, you will be able to add a wide range of messaging features within a short time. Here is a list of the top features you'll get from MirrorFly’s package.
Explore more features from MirrorFly here

Step 1 : The first step of this chat app development is to create an account with MirrorFly.
Step 2 : In our official contact page, fill in your details. Our expert will get in touch with you for the next steps with the account.
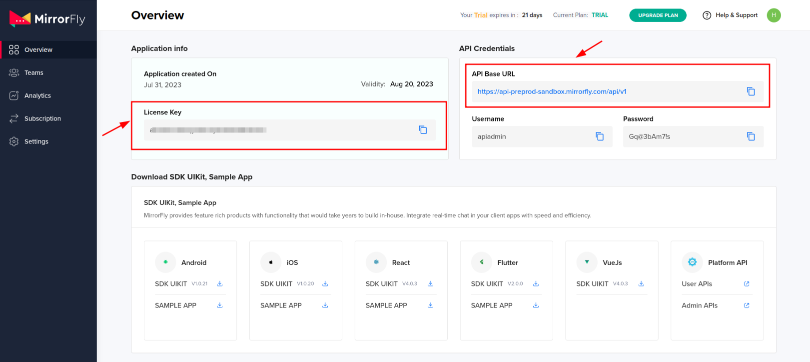
Step 3 : Log into your account and get the license key.
There are 2 ways to create your online chat application in Java. You can integrate MirrorFly API or SDK into our sample app / your existing app or make your own chat app from scratch using Android Studio IDE.
Basic Requirements
Sample App
Download our Sample App here
Step 1 : Start a new project or open an existing project you already created in Android Studio.
Step 2 : If you have Gradle version 6.8 or newer, use the below code in your settings.gradle file. If you're using Gradle version 6.7 or older, add the code to your main build.gradle file.
                         dependencyResolutionManagement {
                         repositories {
                             mavenCentral()
                             google()
                             jcenter()
                             maven {
                                 url "https://repo.mirrorfly.com/release"
                             }
                         }
                          }
Step 3 : Include these dependencies in your app/build.gradle file.
                      dependencies {
                         implementation 'com.mirrorfly.sdk:mirrorflysdk:7.9.9'
                     }
Step 4 : Use the following code in the gradle.properties file to prevent conflicts with the imported libraries.
android.enableJetifier=true
Step 5 : Go to AndroidManifest.xml and enable the permissions listed below.
<uses-permission android:name="android.permission.INTERNET" />
Before you begin using the SDK, make sure you meet some of the basic requirements. Inside the onCreate() method of your Application class, use the following method from ChatManager to provide the required data.
                     ChatManager.initializeSDK("LICENSE_KEY", (isSuccess, throwable, data) -> {
                           if(isSuccess){
                               Log.d("TAG", "initializeSDK success ");
                           }else{
                               Log.d("TAG", "initializeSDK failed with reason "+data.get("message"));
                           }
                     });
Include the created MyApplication in the AndroidManifest.xml file.
                <?xml version="1.0" encoding="utf-8"?>
                <manifest xmlns:android="http://schemas.android.com/apk/res/android"
                    <package="com.example.uikitapplication">
                    <application
                                 android:name=".MyApplication"  // Add this line.
                                 android:icon="@mipmap/ic_launcher"
                                 android:label="@string/app_name"
                                 android:roundIcon="@mipmap/ic_launcher_round"
                                 android:theme="@style/AppTheme">
                                <activity android:name=".MainActivity">
                                <intent-filter>
                                <action android:name="android.intent.action.MAIN" />
                                 ...
                                <category android:name="android.intent.category.LAUNCHER" />
                                </intent-filter>
                                </activity>
                                </application>
Use the following method to register a user in sandbox Live mode based on the provided setIsTrialLicenceKey.
                     FlyCore.registerUser(USER_IDENTIFIER, (isSuccess, throwable, data ) -> {
                         if(isSuccess) {
                             Boolean isNewUser = (Boolean) data.get("is_new_user");
                             String userJid = (String) data.get("userJid");
                             JSONObject responseObject = (JSONObject) data.get("data");
                             String username = responseObject.getString("username");
                             String password = responseObject.getString("password");
                         } else {
                         // Register user failed print throwable to find the exception details.
                         }
                          });
After a successful registration, ChatSDK will automatically try to connect to the Chat Server. It also monitors changes in the application lifecycle, managing connections and disconnections to the Chat Server accordingly.
After you set the ChatConnectionListener, you can get updates on the connection status in the callback method as shown below.
                      ChatManager.setConnectionListener(new ChatConnectionListener() {
                     @Override
                     public void onConnected() {
                         // Write your success logic here to navigate Profile Page or
                         // To Start your one-one chat with your friends
                     }

                     @Override
                     public void onDisconnected() {
                         // Connection disconnected
                     }

                     @Override
                     public void onConnectionFailed(@NonNull FlyException e) {
                         // Connection Not authorized or Unable to establish connection with server
                     }

                     @Override
                     public void onReconnecting() {
                         // Automatic reconnection enabled
                     }
                 });
To send a message to another user, utilize the method provided below.
                     TextMessage textMessage = new TextMessage();
                     textMessage.setToId(TO_JID);
                     textMessage.setMessageText(TEXT);
                     FlyMessenger.sendTextMessage(textMessage, (isSuccess, error, chatMessage) -> {
                         if (isSuccess) {
                             // you will get the message sent success response
                         }
                     });
To receive and observe all incoming messages sent to you, you must initialize the observer MessageEventsListener.
                     ChatEventsManager.setupMessageEventListener(new MessageEventsListener() {
                         @Override
                         public void onMessageReceived(@NotNull ChatMessage message) {
                         //called when the new message is received
                         }
                     });
Furthermore, these listeners will be triggered only when a new message is received from another user. For more details, please visit the specified callback listeners.
                     @Override
                     public void onMessageReceived(@NonNull ChatMessage message) {
                         super.onMessageReceived(message);
                         // received message object
                     }
You’ve come to the end of this tutorial!
You have now learned how to build the best chat apps with the help of MirrorFly SDKs using Java as the programming language.
MirrorFly not only supports app development in Java, it also lets you create cross-platform messaging apps with Flutter. This way, you will be able to develop apps for multiple platforms with the same codebase.
To access the full-length code of this tutorial, check out our Github repo here. If you’ll need any help with the SDK installation, write to us here and our team of experts will get back to you at the earliest. Happy developing!
Add chat features to your Flutter apps - in 10 minutes - with just a few lines of code.
Request DemoDrive 1 billion + conversations on any Android, iOS, or Web app with 500+ chat features & 100+ UI components.