This tutorial will demonstrate the steps to add video calling features to your Android app in Javascript. Before getting started, we recommend you to create an account with MirrorFly and download the video call SDKs needed for the setup.
Without any delay, let us get started with the development:
There are two ways to add our video call SDKs into your existing video call app,
Let’s get into the details.
The entire integration process begins with the installation of app's dependencies.
Step 1 : Open your Android IDE.
Step 2 : Create a new project or open an existing one.
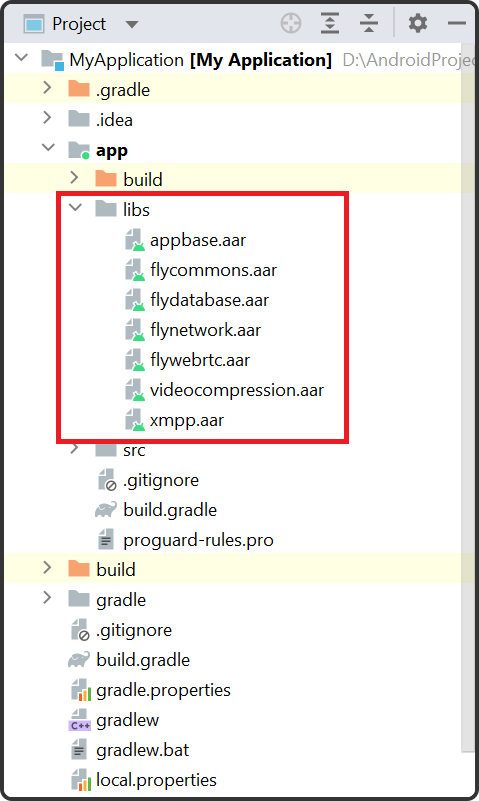
Step 3 : Add the below given libraries to your project's app/libs folder.
Step 4 : Now, download the library files from your MirroFly SDK files and add them to your project as shown below.
Step 5 : Add the below given codes to the app/build.gradle file.
 plugins {
                                  ...
                                  id 'kotlin-android'
                                  id 'kotlin-kapt'
                                 }
                                 android {
                                  compileOptions {
                                 sourceCompatibility JavaVersion.VERSION_1_8
                                  targetCompatibility JavaVersion.VERSION_1_8
                                 }
                                 kotlinOptions {
                                  jvmTarget = '1.8'
                                  }
                                 packagingOptions {
                                  exclude 'META-INF/AL2.0'
                                  exclude 'META-INF/DEPENDENCIES'
                                  exclude 'META-INF/LICENSE'
                                  exclude 'META-INF/LICENSE.txt'
                                  exclude 'META-INF/license.txt'
                                  exclude 'META-INF/NOTICE'
                                  exclude 'META-INF/NOTICE.txt'
                                  exclude 'META-INF/notice.txt'
                                  exclude 'META-INF/ASL2.0'
                                  exclude 'META-INF/LGPL2.1'
                                  exclude("META-INF/*.kotlin_module")
                                  }
                                 }
Step 6 : Continue adding the following dependencies to the app/build.gradle file.
dependencies {
                        ... // your app dependencies

                        implementation files('libs/appbase.aar')
                        implementation files('libs/flycommons.aar')
                        implementation files('libs/flynetwork.aar')
                        implementation files('libs/flydatabase.aar')
                        implementation files('libs/videocompression.aar')
                        implementation files('libs/xmpp.aar')
                        implementation files('libs/flywebrtc.aar')
                        }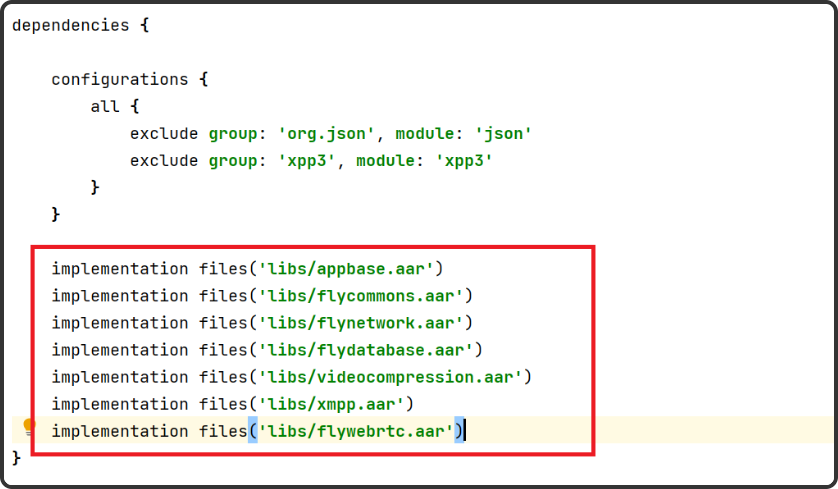
Step 7 : Now, the SDKs are required to have the below dependencies,
                        dependencies {

                           ... // your app dependencies

                           configurations {
                           all {
                           exclude group: 'org.json', module: 'json'
                           exclude group: 'xpp3', module: 'xpp3'
                           }
                           }

                           //For lifecycle listener
                           implementation 'android.arch.lifecycle:extensions:1.1.1'
                           annotationProcessor 'android.arch.lifecycle:compiler:1.1.1'

                           //For GreenDao
                           Implementation 'de.greenrobot:greendao:2.1.0'

                           //For gson parsing
                           implementation 'com.google.code.gson:gson:2.8.1'

                           //for smack implementation
                           implementation 'org.igniterealtime.smack:smack-android:4.4.4'
                           implementation 'org.igniterealtime.smack:smack-tcp:4.4.4'
                           implementation 'org.igniterealtime.smack:smack-im:4.4.4'
                           implementation 'org.igniterealtime.smack:smack-extensions:4.4.4'
                           implementation 'org.igniterealtime.smack:smack-sasl-provided:4.4.4'

                           implementation 'androidx.localbroadcastmanager:localbroadcastmanager:1.0.0'
                           implementation 'androidx.multidex:multidex:2.0.1'
                           implementation 'com.google.android.gms:play-services-location:17.0.0'

                           //Dagger Dependencies
                           api 'com.google.dagger:dagger:2.40.5'
                           kapt 'com.google.dagger:dagger-compiler:2.40.5'
                           api 'com.google.dagger:dagger-android:2.40.5'
                           api 'com.google.dagger:dagger-android-support:2.40.5'
                           kapt 'com.google.dagger:dagger-android-processor:2.40.5'

                           //coroutines
                           implementation 'org.jetbrains.kotlinx:kotlinx-coroutines-android:1.3.3'
                           implementation 'org.jetbrains.kotlinx:kotlinx-coroutines-test:1.3.3'

                           //apicalls
                           implementation 'com.squareup.retrofit2:retrofit:2.6.1'
                           implementation 'com.squareup.retrofit2:converter-gson:2.6.1'
                           implementation 'com.squareup.okhttp3:okhttp:4.2.0'
                           implementation 'com.jakewharton.retrofit:retrofit2-kotlin-coroutines-adapter:0.9.2'

                           //stetho interceptor
                           implementation 'com.facebook.stetho:stetho-okhttp3:1.3.1'

                           //okhttp interceptor
                           implementation 'com.squareup.okhttp3:logging-interceptor:3.14.3'

                           //shared preference encryption
                           implementation 'androidx.security:security-crypto:1.1.0-alpha03'

                           //Socket - versions.gradle
                           implementation 'com.github.nkzawa:socket.io-client:0.6.0'
                           //Google - versions.gradle
                           implementation 'org.webrtc:google-webrtc:1.0.32006'

                           implementation 'androidx.core:core-ktx:+'
                           implementation 'org.jetbrains.kotlin:kotlin-stdlib-jdk7:1.4.31'

                           implementation 'androidx.media:media:1.0.0'

                           //room database
                           implementation 'androidx.room:room-runtime:2.2.5'
                           kapt 'androidx.room:room-compiler:2.2.5'
                           implementation "androidx.room:room-ktx:2.2.5"

                           // Lifecycle
                           implementation 'androidx.lifecycle:lifecycle-extensions:2.2.0'
                           kapt 'androidx.lifecycle:lifecycle-compiler:2.2.0'

                           }
Step 8 : Continue adding the below codes to the gradle.properties file, mainly to avoid importing library conflicts.
android.enableJetifier=true
Step 9 : Now, open the AndroidManifest.xml and add the below permissions to it.
<uses-permission android:name="android.permission.INTERNET" />
                        <uses-permission android:name="android.permission.ACCESS_NETWORK_STATE" />
                        <uses-permission android:name="android.permission.RECORD_AUDIO" />
                        <uses-permission android:name="android.permission.DISABLE_KEYGUARD" />
                        <uses-permission android:name="android.permission.CAMERA" />
                        <uses-permission android:name="android.permission.READ_PHONE_STATE" />
                        <uses-permission android:name="android.permission.WAKE_LOCK" />
                       buildTypes {
                        debug {
                        buildConfigField 'String', 'SDK_BASE_URL', '"https://api-preprod-sandbox.mirrorfly.com/api/v1/"'
                        buildConfigField 'String', 'LICENSE', '"xxxxxxxxxxxxxxxxxxxxxxxxx"'
                        buildConfigField 'String', 'WEB_CHAT_LOGIN', '"https://webchat-preprod-sandbox.mirrorfly.com/"'
                        buildConfigField "String", "SUPPORT_MAIL", '"contussupport@gmail.com"'
                        }
                        }
You require some critical data for the video call SDK to operate properly. Thus, you need a ChatSDK builder class to provide data to call SDKs.
Now, add the below lines in the oncreate() method of your application class,
| Argument | Description | Type |
|---|---|---|
| CALL_UI_ACTIVITY | Class | Activity which needs to be invoked during incoming call. when a incoming call is received Call sdk will start this activity with the call details |
                                 @Override
                                 public void onCreate() {
                                 super.onCreate();
                                 //Initialize call manager
                                 CallManager.init(this);
                                 //set your call activity
                                 CallManager.setCallActivityClass(CALL_UI_ACTIVITY.class);
                                 CallManager.setMissedCallListener((isOneToOneCall, userJid, groupId, callType, userList) -> {
                                 //show missed call notification
                                 });

                                 CallManager.setCallHelper(new CallHelper() {
                                 @NotNull
                                 @Override
                                 public String getDisplayName(@NotNull String jid) {
                                 return ContactManager.getDisplayName(jid);
                                 }
                                 @Override
                                 public String getNotificationContent(@NonNull String callDirection) {
                                 return CallNotificationHelper.getNotificationMessage();
                                 }
                                 @Override
                                 public boolean isDeletedUser(@NonNull String jid) {
                                 return ContactManager.getProfileDetails(jid).getContactType() == ContactType.DELETED_CONTACT;
                                 }
                                 @Override
                                 public void sendCallMessage(@NotNull GroupCallDetails details, @NotNull List users, @NotNull List invitedUsers) {
                                 CallMessenger.sendCallMessage(details, users, invitedUsers);
                                 }
                                 });
                                 }
In your manifest, you need to define the Call UI Activity as given below,
                        <activity
                        android:name="YOUR_CALL_ACTIVITY"
                        android:configChanges="screenSize|smallestScreenSize|screenLayout|orientation"
                        android:excludeFromRecents="true"
                        android:launchMode="singleTask"
                        android:resizeableActivity="false"
                        android:screenOrientation="portrait"
                        android:supportsPictureInPicture="true"
                        android:showOnLockScreen="true"
                        android:turnScreenOn="true"
                        android:taskAffinity="call.video"
                        tools:targetApi="o_mr1" />
Now, to configure the call activity you can call the below method on your call activity onCreate(),
CallManager.configureCallActivity(ACTIVITY);
If you wish to notify the call SDK to remove the ongoing call notification, call the below method on onStart() from your activity.
CallManager.bindCallService();
To notify the call SDK to show the ongoing call notification, must call the below onStop() method from your call activity.
CallManager.bindCallService();
To make or receive calls, the SDKs need permissions for both audio and video as given below,
You require a below permission to make a voice call
                            Manifest.permission.RECORD_AUDIO
                            Manifest.permission.READ_PHONE_STATE
To check for the audio permission, you can use this below method,
CallManager.isAudioCallPermissionsGranted();
The same way to make a video call you require the below permission,
                              Manifest.permission.RECORD_AUDIO
                              Manifest.permission.CAMERA
                              Manifest.permission.READ_PHONE_STATE
To check for a video call permission you can use the below mentioned method,
CallManager.isVideoCallPermissionsGranted();
| Arguments | Type | Description |
|---|---|---|
| TO_JID | String | jid of the call receiver |
| CALLBACK | CallActionListener | callback to observe the action status |
As soon as the permissions are checked, you can use the following codes to make a one-to-one video call to get connected with another user.
                              CallManager.makeVideoCall("TO_JID", (isSuccess, message) -> {
                              });
To make a Group video call, you can use the following codes to add group video call functionality,
                        CallManager.makeGroupVideoCall(JID_LIST, GROUP_ID, (isSuccess, message) -> {
                        });
Once, the call is connected you get access to add users to the ongoing call using the below codes:
| Arguments | Type | Description |
|---|---|---|
| JID_LIST | List |
jid list of the callee's |
CallManager.inviteUsersToOngoingCall(JID_LIST);
If your android device’s version is greater than or equal to Android 10 (API level 29), your call SDK will notify you about every incoming call you receive. Otherwise, the set activity will get started during the SDK initialization using the CallManager.setCallActivityClass() method.
Whenever a user (callee) accepts an incoming call, the below given two primary actions are performed :
Hence, the below codes will be used to achieve the same:
| Arguments | Type | Description |
|---|---|---|
| CALLBACK | CallActionListener |
callback to observe the action status |
                                 CallManager.answerCall((isSuccess, message) -> {
                                 });
Whenever the callee declines a call without answering it, the below activities will take place :
You can use the below codes to establish this process,
CallManager.declineCall();
To disconnect an ongoing call, the user needs to follow the below codes,
CallManager.disconnectCall();
Finally we’ve come to the end of this tutorial! We hope this article has done a fair job in helping you understand the steps to add video calling to your apps using MirrorFly SDKs. You can also directly access the full length code of our features at our Github repo , for your upcoming projects.
As the next step, explore our other feature-rich in-app communication features and start experimenting with them.
Sounds interesting? Best of luck with your app development!
Add chat features to your Flutter apps - in 10 minutes - with just a few lines of code.
Request DemoTo use Javascript language for mobile app development, you can write codes through the React Native framework. This framework lets developers write code in JS and then compile it to Android/iOS's native language.
Absolutely yes. Javascript can be used for mobile app development, including front-end and back-end.
Plus, this versatile programming language allows developers to write codes in React Native and Node.js frameworks and then compile them in JS scripts thus fastening the development process.
WebRTC is a protocol that is written in JS to facilitate real-time communication like chats, voice, and video between browsers and mobile devices. And here's how to use WebRTC in JS:
1. Accessing media devices: Via the function getUserMedia() that helps users to capture audio and video feeds.
2. Create connection: Establishes connection between peers using the RTCPeerConnection function.
3. Handling candidates: Fosters exchange of ICE candidates between users/peers post establishing a connection.
4. Carry on communication: After all these steps, users can transmit and receive texts using the SDP protocol.
Video calls in Javascript usually come packed with WebRTC protocol as it enables real-time communication between peers.
However, to make it work, you need to first create an instance of StreamVideoClient that will establish a connection between users. Then, you need to create a call object and initiate the call using the Create: True function.
WebRTC (Web Real-Time Communication) is an open-source protocol that adds real-time chats, video, and audio capabilities to communication apps/websites using Javascript APIs.
Some of the well-known APIs are:
Because of the language's versatility and powerful features, Javascript apps are used for a variety of use cases like,
Besides these, JS language can also be used to build browser-based games and program IoT devices.
Drive 1 billion + conversations on any Android, iOS, or Web app with 500+ chat features & 100+ UI components.