In this tutorial, you will learn how to use the MirrorFly SDK coded in Kotlin, for implementing video calling features to Android apps. To get started, we take you through the steps to download our SDKs and then explain the integration process in the Android Studio IDE. At the end, we will show you the steps to connect the client app and the SDK server, to implement the direct messaging functionality.
Here is a quick-list of requirements we’ll use to build the video calling app:
The requirements for call SDK for Android are:
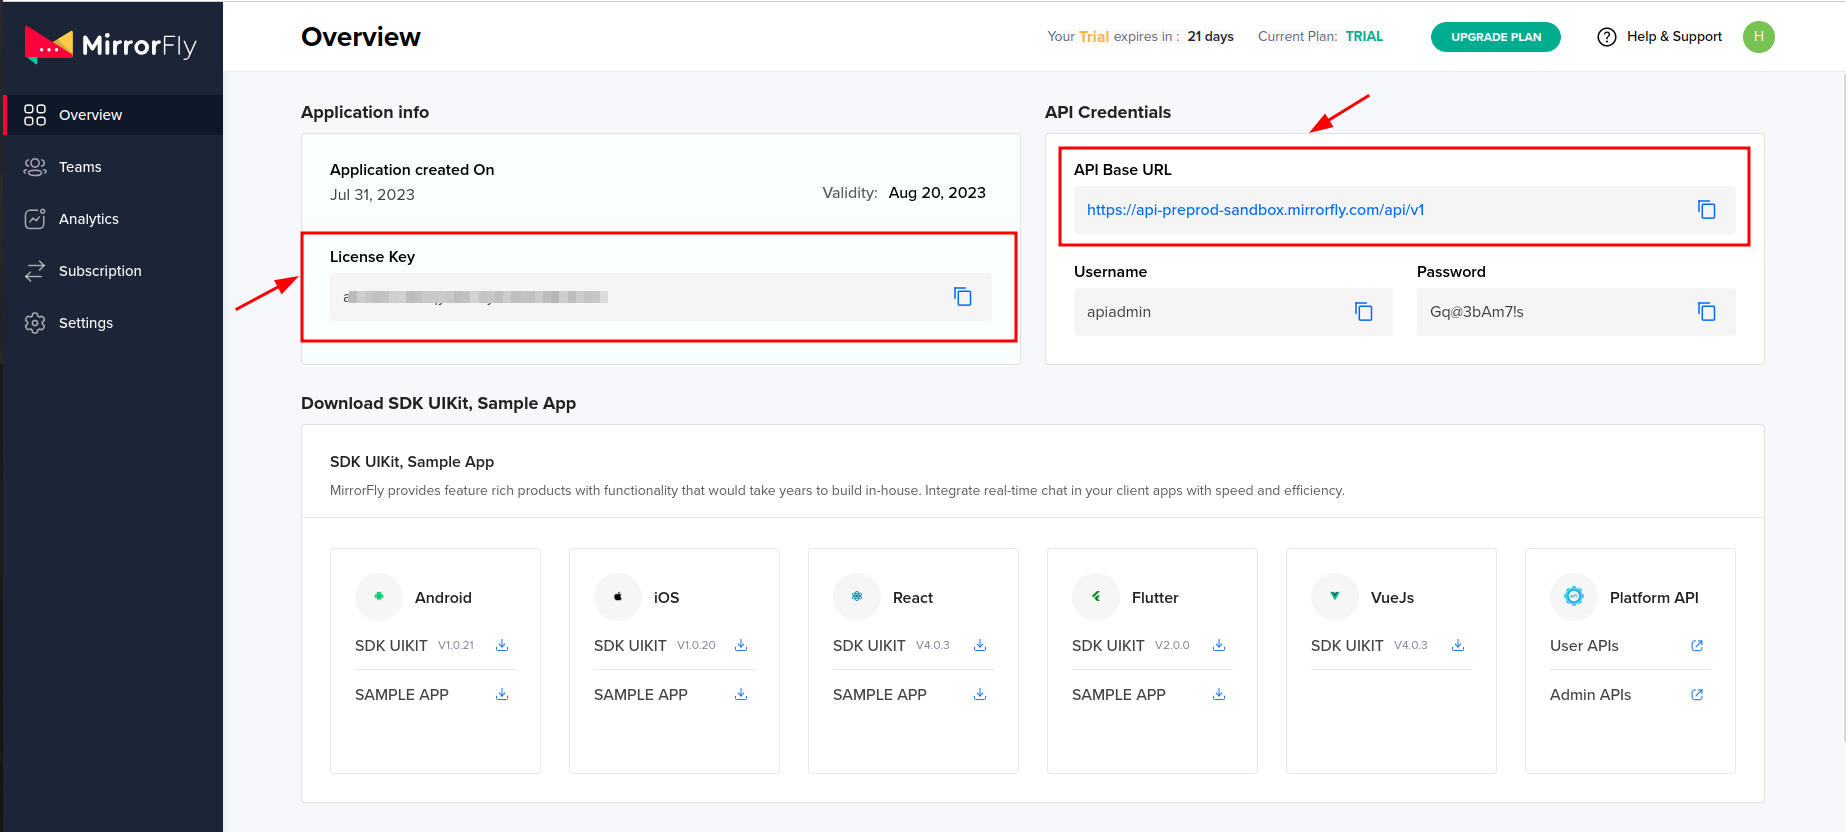
Before integrating the MirrorFly Call SDK into your app, make sure to acquire an SDK License Key. This key is essential for the MirrorFly server to authenticate the SDK within your app.
Step 1 : Contact our team here to create a MirrorFly user account. One of our experts will get in touch with you to discuss your requirements and help setting up your account.
Step 2 : Login to your account.
Step 3 : Go to the ‘Application Info’ section and get your License Key.
Step 1 : Start a new project or open an existing one in Android Studio.
Step 2 : For Gradle versions 6.8 or higher, include the following code in your settings.gradle file. If you're using Gradle 6.7 or an earlier version, add the provided code to your root build.gradle file. Refer to the release notes for more information on Gradle updates.
Gradle 6.8 or higher
                  dependencies {
                      implementation 'com.mirrorfly.sdk:mirrorflysdk:7.10.0'
                   }
Gradle 6.8 or higher
                  allprojects {
                      repositories {
                         jcenter()
                         maven {
                               url "https://repo.mirrorfly.com/release"
                         }
                      }
                   }
Step 3 : Go to the app/build.gradle file, and include the following dependencies.
                   dependencies {
                      implementation 'com.mirrorfly.sdk:mirrorflysdk:7.10.0'
                   }
Step 4 : Insert the following line into the gradle.properties file to prevent conflicts with imported libraries.
android.enableJetifier=true
Step 5 : Click here to add the necessary runtime permissions for calls.
Before initializing the SDK, ensure you meet some basic requirements. In your Application class, within the onCreate() method, utilize the following method from ChatManager to provide the required data.
                      ChatManager.initializeSDK("LICENSE_KEY"){ isSuccess, _, data ->
                         if (isSuccess) {
                            Log.d("TAG", "initializeSDK success ")
                         } else {
                            Log.d("TAG", "initializeSDK failed with error message"+ data["message"])
                         }
                      }
Include the created MyApplication in the AndroidManifest.xml file.
<?xml version="1.0" encoding="utf-8"?>
                    <manifest xmlns:android="http://schemas.android.com/apk/res/android"
                      package="com.example.uikitapplication">

                    <application>
                      android:name=".MyApplication"  // Add this line.
                      android:icon="@mipmap/ic_launcher"
                      android:label="@string/app_name"
                      android:roundIcon="@mipmap/ic_launcher_round"
                      android:theme="@style/AppTheme">
                    <activity android:name=".MainActivity">

                    <intent-filter>
                    <action android:name="android.intent.action.MAIN" />
                      ...
                    <category android:name="android.intent.category.LAUNCHER" />
                    </intent-filter>

                    </activity>
                    </application>
Use the following method to register a user in sandbox Live mode based on the provided setIsTrialLicenceKey.
                         FlyCore.registerUser(USER_IDENTIFIER) { isSuccess, throwable, data ->
                            if(isSuccess) {
                               val isNewUser = data["is_new_user"] as Boolean
                               val userJid = data["userJid"] as String
                               val responseObject = data.get("data") as JSONObject
                               val username = responseObject.getString("username");
                               val password = responseObject.getString("password");
                            } else {
                               // Register user failed print throwable to find the exception details.
                            }
                         }
Caution: If FORCE_REGISTER is not set to true and there are too many open sessions, you can't register, and it will show an error 405. To sign up, either set FORCE_REGISTER to true, or log out of one of the existing sessions.
After a successful registration, ChatSDK will automatically try to connect to the Chat Server. Additionally, ChatSDK keeps an eye on changes in the application lifecycle, ensuring it connects and disconnects from the Chat Server as needed.
Once the ChatConnectionListener is configured, you can receive updates on the connection status through the specified callback method outlined below.
                         ChatManager.setConnectionListener(object : ChatConnectionListener {
                               override fun onConnected() {
                                  // Write your success logic here to navigate Profile Page or
                                  // To Start your one-one chat with your friends
                               }
                               override fun onDisconnected() {
                                  // Connection disconnected
                               }
                               override fun onConnectionFailed(e: FlyException) {
                                  // Connection Not authorized or Unable to establish connection with server
                               }
                               override fun onReconnecting() {
                                  // Automatic reconnection enabled
                               }
                            })
In the onCreate() method of your Application class, include the following lines:
                         @Override
                               public void onCreate() {
                               super.onCreate();
                               //Initialize call manager
                               CallManager.init(this)
                               //set your call activity
                               CallManager.setCallActivityClass(CALL_UI_ACTIVITY::class.java)
                               CallManager.setMissedCallListener(object : MissedCallListener {
                                        override fun onMissedCall(isOneToOneCall: Boolean, userJid: String, groupId: String?,    callType: String, userList: ArrayList) {
                                                 //show missed call notification
                                              }
                                        })

                               CallManager.setCallHelper(object : CallHelper {
                                     override fun getNotificationContent(callDirection: String): String {
                                           return CallNotificationHelper.getNotificationMessage()
                                     }

                                     override fun sendCallMessage(details: GroupCallDetails, users: List, invitedUsers: List) {
                                           CallMessenger.sendCallMessage(details, users, invitedUsers)
                                     }
                               })

                               CallManager.setCallNameHelper(object : CallNameHelper {
                                     override fun getDisplayName(jid: String): String {
                                        return ContactManager.getDisplayName(jid)
                                     }
                               })
                               }
Important: The configuration of setCallNameHelper is optional. If not set, the user name will be empty in both incoming and ongoing call notifications. Additionally, note that the sendCallMessage method is utilized to dispatch the initial calling payload to the recipient.
Define the Call UI Activity in your manifest as shown below:
      <activity
 android:name="YOUR_CALL_ACTIVITY"
 android:configChanges="screenSize|smallestScreenSize|screenLayout|orientation"
 android:excludeFromRecents="true"
 android:launchMode="singleTask"
 android:resizeableActivity="false"
 android:screenOrientation="portrait"
 android:supportsPictureInPicture="true"
 android:showOnLockScreen="true"
 android:turnScreenOn="true"
 android:taskAffinity="call.video"
 tools:targetApi="o_mr1" />
Invoke the following method in the onCreate() of your call activity to set up the call activity.
CallManager.configureCallActivity(ACTIVITY)
Call the method below in the onStart() of your call activity to inform the call SDK to dismiss the ongoing call notification.
CallManager.bindCallService()
Invoke the method below in the onStop() of your call activity to instruct the call SDK to display the ongoing call notification.
CallManager.unbindCallService()
Most SDK methods require the user's JID as an input parameter. Therefore, the SDK offers the following utility method to prepare the JID. This method constructs the user's JID using the username obtained from the Register response.
The call feature is crucial for contemporary communication. The Call SDK enables users to initiate one-to-one audio/video calls with another SDK user.
Note: Ensure you check for the necessary runtime permissions before using Call SDK methods. If the required permissions are not available, isSuccess will be false, and an error message will be provided in the callback.
The "Make Voice Call" feature allows users to initiate a one-to-one audio call with another SDK user. Utilize the following method to make a voice call:
                         CallManager.makeVoiceCall("TO_JID", object : CallActionListener{
                            override fun onResponse(isSuccess: Boolean, message: String) {
                            }
                         })
When you receive an audio call from another SDK user, the Call SDK will display a notification if the device's Android version is greater than or equal to Android 10 (API level 29). Otherwise, the activity you set using the CallManager.setCallActivityClass() method during Call SDK initialization will be launched with the call details. A sample call UI is provided for easy integration.
Caution: Ensure to set the activity class for the Call SDK using CallManager.setCallActivityClass().
Note: If the necessary permissions are not available, the call will be automatically declined even if you attempt to answer it.
                   CallManager.answerCall(object : CallActionListener {
                      override fun onResponse(isSuccess: Boolean, message: String) {

                      }
                   })
When you receive an audio call from another SDK user, and your activity is started depending on the Android version, if the user presses the decline button in your call UI, you must call the following SDK method to reject the call and notify the caller.
CallManager.declineCall()
If you wish to disconnect an audio call either before getting connected or after the conversation has ended, and the user presses the disconnect button in your call UI, you should call the following SDK method.
Note: The method below accepts CallActionListener as an optional parameter; you can pass the listener to receive a disconnect success callback.
CallManager.disconnectCall()
The "Make Group Video Call" feature enables users to initiate a video call with multiple SDK users. Utilize the following method to make a group video call:
Note: The method below accepts CallActionListener as an optional parameter; you can pass the listener to receive a disconnect success callback.
CallManager.makeGroupVideoCall(JID_LIST, GROUP_ID, object : CallActionListener{
override fun onResponse(isSuccess: Boolean, message: String) {
}
})
That’s it!
We hope this article helped you understand the steps to implement chat into your android apps using Kotlin. As you can see, it is trivial and easy to build powerful in-app communication features with MirrorFly SDKs. If you’d like to extend your app functionality with more interactive chat features, our SDKs offer a wide range of options, you can talk to our experts for more details.
Add real time HD calling to your Android app using MirrorFly’s Kotlin SDK. Set up video calling voice and chat with clean and easy code.
Request DemoDevelopers greatly prefer Kotlin for its simpler and expressive syntax that reduces the boilerplate code & builds android apps faster. Just not these, Kotlin's null safety features are known to prevent errors to the max.
Yes you can. Kotlin is a modern programming language that was designed to build high performance Android apps with ease. Plus, its interoperability with Java, makes it seamlessly possible to add it to existing Java code. And use is to build cross-platform mobile apps using Kotlin Multi Platform technology.
Of course yes. Kotlin comes as the best option to build mobile apps for Android. Because it offers great interoperability, an advanced feature set, concise syntax, and several other capabilities for creating robust apps.
Kotlin is a more advanced programming language used by developers for building Android applications. It is highly interoperable with Java, safe, and offers concise syntax thus making it an easy language for coding.
Both Kotlin and Flutter serve different purposes. While Flutter is a great framework for creating cross-platform apps with a single codebase, Kotlin is used to build dynamic Android apps. However, recently Kotlin Multi Platform emerged as a new trend these days leaving behind Flutter.
No, Kotlin apps can't run on iOS. As Kotlin is a language used to build Android apps and hence runs on JVM (Java Virtual Machine). However, there are tools like Kotlin Multiplatform and Kotlin Native that allow developers to share codes and make it possible to run on both iOS and Android platforms.
Drive 1 billion + conversations on any Android, iOS, or Web app with 500+ chat features & 100+ UI components.