This tutorial explains how to implement group chat functionality in Android apps using MirrorFly Chat SDKs. Throughout this guide, we have used Kotlin as the primary programming language, and Android Studio as the development environment.
Here’s a quick overview of the steps instructed in this guide:
The first step in building a group chat is to get a license key to access the SDK modules.
Step 1 : Sign up for a Free MirrorFly account on the Console Page
Step 2 : Fill in your basic details - name and contact details.
Step 3 : Verify your account via your registered email ID
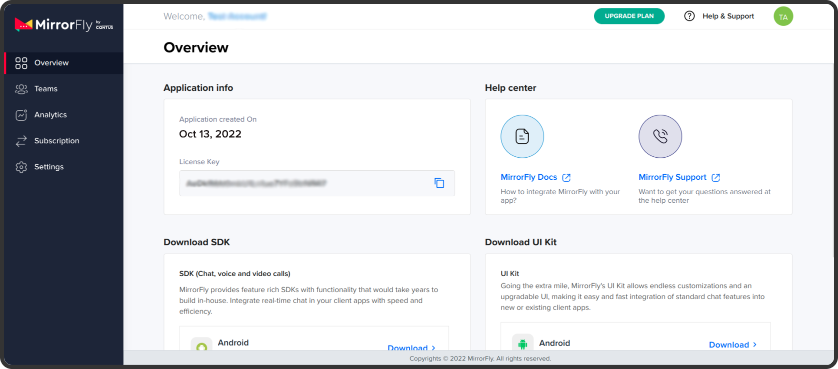
Step 4 : Once you are in, download the Android SDK in the Account's Overview section
Step 5 : Copy the License Key in the Application info section.
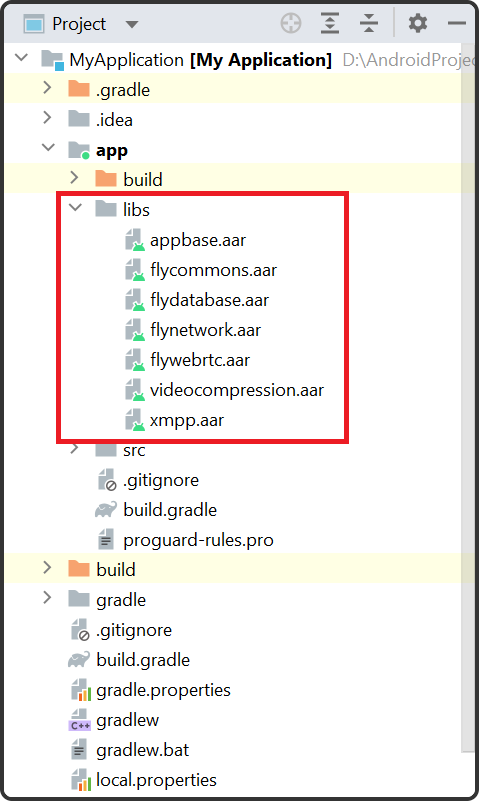
Step 6 : Next, extract the dependency files from the downloaded SDK package. You will need these AAR files to create the libraries for your Android project
If you have an existing project, you can directly open the project folder and continue with the SDK integration.
If you’d like to try the MirrorFly features using a trial app, you can download our sample app here
To create a new Android app from start, you need to create a project in the Android IDE.
Let’s create one now:
Step 1 : Open your Android Studio IDE
Step 2 : In the Welcome Window of your Android Studio, click on Start a new Android Studio project.
Step 3 : From the template grids, choose Basic Activity
Step 4 : Give your app a name of your choice
Step 5 : Set the programming language to Kotlin
Step 6 : Let the other fields with the default values
Step 7 : Click on Next. Your project window opens.
Step 8 : In the left side of your project view, you will see a hierarchy of files.
Step 9 : You’ll need to import the SDK library folder here.
Step 10 : The exact location will be the app module in your project folder.
Step 11 : Next, you need to add the below code to the build gradle of your app module
                     plugins {
                        ...
                        id 'kotlin-android'
                        id 'kotlin-kapt'
                     }
                     android {
                        compileOptions {
                           sourceCompatibility JavaVersion.VERSION_1_8
                           targetCompatibility JavaVersion.VERSION_1_8
                        }

                        kotlinOptions {
                           jvmTarget = '1.8'
                        }

                        packagingOptions {
                           exclude 'META-INF/AL2.0'
                           exclude 'META-INF/DEPENDENCIES'
                           exclude 'META-INF/LICENSE'
                           exclude 'META-INF/LICENSE.txt'
                           exclude 'META-INF/license.txt'
                           exclude 'META-INF/NOTICE'
                           exclude 'META-INF/NOTICE.txt'
                           exclude 'META-INF/notice.txt'
                           exclude 'META-INF/ASL2.0'
                           exclude 'META-INF/LGPL2.1'
                           exclude("META-INF/*.kotlin_module")
                        }
                     }
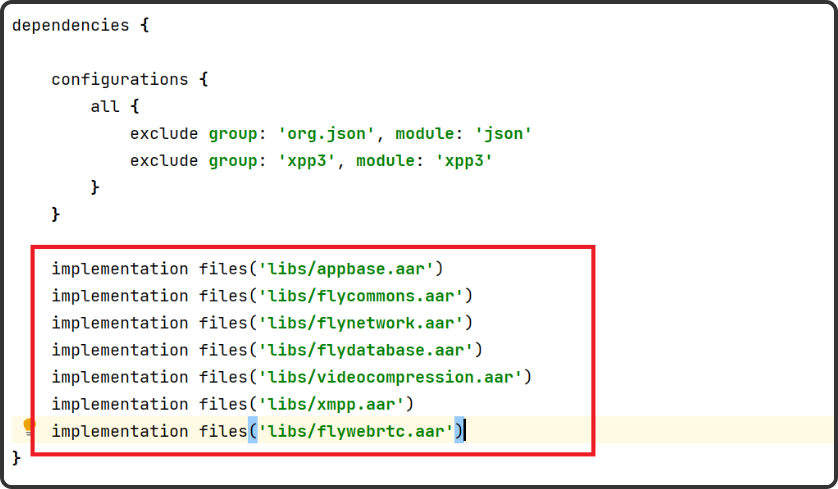
Step 12 : Next, you need to add the below dependencies
                           dependencies {

                              ... // your app dependencies

                              implementation files('libs/appbase.aar')
                              implementation files('libs/flycommons.aar')
                              implementation files('libs/flynetwork.aar')
                              implementation files('libs/flydatabase.aar')
                              implementation files('libs/videocompression.aar')
                              implementation files('libs/xmpp.aar')

                           }
Step 13 : Next, you’ll need the list of below modules that support the SDK functionalities
                     dependencies {
                           ... // your app dependencies

                           configurations {
                                    all {
                                       exclude group: 'org.json', module: 'json'
                                       exclude group: 'xpp3', module: 'xpp3'
                                    }
                           }


                           //For lifecycle listener

                           implementation 'android.arch.lifecycle:extensions:1.1.1'
                           annotationProcessor 'android.arch.lifecycle:compiler:1.1.1'


                           //For GreenDao
                           implementation 'de.greenrobot:greendao:2.1.0'


                           //For gson parsing
                           implementation 'com.google.code.gson:gson:2.8.1'


                           //for smack implementation
                           implementation 'org.igniterealtime.smack:smack-android:4.4.4'
                           implementation 'org.igniterealtime.smack:smack-tcp:4.4.4'
                           implementation 'org.igniterealtime.smack:smack-im:4.4.4'
                           implementation 'org.igniterealtime.smack:smack-extensions:4.4.4'
                           implementation 'org.igniterealtime.smack:smack-sasl-provided:4.4.4'
                           implementation 'androidx.localbroadcastmanager:localbroadcastmanager:1.0.0'
                           implementation 'androidx.multidex:multidex:2.0.1'
                           implementation 'com.google.android.gms:play-services-location:17.0.0'


                           //Dagger Dependencies
                           api 'com.google.dagger:dagger:2.40.5'
                           kapt 'com.google.dagger:dagger-compiler:2.40.5'
                           api 'com.google.dagger:dagger-android:2.40.5'
                           api 'com.google.dagger:dagger-android-support:2.40.5'
                           kapt 'com.google.dagger:dagger-android-processor:2.40.5'


                           //coroutines
                           implementation 'org.jetbrains.kotlinx:kotlinx-coroutines-android:1.3.8'
                           implementation 'org.jetbrains.kotlinx:kotlinx-coroutines-test:1.3.8'


                           //apicalls
                           implementation 'com.squareup.retrofit2:retrofit:2.6.1'
                           implementation 'com.squareup.retrofit2:converter-gson:2.6.1'
                           implementation 'com.squareup.okhttp3:okhttp:4.2.0'
                           implementation 'com.jakewharton.retrofit:retrofit2-kotlin-coroutines-adapter:0.9.2'


                           //stetho interceptor
                           implementation 'com.facebook.stetho:stetho-okhttp3:1.3.1'


                           //okhttp interceptor
                           implementation 'com.squareup.okhttp3:logging-interceptor:3.14.3'


                           //shared preference encryption
                           implementation 'androidx.security:security-crypto:1.1.0-alpha03'
                     }
Step 14 : To avoid conflicts among the imported library files, you need to add the below codes
android.enableJetifier=true
Step 15 : Next, add the following permissions to the AndroidManifest.xml. These permissions are essential for accessing different elements of the SDK components
                     <uses-permission android:name="android.permission.INTERNET" />
                     <uses-permission android:name="android.permission.ACCESS_NETWORK_STATE" />
Step 16 : Update your license key and configure the SDK as mentioned below:
                      buildTypes {
                         debug {
                            buildConfigField 'String', 'SDK_BASE_URL', '"https://api-preprod-sandbox.mirrorfly.com/api/v1/"'
                            buildConfigField 'String', 'LICENSE', '"xxxxxxxxxxxxxxxxxxxxxxxxx"'
                            buildConfigField 'String', 'WEB_CHAT_LOGIN', '"https://webchat-preprod-sandbox.mirrorfly.com/"'
                            buildConfigField "String", "SUPPORT_MAIL", '"contussupport@gmail.com"'
                         }
                      }
The SDK needs a certain set of basic details to initialize. In Android app development, the ChatSDK builder consists of these details. You need to use this builder in the onCreate() method to initialize the Chat SDK as given below:
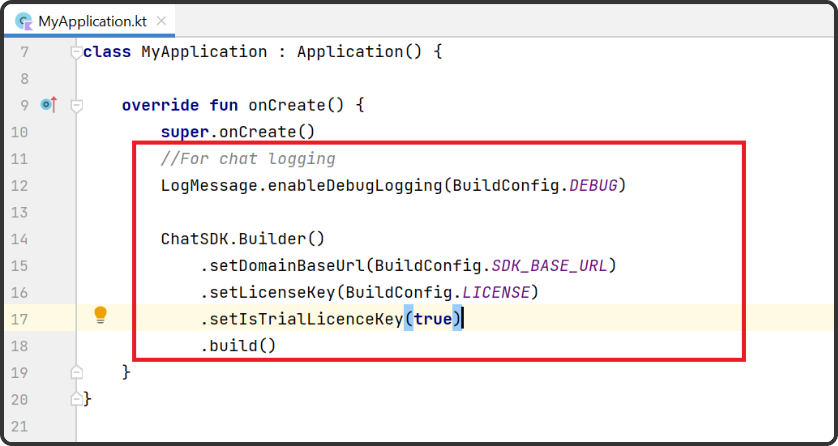
                      //For chat logging
                      LogMessage.enableDebugLogging(BuildConfig.DEBUG)

                      ChatSDK.Builder()
                      .setDomainBaseUrl(BuildConfig.SDK_BASE_URL)
                      .setLicenseKey(BuildConfig.LICENSE)
                      .setIsTrialLicenceKey(true)
                      .build()
Once the Chat SDK is initialized, you need to register a user in the sandbox/ live mode. You will use the setIsTrialLicenceKey for his step.
                         FlyCore.registerUser(USER_IDENTIFIER) { isSuccess, throwable, data ->
                         if(isSuccess) {
                            val isNewUser = data["is_new_user"] as Boolean
                            val responseObject = data.get("data") as JSONObject
                            // Get Username and password from the object
                         } else {
                            // Register user failed print throwable to find the exception details.
                         }
                         }
The chat SDK and the server needs to be connected, to send and receive messages between the user devices.
                      ChatManager.connect(object : ChatConnectionListener {
                         override fun onConnected() {
                               // Write your success logic here to navigate Profile Page or
                               // To Start your one-one chat with your friends
                         }

                         override fun onDisconnected() {
                            // Connection disconnected
                            //No need implementations
                         }

                      override fun onConnectionNotAuthorized() {
                            // Connection Not authorized
                            //No need implementations
                      }
                      })
To set up your app to send and receive messages, you need to add the single chat module as below:
Add the below code in the FlyMessenger.sendTextMessage tag
                   FlyMessenger.sendTextMessage(TO_JID, TEXT, listener = object : SendMessageListener {
                      override fun onResponse(isSuccess: Boolean, chatMessage: ChatMessage?) {
                         // you will get the message sent success response
                      }
                   })
To receive direct messages, you need to extend the FlyBaseActivity from SDK in the BaseActivity. Next, observe all the feature listeners and incoming messages.
class MainActivity : FlyBaseActivity()
The SDKs will call the listeners only when the app receives a new message from other users.
                   override fun onMessageReceived(message: ChatMessage) {
                      super.onMessageReceived(message)
                      // received message object
                   }
We need to do some additional configurations for Group Chats in your project Application class inside the onCreate() method build the ChatSDK Builder and provide the necessary data. An example can be found below.
You need to configure the ChatSDK Builder in the onCreate() method to add the Group chat module as given below.
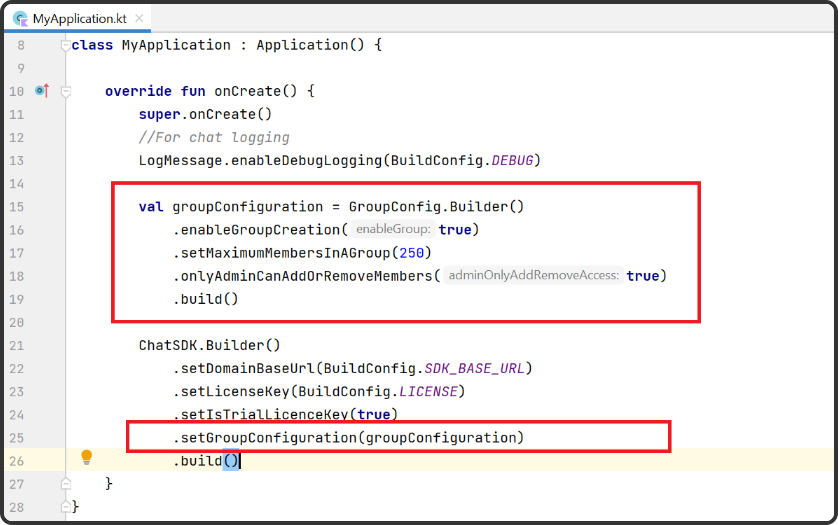
                        //For chat logging
                               LogMessage.enableDebugLogging(BuildConfig.DEBUG)

                               val groupConfiguration = GroupConfig.Builder()
                                  .enableGroupCreation(true)
                                  .setMaximumMembersInAGroup(250)
                                  .onlyAdminCanAddOrRemoveMembers(true)
                                  .build()

                               ChatSDK.Builder()
                                  .setDomainBaseUrl(BuildConfig.SDK_BASE_URL)
                                  .setLicenseKey(BuildConfig.LICENSE)
                                  .setIsTrialLicenceKey(true)
                                  .setGroupConfiguration(groupConfiguration)
                                  .build()
The SDK methods need a jid as an input parameter in a group chat module. You can get this group jid from the group id using the below utility method. This method uses the [ com.contusflysdk.api.ChatConnectionManager.initialize ] configurations to prepare the jid.
val groupJid : String = FlyUtils.getGroupJid(GROUP_ID)
You need to call the below method to create a group in your app
                      GroupManager.createGroup(GROUP_NAME, MEMBERS_JID_LIST, GROUP_IMAGE_ID) { isSuccess, throwable, data -> {

                         if(isSuccess){
                            //Update the UI
                         }else{
                               // Group creation failed print throwable to find the exception details.
                         }

                      }
Congratulations! You now know how to build a fully functional group chat app using Kotlin. This tutorial covered the steps to set up an Android project, integrate MirrorFly’s group chat SDKs and connect your app to the MirrorFly server.
We hope you enjoyed this tutorial and if you did, be sure to check out our other features you may find useful. Also, you can access the full-length code of this tutorial from our MirrorFly Github Repo. Wrapping things up, we bid our bye, wishing the best with your app development!
Add chat features to your Flutter apps - in 10 minutes - with just a few lines of code.
Request DemoDrive 1 billion + conversations on any Android, iOS, or Web app with 500+ chat features & 100+ UI components.