Let's Integrate our Javascript Call SDKs in 5 Minutes | Docs
Quick Start#
Call SDKs for Javascript#
With CONTUS MirrorFly Call SDK for web, you can easily add real-time calls features to your client app within 30 minutes.
Through our client SDK, you can initialize and configure calls into your app with minimal efforts.
note
If you're looking for the fastest way to build your app’s UI with MirrorFly Call SDK, you can use our sample apps. To get our sample apps, click here
Getting Started#
Supported browsers#
| Browser | Supported versions |
|---|---|
| Edge | 13 or higher |
| Chrome | 16 or higher |
| Firefox | 11 or higher |
| Safari | 7 or higher |
Things To Be Noted Before You Get Started#
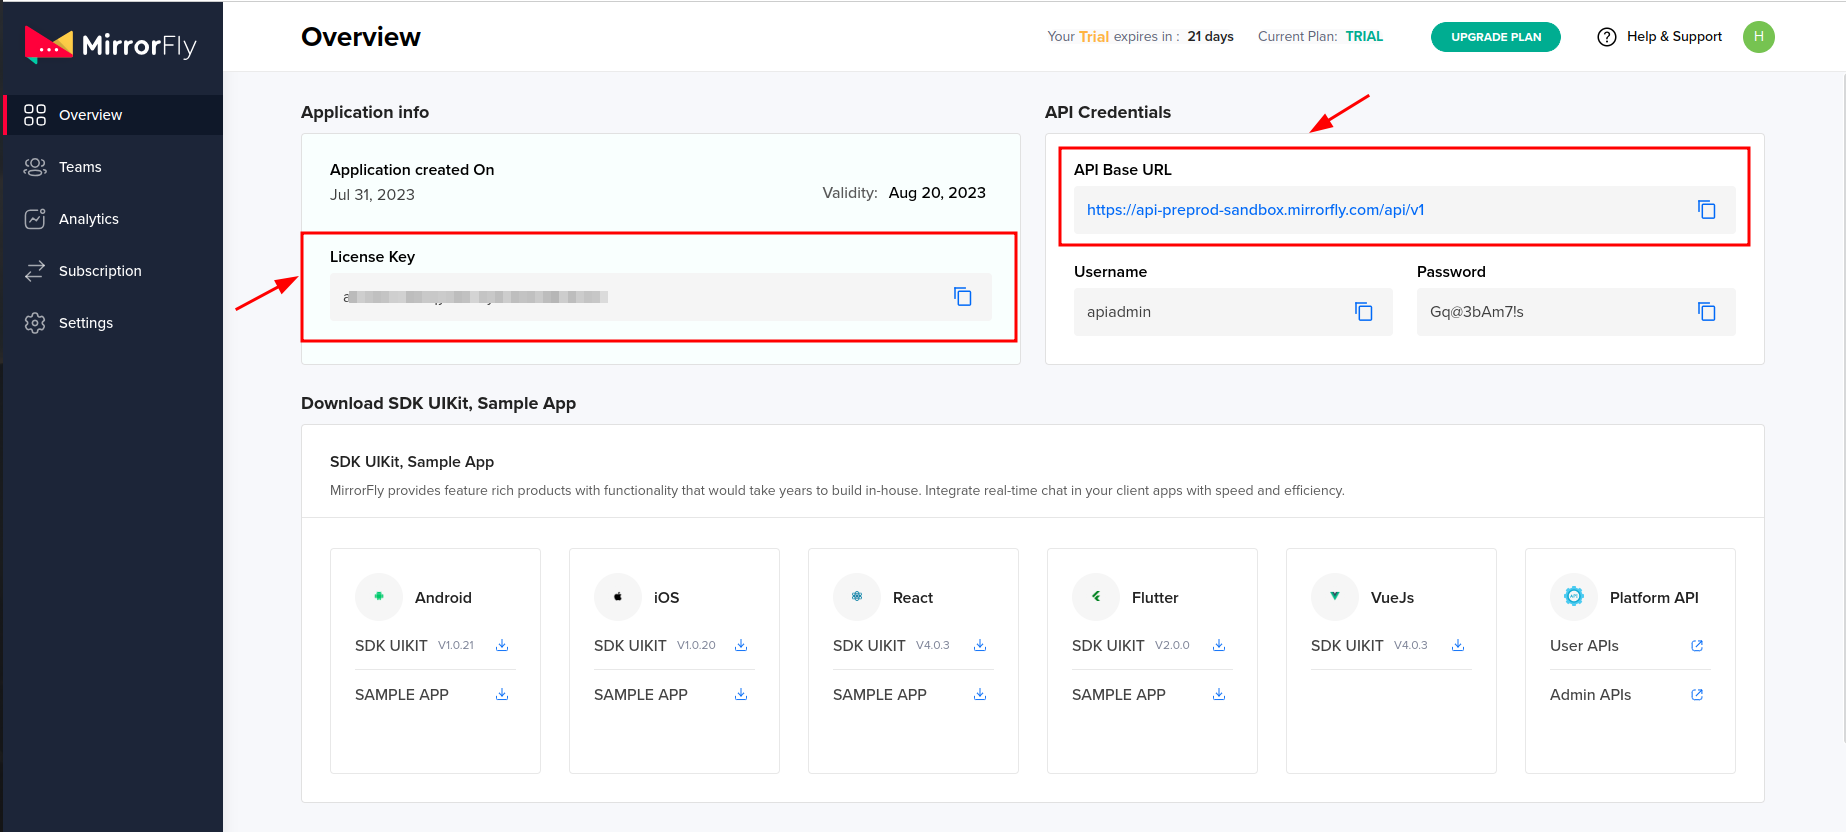
SDK License Key#
caution
Skip this part if you are already having your license key.
To integrate MirrorFly Call SDK into your app, you will need a SDK License Key. The MirrorFly server will use this license key to authenticate the SDK in your application.
To get the License Key,#
Step 1: Register here to get a MirrorFly User account. Registration is subject to verification and would take up to 24 hours.
Step 2: Login to your Account
Step 3: Get the License key from the application Info’ section
Integrate Call SDK into Your Javascript App#
CONTUS MirrorFly Call for JavaScript, makes the in-app call development process easy with all the essential messaging features
Since it’s the core of all the languages - Importing JavaScript into the application is the fundamental step to proceed further before using any language.
Integrate Using Npm package#
note
Install mirrorfly-sdk npm package by using the below command
Step 1: Install Mirrorfly Sdk in your application
Step 2: Import the SDK into your application where you want
Call SDK Integration for Javascript#
warning
Skip this part if you are already installed the SDK using NPM.
Step 1: To download the files from the JavaScript SDKs, click on the Download button.
Step 2: Extract the files from the downloaded zip file and copy them into your application.
Step 3: Once the file has been copied, include the script file into your index.html
Step 4: Now you have the SDK object available in your application to proceed further with initialization.
Step 5: Once, you have successfully got the SDK into your application. It’s time to go with your client’s preferred language implementation.
Initialize Call SDK#
caution
If you already initialized the SDK, you can add the below callback listeners to receive call related events.
To begin with the initialization process of the call SDK you are required to have certain data that responds to the changes in the connection status in the client's app.
Now, paste the license key on the licensekey param and use the below given method to pass these data through the SDK for further processing.
note
When you are in the trial mode, by default the sandbox servers will be used. After purchase it will be upgraded to dedicated server.
Request Params#
| Arguments | Description | Type | Required |
|---|---|---|---|
| licenseKey | Mirrorfly's License Key | String | true |
| callbackListeners | Check here for callback listerners | Object | true |
Response Params#
| Arguments | Description | Type |
|---|---|---|
| statusCode | Status Code | Number |
| message | Success/Error Message | String |
Create a User#
caution
Skip this part if you are already integrated the register and connect method.
Register User#
Step 1: You can use the below given method to register a new user.
Step 2: Once you are registered, you will be provided with a username and password that you can utilize to make the connection with the server via connect method.
Request Params#
| Status | Description | Type | Required |
|---|---|---|---|
USER_IDENTIFIER | Unique Id to Register the User. User identifier can only contain lowercase alphanumeric characters, hyphens (-), and underscores (_) | String | true |
FORCE_REGISTER | default value true provide true to force the old session logged out when the registered user has reached the maximum number of multiple-sessions or provide false to allow registration till the maximum no of multiple-sessions reached | Boolean | false |
registerMetaData | registerMetaData is an optional parameter to provide MetaData of user. Maximum size is 3 | Object | false |
Request Input for registerMetaData#
| Arguments | Description | Type |
|---|---|---|
| key | Name of the Key | String |
| value | Name of the value | String or Boolean or Number |
caution
If FORCE_REGISTER is false and if it reached the maximum no of multiple-sessions, then registration will not success and it will throw a 405 exception. Either FORCE_REGISTER should be true or one of the existing session need to be logged out to continue registration.
note
If you want to use your own Id, you can use the userJid in the registration response.
Response Params#
| Arguments | Description | Type |
|---|---|---|
| statusCode | Status Code | Number |
| message | Success/Error Message | String |
| data | Username, Password, isProfileUpdated, isSandbox, userJid | Object |
Sample Response:#
caution
userJid is the unique id that allows you to connect with other users to send or receive messages.
Connect to MirrorFly Server#
Step 1: You can use the credentials that you have obtained while registration to make the connection with the server.
Step 2: Once you have created the connection successfully, you will be responded with an approval message as ‘statusCode of 200’ or else will get an execution error.
Step 3: With this you can also trace the connection status that you receive in connectionListener callback function.
Step 4: If you face any error while making a connection with the server, you will receive an error message with callback.
Request Params#
| Status | Description | Type | Required |
|---|---|---|---|
USERNAME | Username | String | true |
PASSWORD | Password | String | true |
Response Params#
| Arguments | Description | Type |
|---|---|---|
| statusCode | Status Code | Number |
| message | Success/Error Message | String |
Preparing user jid#
To generate a JID for any user, use the below method.
| Argument | Description | Type |
|---|---|---|
| USER_NAME | unique username which we get from Register response. | String |
Make a voice call#
Initiate a call by providing the callee’s user JID into the makeVoiceCall method. Once the call initiated successfully, a callStatusListener callback will be triggered and callee user call status will be received here.
caution
If One to one call feature is unavailable for your plan, then it will throw 403 exception
Request Params#
| Param | Description | Type | Required |
|---|---|---|---|
USER_JID | User JID | Array | true |
GROUP_ID | Group Id - For one to one calls, provide null. | String | false |
metadata | metadata - is an optional parameter to provide Metadata of call. Maximum size is 3. Example : {key : value} | Object | false |
callback | Callback method to handle success and error while making the call | Method | false |
note
A metadata object key and value should both be strings.
success#
note
To receive the user track, a userTrackListener callback should already be registered in the caller's client app. Whenever you make the call to a user, you will receive your own track and the callee's track in the same callback method. To differentiate the user, You can use the 'localUser' and 'userJid' param. You will receive both Audio and Video track in the same callback method.
Sample Javascript code to play the track#
You need to supply the track object which was received in the callback method to the audio/video element based on the track type that you have received.
warning
For the Audio/Video call, you shouldn't play your own Audio track.
Receive incoming call#
To receive an incoming call, a incomingCallListener callback should already be registered in the callee’s client app. Whenever a user make call to a user, the callee user will receive the calling data in this callback.
Response Params#
| Arguments | Description |
|---|---|
| allUsers | JID's of the users in the call. |
| callTime | Call intiated time in timestamp format. |
| callType | Describe the audio or video call. |
| groupId | Contain the group ID If the call is group call. Otherwise, the value will be NULL. |
| localUser | To determine local user or not |
| roomId | Call room ID. |
| roomLink | Call room Link. |
| status | Status of the call(calling, ringing, connecting, connected). |
| toUsers | Array of User JID of callee users. |
| userDetails | User details object of the callee users. |
| userJid | User JID who intiated the call |
| usersStatus | Array of users with the details of the call. |
Answer a call#
To answer a call use the answerCall method.
note
To receive the user track, a userTrackListener callback should already be registered in the caller's client app. Whenever you answer the call, you will receive your own track and the caller's track in the same callback method itself. To differentiate the user, You can use the 'localUser' and 'userJid' param. You will receive both Audio and Video track in the same callback method.
Sample Javascript code to play the track#
You need to supply the track object which was received in the callback method to the audio/video element based on the track type that you have received.
warning
For the Audio/Video call, you shouldn't play your own Audio track.
End a call#
To end a call use the endCall method.