The Ultimate Guide to Building a Flutter Chat App + Firebase Integration.
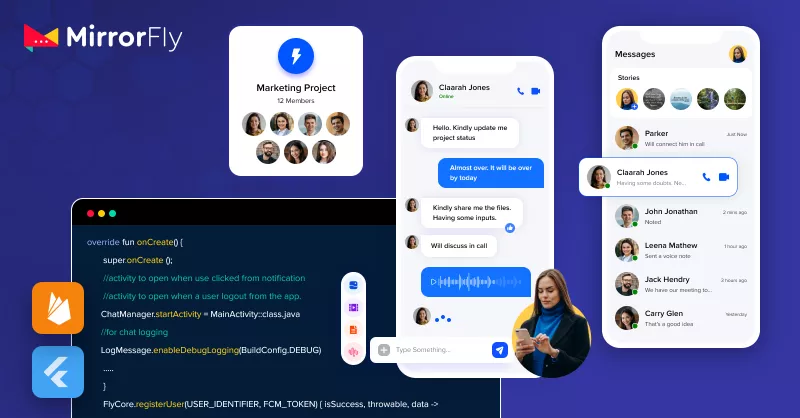
Flutter is a go-to framework for developers, aiming to build their chat apps natively for all platforms, within a short time. On the other hand, Firebase helps you integrate real-time functionalities into your app along with security and storage capabilities.
Incorporating both these technologies lets you create a scalable, feature-rich, and user-friendly chat app for your users.
In this article, we’ll cover a complete overview of the steps in building a chat app in Flutter with Firebase integration. Also, you’ll learn how to create an Android app, integrate in-app chat using MirrorFly Flutter chat SDKs, and setting up Firebase integration.
First, let’s get into the basics:
Table of Contents
Why Should You Choose Flutter For Your Chat App?
Flutter is a powerful framework built by Google that can help you build high-quality apps within a short period of time. There are many reasons to why this framework may be the best choice for your app, but here are the top reasons:
Shorter Development Time: Be it any kind of app you are building, Flutter will cut your development time by half, without compromising on the quality of the build.
Cross-platform compatibility: Since Flutter is a cross-platform framework, you can build apps for all the devices from a single codebase instead of building separate apps for mobiles, web browsers and desktops.
User-friendliness: The customization rendered by Flutter lets you create a beautiful, modern chat app system design.
Hot-reload: Making changes in your codes and worried about losing the existing app state. Fear not, Flutter lets you see the changes in real-time, without affecting the app.
Why Should You Integrate Firebase Into Your Chat App?
Firebase is a good choice for a chat app, as it is a real-time database that facilitates instant messaging. Modern communication demands features and capabilities that go way beyond regular chat apps, and Firebase plays a vital role in building robust and secure real-time infrastructure.
Here are the major reasons why developers choose Firebase integration for their chat apps:
Real-time functionalities: When you are building apps that need to deliver data within 1/2 a second, typically in real-time then Firebase integration might be your best bet.
Security: User authentication is a critical feature for apps that involve multiple users. When you set up a login for users with email, password, google or Facebook sign in, Firebase helps you incorporate them into your apps easily. Moreover, the data stored in the cloud is also protected with this service.
Data Storage: A chat app typically involves conversations and media shares being stored for user access. This is another service offered by Firebase to keep user data safely in a cloud space.
So far, we have talked about both Flutter and Firebase. Now let’s see how these both work together.
How effective is the Flutter Chat app with Firebase?
Flutter works well with Firebase based on criteria such as
- Cross-platform compatibility: Flutter is compatible with cross-platform support. You can code once and deploy it on multiple platforms, such as iOS, Android, Web, and desktop. It gives you performance like native apps.
- Hassle-free integration: You can easily integrate the Flutter chat API in just 20 minutes instead of building a chat app from scratch for every platform, which involves a lot more time, money, and effort.
- High scalability: Flutter is designed to scale automatically based on your app’s growth. You don’t have to worry about feeding servers, load balancing, or handling spikes in traffic.
- Real-time communication features: Firebase facilitates real-time communication features such as push notifications, dashboards and analytics, real-time metrics, device cross-platform compatibility, and so on.
These are some of the notable reasons that Flutter works well with Firebase. Now it’s time to start using them to build your messaging application.
Part I: Steps To Build Your Chat App In Flutter
In this tutorial, we have demonstrated step-by-step instructions on how to build an Android chat app that lets users send and receive messages.
We’ll use Android Studio as the development environment and MirrorFly’s Chat SDKs to add messaging functionality to your app.
Minimum Requirements
- Flutter 2.0.0 or later
- Android 4.4 or later
- MirrorFly Chat SDKs & License Key
- Dart 2.12.0 or later
- Firebase Account
Step 1: Get Your Chat SDKs And License Key
- Create your MirrorFly account
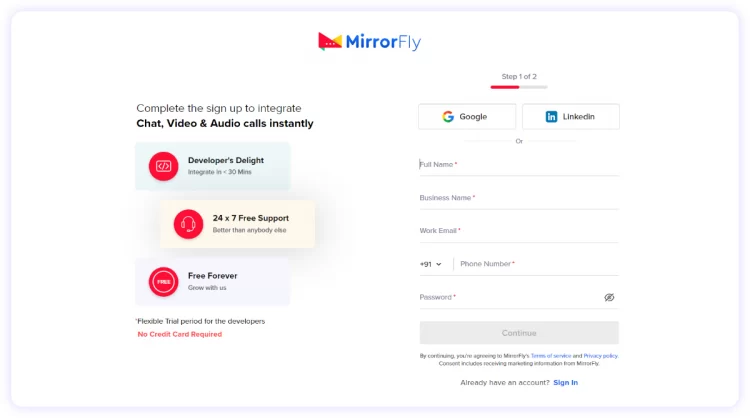
- Verify your account with the Confirmation link sent to your Email ID
- Sign in to your MirrorFly Account and complete the account setup process
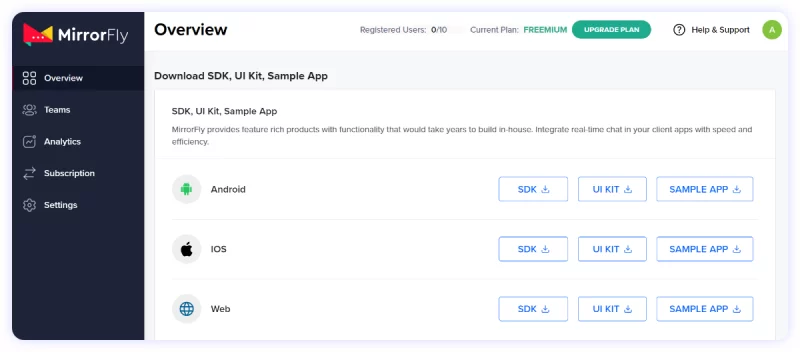
- Download the Flutter SDK Package
- Extract the downloaded SDK files onto your device
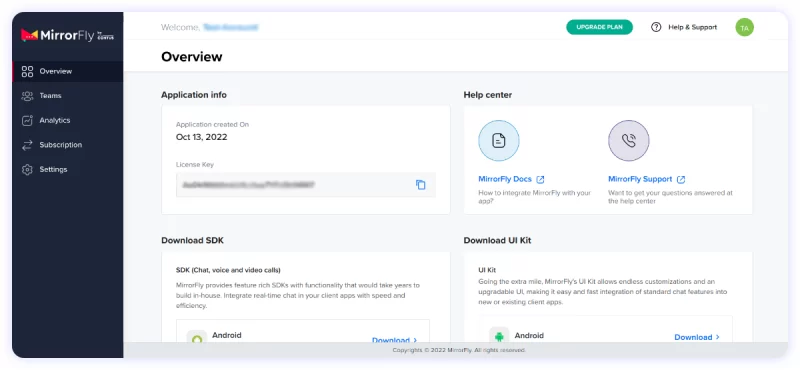
- Again, go to your MirrorFly Account Dashboard
- Make a note of your License Key
Step 2: Get Started With Your Chat App Project In Android Studio
In this step, you’ll create a new Android project, setting up Flutter as your development language.
- Open the Android Studio IDE
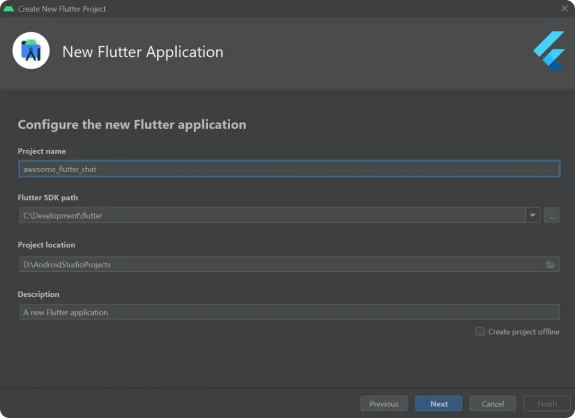
- Fill in the basic information of your project. Your Project Window will open
- From the Downloads folder of your device, import the dependencies to your project’s App Folder.
- Next, add the
pubspec.yamlfile - To avoid library conflicts between the imported files, you’ll need to add the below line in the
gradle.properties
android.enableJetifier=true You’ll require permission to access different components of the project. To grant them, add the below lines to the AndroidManifest.xml
<uses-permission android:name="android.permission.INTERNET" />
<uses-permission android:name="android.permission.ACCESS_NETWORK_STATE" />
Next, in the app/build.gradle configure the License key that you acquired from your MirrorFly Account Dashboard.
plugins {
	...
	id 'kotlin-android'
	id 'kotlin-kapt'
}
android {
	compileOptions {
    	sourceCompatibility JavaVersion.VERSION_1_8
    	targetCompatibility JavaVersion.VERSION_1_8
	}

	kotlinOptions {
    	jvmTarget = '1.8'
	}

	packagingOptions {
    	exclude 'META-INF/AL2.0'
    	exclude 'META-INF/DEPENDENCIES'
    	exclude 'META-INF/LICENSE'
    	exclude 'META-INF/LICENSE.txt'
    	exclude 'META-INF/license.txt'
    	exclude 'META-INF/NOTICE'
    	exclude 'META-INF/NOTICE.txt'
    	exclude 'META-INF/notice.txt'
    	exclude 'META-INF/ASL2.0'
    	exclude 'META-INF/LGPL2.1'
    	exclude("META-INF/*.kotlin_module")
	}
}
In the app/build.gradle file of your Flutter project, add the following dependencies:
dependencies {
... // your app dependencies
implementation files('libs/appbase.aar')
implementation files('libs/flycommons.aar')
implementation files('libs/flynetwork.aar')
implementation files('libs/flydatabase.aar')
implementation files('libs/videocompression.aar')
implementation files('libs/xmpp.aar')
}Add the below modules to your gradle build and configure the required parameters as shown below:
dependencies {
... // your app dependencies
configurations {
all {
exclude group: 'org.json', module: 'json'
exclude group: 'xpp3', module: 'xpp3'
}
}
//For lifecycle listener
implementation 'android.arch.lifecycle:extensions:1.1.1'
annotationProcessor 'android.arch.lifecycle:compiler:1.1.1'
//For GreenDao
implementation 'de.greenrobot:greendao:2.1.0'
//For gson parsing
implementation 'com.google.code.gson:gson:2.8.1'
//for smack implementation
implementation 'org.igniterealtime.smack:smack-android:4.4.4'
implementation 'org.igniterealtime.smack:smack-tcp:4.4.4'
implementation 'org.igniterealtime.smack:smack-im:4.4.4'
implementation 'org.igniterealtime.smack:smack-extensions:4.4.4'
implementation 'org.igniterealtime.smack:smack-sasl-provided:4.4.4'
implementation 'androidx.localbroadcastmanager:localbroadcastmanager:1.0.0'
implementation 'androidx.multidex:multidex:2.0.1'
implementation 'com.google.android.gms:play-services-location:17.0.0'
//Dagger Dependencies
api 'com.google.dagger:dagger:2.40.5'
kapt 'com.google.dagger:dagger-compiler:2.40.5'
api 'com.google.dagger:dagger-android:2.40.5'
api 'com.google.dagger:dagger-android-support:2.40.5'
kapt 'com.google.dagger:dagger-android-processor:2.40.5'
//coroutines
implementation 'org.jetbrains.kotlinx:kotlinx-coroutines-android:1.3.8'
implementation 'org.jetbrains.kotlinx:kotlinx-coroutines-test:1.3.8'
//apicalls
implementation 'com.squareup.retrofit2:retrofit:2.6.1'
implementation 'com.squareup.retrofit2:converter-gson:2.6.1'
implementation 'com.squareup.okhttp3:okhttp:4.2.0'
implementation 'com.jakewharton.retrofit:retrofit2-kotlin-coroutines-adapter:0.9.2'
//stetho interceptor
implementation 'com.facebook.stetho:stetho-okhttp3:1.3.1'
//okhttp interceptor
implementation 'com.squareup.okhttp3:logging-interceptor:3.14.3'
//shared preference encryption
implementation 'androidx.security:security-crypto:1.1.0-alpha03'
//for mobile number formatting
implementation 'io.michaelrocks:libphonenumber-android:8.10.1'
}
buildTypes {
  debug {
	buildConfigField 'String', 'SDK_BASE_URL', '"https://api-preprod-sandbox.mirrorfly.com/api/v1/"'
	buildConfigField 'String', 'LICENSE', '"xxxxxxxxxxxxxxxxxxxxxxxxx"'
	buildConfigField 'String', 'WEB_CHAT_LOGIN', '"https://webchat-preprod-sandbox.mirrorfly.com/"'
	buildConfigField "String", "SUPPORT_MAIL", '"contussupport@gmail.com"'
  }
}
Step 3: Initialize The Chat SDKs
In your Android Application Class, go to the onCreate() method and add the ChatSDK builder. This step will help you get all the necessary details to get started with the SDK initialization.
Kotlin:
//For chat logging
LogMessage.enableDebugLogging(BuildConfig.DEBUG)

ChatSDK.Builder()
	.setDomainBaseUrl(BuildConfig.SDK_BASE_URL)
	.setLicenseKey(BuildConfig.LICENSE)
	.setIsTrialLicenceKey(true)
	.build()
Step 4: Register a User
- Once you’ve initialized the SDK, you’ll need to register the user using the
USER_IDENTIFIERandFCM_TOCKEN - You can create the user either in the live or sandbox mode, as given below
Flutter:
FlyChat.registerUser(USER_IDENTIFIER, FCM_TOCKEN).then((value) {
	if (value.contains("data")) {
	// Get Username and password from the object
	}
}).catchError((error) {
	// Register user failed print throwable to find the exception details.
});
Once you register the user, the server automatically gets connected.
Step 5: Start Sending And Receiving Messages
- Send a Chat Message
Add the sendTextMessage() method to start sending messages from your Flutter app.
FlyChat.sendTextMessage(TEXT, TO_JID, replyMessageId).then((value) {
     // you will get the message sent success response
 });
- Receive a Chat Message
Get notifications on any incoming message, using the below onMessageReceived() method
FlyChat.onMessageReceived.listen(onMessageReceived);
void onMessageReceived(chatMessage) {
     //called when the new message is received
 }
You’ve now successfully built a chat app in Flutter that can send and receive messages. Now, let us move on to integrate Firebase into your application.
Part II: Steps To Integrate FireBase Into Your App
Follow the below steps to add Firebase services to your messaging application:
Step 1 : Create a Firebase Project
- Open the Firebase Console
- Create a Project using the package name of your Flutter application. Let us assume that name is
com.testapp
Step 2: Configure Your App Info In The Console
To store and manage your app’s configuration information the Google Developer Console, you’ll need to perform the following steps:
- Go to Console
- Select your project
- Navigate to Project settings
- Select Cloud Messaging. You’ll find the
google-service.jsonfile here - Download the file
- Add it to the App folder of your project
Step 3: Add Firebase Dependencies
- Once you’ve set up the configuration, you’ll need to add the below Firebase dependencies. To do this,
- Go to build.gradle
- Add the below repos
buildscript {
    repositories {
        // Check that you have the following line (if not, add it):
        google()  // Google's Maven repository
   }
   dependencies {
       classpath 'com.google.gms:google-services:4.3.13' // google-services plugin
   }
}

allprojects {
   repositories {
       // Check that you have the following line (if not, add it):
       google() // Google's Maven repository
   }
}
Next, add the plugins for the Android app and Google services
apply plugin: 'com.android.application'
apply plugin: 'com.google.gms.google-services'

dependencies {
  implementation platform('com.google.firebase:firebase-bom:30.3.1')
}
You’ve now successfully set up Firebase for your app. Let’s proceed further to integrate the Push notifications
Step 4: Firebase Integration For Push Notification
- To set up push notifications, go to the build.gradle and add the FCM dependency as mentioned below
implementation 'com.google.firebase:firebase-messaging:23.0.6'
In your Manifest file, add the below line
<service android:name=".MyFirebaseMessagingService"
         android:exported="false">
    <intent-filter>
        <action android:name="com.google.firebase.MESSAGING_EVENT" />
    </intent-filter>
</service>
Extend the FirebaseMessagingService service by creating the MyFirebaseMessagingService file in your application
Java:
public class MyFirebaseMessagingService extends FirebaseMessagingService {
    @Override
    public void onMessageReceived(@NonNull RemoteMessage message) {
        //Push message will be received here when push notification triggered for this device
    }

    @Override
    public void onNewToken(@NonNull String token) {
         //Whenever Device token will get updated/changed this method will be triggered
         PushNotificationManager.updateFcmToken(token, isSuccess, message) -> {

                         });
    }
}
Kotlin:
class MyFirebaseMessagingService : FirebaseMessagingService() {

    override fun onMessageReceived(message: RemoteMessage) {
        //Push message will be received here when push notification triggered for this device
    }

    override fun onNewToken(token: String) {
        //Whenever Device token will get updated/changed this method will be triggered
        PushNotificationManager.updateFcmToken(token, object : ChatActionListener{
            override fun onResponse(isSuccess: Boolean, message: String) {
                }
        })
    }
}
- Use the link below to enable cloud messaging
To start receiving messages and calls from Chat SDK, you’ll need to authenticate cloud messaging with the server. For Authentication,
- Go to Project Setting under Cloud Messaging
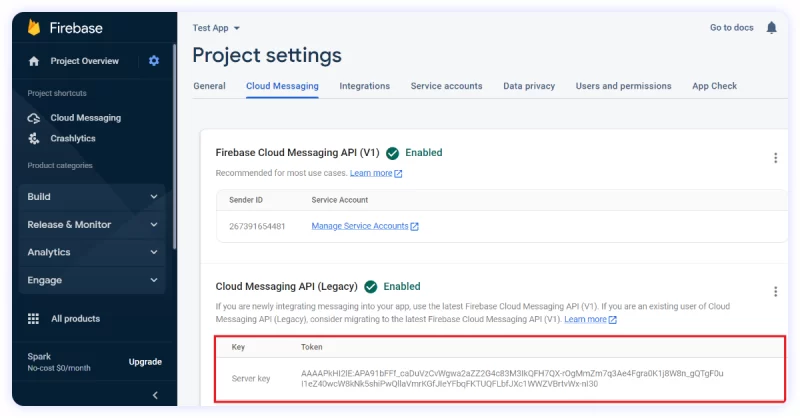
- Copy the API Key
- Configure it in the server
- Next, add the below permissions to the
AndroidManifest.xml
<uses-permission android:name="android.permission.INTERNET" />
<uses-permission android:name="android.permission.ACCESS_NETWORK_STATE" />
In the cloud message console, add the device token
Java:
 FirebaseMessaging.getInstance().getToken()
                .addOnCompleteListener(new OnCompleteListener<String>() {
                    @Override
                    public void onComplete(@NonNull Task<String> task) {
                        if (!task.isSuccessful()) {
                            //Fetching FCM registration token failed
                            return;
                        }

                        //Fetching FCM registration token succeed
                        // Get new FCM registration token
                        String token = task.getResult();
                        PushNotificationManager.updateFcmToken(token, isSuccess, message) -> {

                         });
                    }
                });
Kotlin:
FirebaseMessaging.getInstance().token.addOnCompleteListener(OnCompleteListener { task ->
            if (!task.isSuccessful) {
                //Fetching FCM registration token failed
                return@OnCompleteListener
            }

            //Fetching FCM registration token succeed
            // Get new FCM registration token
            val token = task.result
            PushNotificationManager.updateFcmToken(token, object : ChatActionListener{
            override fun onResponse(isSuccess: Boolean, message: String) {
                }
            })
        })
Step 5: Firebase Integration For Crashlytics
- In your project level
build.gradle, add the Crashlytics as given below
dependencies {
    // Check for v4.3.3 or higher
    classpath 'com.google.gms:google-services:4.3.13'
    classpath "com.google.firebase:firebase-crashlytics-gradle:2.9.1"
}

allprojects {
    repositories {
       // Add repository
        google()  // Google's Maven repository
    }
}
In your app-level build.gradle, add the Crashlytics as given below
apply plugin: 'com.android.application'
apply plugin:  'com.google.firebase.crashlytics'

dependencies {
 // Add dependency
  implementation 'com.google.firebase:firebase-crashlytics:18.2.12'
}
Steps to set up a Firebase Cloud Messaging app on Flutter
- Prepare your platform.
- Install the FCM plugin.
- Get the registration token.
- Disable automatic initialization.
- Re-activate FCM auto-init during runtime.
- Handle incoming messages.
Conclusion:
We hope this article helped you understand the steps involved in building an encrypted Flutter Chat App with Firebase Integration. By following the instructions, you will be able to add real-time messaging functionalities to your Android app as well as set up user authentication, push notifications, and crash reporting using Firebase.
All things considered, you now have everything you need to build a feature-rich messaging app. Why wait? Begin your development now!
Well, if you are considering 100% customizable video, voice, and chat features for your Flutter app development, you can avail of our best self-managed chat solution for a one-time license cost! To know more about this faster and more reliable option, talk to our experts today!
Till then, Happy building, and good luck!
Get Started with MirrorFly’s Secure Flutter Chat Features Today!
Drive 1+ billions of conversations on your apps with highly secure 250+ real-time Communication Features.
Contact Sales200+ Happy Clients
Topic-based Chat
Multi-tenancy Support

Frequently Asked Questions (FAQ)
Yes, of course! Firebase can be a great choice for building chat apps as it offers certain features and tools that are essential for chat applications like real-time database, authentication, and cloud messaging. Additionally, they offer libraries and SDKs that come compatible with different platforms and support integrations with third-party services like Dialog Flow and other cloud services.
Thus, making it a great option for building a scalable and reliable chat application
Yes, Firebase is free and you can make use of their no-cost pricing plan (Spark Plan) as long as you want. However, if you want more storage, network bandwidth, or hosting space for your chat app, then you must opt for their paid-tier pricing plan (Blaze Plan).
Below are the steps you need to follow for developing a messaging application. 1. Set up your Flutter development environment. 2. Create a new Firebase project. 3. Configure the Firebase settings. 4. Create the app’s UI. 5. Set up user authentication. 6. Install the chat functionality. 7. Manage user profiles and contacts. 8. Enable push notifications for new messages. 9. Test your chat app 10. Launch your app
Yes, definitely, you can build a chat app in Flutter. It allows you to build a chat app that can be deployed on multiple platforms. It also has some notable features like hot reload, a single code base, community support, open-source, a rich set of features, a highly customizable widget, access to libraries, and so on.
Firebase’s primary language is Javascript for its client-base libraries and SDKs in order to interact with its features such as authentication, databases, storage, and cloud hosting. However, it supports multi-programming languages for server-side development like Java, Python, Go, and more.
Yes, Firebase works offline on Flutter applications. It provides a local caching mechanism that allows your app to continue functioning even without network connectivity. This feature is more useful for mobile applications, as they often encounter issues with limited or no internet connection.
In general, neither can be considered better than the other. Choosing between Firebase and AWS depends on your project requirements, technical expertise, scalability, and cost considerations. It’s recommended to evaluate the features and benefits of both platforms and choose based on your project requirements.
The New York Times, Starava, Tiktok, Dualingo, Delivery Hero, and Shazam are some of the famous apps that rely on Firebase for real-time data synchronisation, cloud storage, user authentication, push notifications, and more.
Both SQL and Firebase are faster in their own ways. SQL databases are enhanced for structured data and complex queries, making them capable of handling advanced querying capabilities such as complex joins, aggregation, and indexing. On the other hand, Firebase uses a NoSQL data model and is enhanced for real-time data synchronization and simple queries.
Flutter communicates with Firebase using the Firebase SDK for Flutter. Firebase is a completely mobile and online app development platform. Flutter is an open-source UI software for multi-platform app development that can be deployed on iOS, Android, the Web, and desktop. Both are backed by Google.
Related Articles
- Top 10 Flutter Packages for Real-Time Communication
- Build A Flutter Chat App With End-to-end Encryption
- A Complete Guide to Multi-Platform Chat Development
hi,
is there any possibilities to give a explanation of my queries in a short time? How can I secure my chat app and protect user data?
Hi Anila, In order to build a Flutter chat app, you can make use of the below-listed packages and libraries.
If you feel these processes take a long time, you can simply opt for MirrorFly Flutter chat SDKs and integrate communication functionalities into your Flutter app in < 10 minutes.
hello team fly,
It is actually good to read and I can get some knowledge by the first look of it, can you tell me that How do I implement real-time messaging in a Flutter chat app with Mirrorfly?
Welcome David, I hope you are doing great. To be specific, implementing real-time messaging in your Flutter chat app with MirrorFly is just a 10-minute job. Here, I’ll take you through the step-by-step process.
That’s it. By following the above-mentioned simple procedure, you can integrate real-time messaging functionalities and features with your Flutter app.
hi guys,
Could you let me know what are the essential components of a chat application developed with Flutter and Firebase?
Hello Jarvis, I hope you are doing great. While developing a chat app using Flutter and Firebase, it’s crucial to incorporate features that improve the user experience and functionality. Think about the following key elements:
You can have a look at our Flutter tutorial docs for Flutter codes to implement a full, comprehensive suite of Flutter chat apps.
hi,
Thanks for sharing a great article I notice that customizability is at the forefront of your chat app, so now explain me in a short way that what is Firebase, and how does it relate to the development of chat applications?
Hi Alice, It was great to hear this question from you. Firebase aims to simplify and accelerate the development of applications. It provides multiple features and key components for a chat app, as follows:
hey guys,
I’m Deepak, I would like to discuss regarding how to build a chat app in Flutter with Firebase integration? could you make it simple?
Hello Deepak, Building a chat app in Flutter with Firebase integration involves several steps, as mentioned below.
By following the above-mentioned steps, you can develop a chat app in Flutter with Firebase integration for any platform.
Hi team,
this is a very detailed article for those who try to build a chat application, can you tell me why is Flutter utilized for the building of chat applications with Firebase?
Hi Ajmal, I hope you are doing great. Well, here are a few reasons why Flutter is utilized for building chat applications with Firebase.
1. Cross-platform development
2. Widget-based UI
3. Hot Reload
4. Firebase Realtime Database
5. Authentication and authorization
6. Cloud Functions
7. Cloud Messaging
8. Scalability and reliability
These are a few reasons to build a chat app using Flutter with Firebase. You can also talk with an expert to learn more about this matter.
How do I make a group chat on Flutter?
You can make a group chat on Flutter by following the simple procedure mentioned below.
1. Setup the Flutter project.
2. Design a user interface.
3. Implement user authentication.
4. Choose a backend service to handle real-time messaging.
5. Implement a feature to create a new group chat.
6. Allow users to send and receive messages in groups.
7. Use real-time capabilities from your backend service.
8. Test and deploy
9. Implement push notifications and features to manage groups.
10. Provide clear documentation for users regarding dos and don’ts.
By following this procedure, you can easily make a group chat on Flutter.
I’m trying to configure Firebase Messaging in Flutter, but it seems that there is no implementation yet for the upstream messages.
According to the Firebase documentation for Flutter, the Firebase_messaging plugin supports upstream messages. Flutter primarily supports downstream messages, which are messages sent from the server to the client (Flutter). However, upstream messages that are sent by the client and sent to the server are not primarily focused on in the early stages of development. Here is a fix: By directly interacting with FCM APIs, upstream messaging is still possible in the Flutter app. Refer documentation page for steps and codes.
Is there any way to create push notifications with Flutter without using Firebase (FCM)?
Yes, you can implement push notifications in your Flutter chatting app without using Firebase (FCM). One of the best alternatives is the OneSignal platform. It allows you to facilitate push notifications seamlessly on both Android and iOS messaging platform.
How do I add an active user feature to the Chat Flutter app?
Active user features or presence indicators help you identify the user status in real-time, both online and offline. To add an active user feature to your Flutter messaging app requires several steps, as mentioned below.
Step 1: Track user status management
Step 2: Setup an API for backend integration.
Step 3: Derive app state management
Step 4: Implemetn UI
Step 5: Optimise for real-time updates.
These steps involve several coding lines; refer to the documentation page for coding.
Hello MirrorFly, a really great article that’s put up neatly for beginners. Hats off! I’m looking forward to learning more about your product and how it can benefit me, as I’m developing a real-time chat app and needs authentication features to be implemented.
Hello Walt, thank you for your kind words about my article. I’m thrilled to hear that you are interested in our product and how it can help you build a real-time chat app. Here’s a brief intro about us. MirrorFly is a powerful Free chat API provider that is highly preferred by developers for its easy-to-use messaging features and simple integration capabilities. Along with these, it also offers both cloud and self-hosted solutions to build feature-rich chat apps. If you would like to learn more about us, you can schedule a demo with our expert team who would be happy to guide you on your requirements.
And regarding the need to add authentication for your chat app, the ideal option would be to go ahead with firebase integration using MirrorFly’s in-app chat SDK.
Hello team, I’m looking to build a healthcare chat app using Flutter for adding voice and video capabilities and I want to know whether you support this framework. Also, I want to know whether you have UI kits for my app. How may I reach you?
Hello Saina, thank you for reaching out to us, and great to hear that you are planning to build a healthcare chat app. Yes, we do support the Flutter framework for building chat apps with both voice and video capabilities. And regarding UI kits, we have a pre-built UI kit for iOS, Android, and web apps that can help you jumpstart your healthcare chat app project.
You can get in touch with us by talking to our experts or by sending an email to our support team.
Hi, I have built a chat app using Flutter but looking for certain features. And when I searched other websites, I found the pricing to be high. May I know at what pricing you offer your services and I need integration support too?
Hello Charles, it is really wonderful news that you have a chat app ready in hand. I’m thrilled to tell you that MirrorFly’s Free chat API offers high-end messaging features to users for recurring monthly packages or one-time license cost. You may also take a look at our pricing page to get more clarity on the pricing options available.
Regarding the SDK integration support, our self-hosted solutionself-hosted solution lets you hire a dedicated development team to help you with the integration right from the start till your app goes live. If you would like to proceed further, please talk to our experts.
Hello, I’m Benjamin and this is a very good tutorial. Can you tell me how to notify the user status online or offline? Thanks!!
Hello Benjamin, thank you for your kind response towards my article. You can notify users about their offline/online status by enabling online presence indicators in your chat service using our Free chat API.Or simply, you may talk to our experts regarding this.
Thank you very much for the blog post! I hope you write more stories on flutter!
Sure Kennedy! Thanks for your response to my article and please keep coming back for more insights on developer-related articles.
This is a great article to learn how to build a chat application using Flutter and firebase. This article has everything from Firebase integration to Flutter along with Authentication, Sign-in, Cloud firebase, and storage services. This is a must-learn tutorial for beginners in Flutter development because it teaches much more about Firebase services and how to access them in Flutter to build a Chat application. This type of integration is adopted in some of the most amazing Flutter chat app templates that are in the market.
Thanks for such a wonderful response to my article! Very true Ayaz, these days Flutter is highly used to build chat apps along with Firebase services. My best wishes to you.