

Planning to wake up your users to push notifications from your chat app? Join me in exploring more about the feature.
People love to get a glimpse of what they are heading to, before reading the whole message – and Push notifications serve this right. Besides, from a developer’s point of view, is it both convincing and exciting that the integration of this feature into apps can be done super-quick, especially when using a chat SDK with push notification support.
In this article, I will introduce you to the ins and outs of push notifications along with the steps to implement them within your chat app.
With less talking, and more into building, let’s get started!
What are Push Notifications?
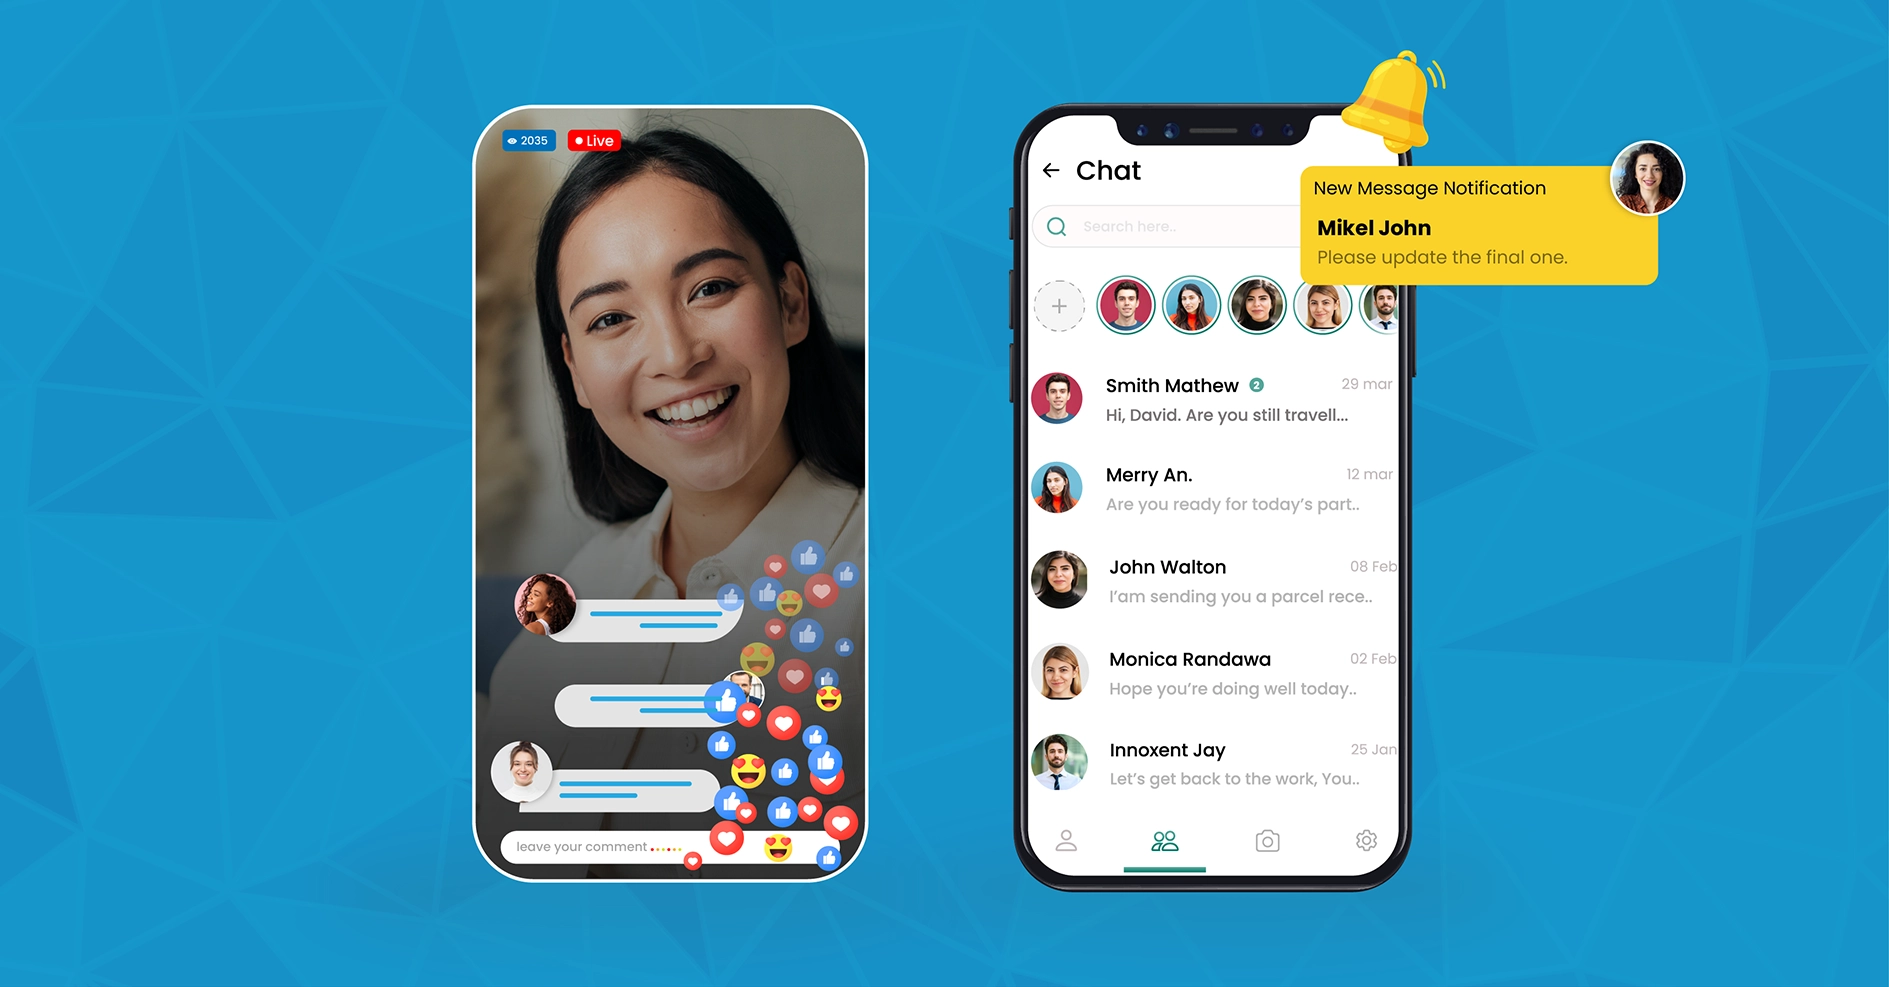
Push notification is a clickable pop-up message that appears on the notification pane of the user’s device, even when they are not using their app. In a chat app, these notifications are primarily used to grab the user’s attention and prospects to take a specific call to action.
Here’s an example of what a push notification looks like in a chat app:
Types of Push Notifications
The functionality of chat SDK with push notifications is specific to each operating system. Based on the device they’ll run, push notifications can be classified as follows:
- Mobile Push Notification
- Web Push Notification
Mobile Push Notification
When a user receives an incoming message, the chat app triggers an alert to the user on the notification pane of the mobile device. This feature is referred to as Mobile Push Notifications.
In general, mobile notifications are supported by both Android and iOS platforms. Each of these operating systems treats push notifications differently and users will have to look out for the following permissions on the respective platforms:
- Notification Permissions
- iOS:
In Apple phones, push notifications are not available as a default setting. Rather he/ she must get into the app settings and opt-in for it. - Android:
By default, push notifications are enabled in Android devices. Users need to opt out of the push notification only by manually disabling it in the app’s notification settings
- Display of Messages:
- iOS: When a user receives a message, it pops up for a few seconds in the notification area and disappears automatically. It can still be accessed on the notification center.
- Android: When a user receives a message, the message stays on the notification area until the user deliberately clears it off from the notification pane. Also, the user may choose what type of message notification can be displayed by selecting the options from the app’s settings.
Web Push Notification
Web Push notifications are message alerts that slide across the desktop or mobile screen when the user logs into his/ her web chat app.
These notifications make it fairly easy to alert the users, without the need for an app to be installed on their desktops. Right when the user comes online with your chat app logged in on the browser, the notifications start popping up.
- Complete Source Code
- Lifetime Data Ownership
- Deploy on Own Server
How Do Push Notifications Work in a Chat App?
Push notifications make it fairly easy to intimate users that they’ve received a message in their chat app. In the context ahead, I’ll explain the complete process of implementing push notifications in a messaging app. Let’s start right here.
The Operational Elements of Push Notifications
The performance of Push notifications in a chat app depends on 3 major elements:
- Operating System Push Notification Service (OSPNS):This acronym refers to the operating system ( iOS, Android and Windows) on which the push notifications function. Each OS displays the push notifications in its own style of service.
- Chat App Purpose: The design, display, and experience of your push notification solely depend on the type of chat app you develop. The message location and strategy will differ depending on the scenario where your chat app is used.
- User’s Technology: The user’s app can be built on any OS and on any device. The type of message alerts uniquely differs from each other based on the technology used.
Steps To Add Push Notification In Chat APP
Step 1: Adding Push Notification to Your Chat App
- Add Push Notifications to your App
- Register with an OSPNS (Firebase for Android, Apple Push Notification Service for iOS)
- Your OSPNS provides an API to communicate with their service.
- Add the SDK to your app. The SDK is a library of codes with OSPNS services.
- Upload the app to the app store/ play store
Step 2: Activation of Push Notifications by Users
Note: Your app and the user device are both registered with the OSPNS (APNs and FCM)
- The user visits the app store, downloads your chat app and installs it.
- Your app identifies the user’s device ID (token assigned by APNs and FCM)
- The MirrorFly SDKs register this to the FCM push notification service channel.
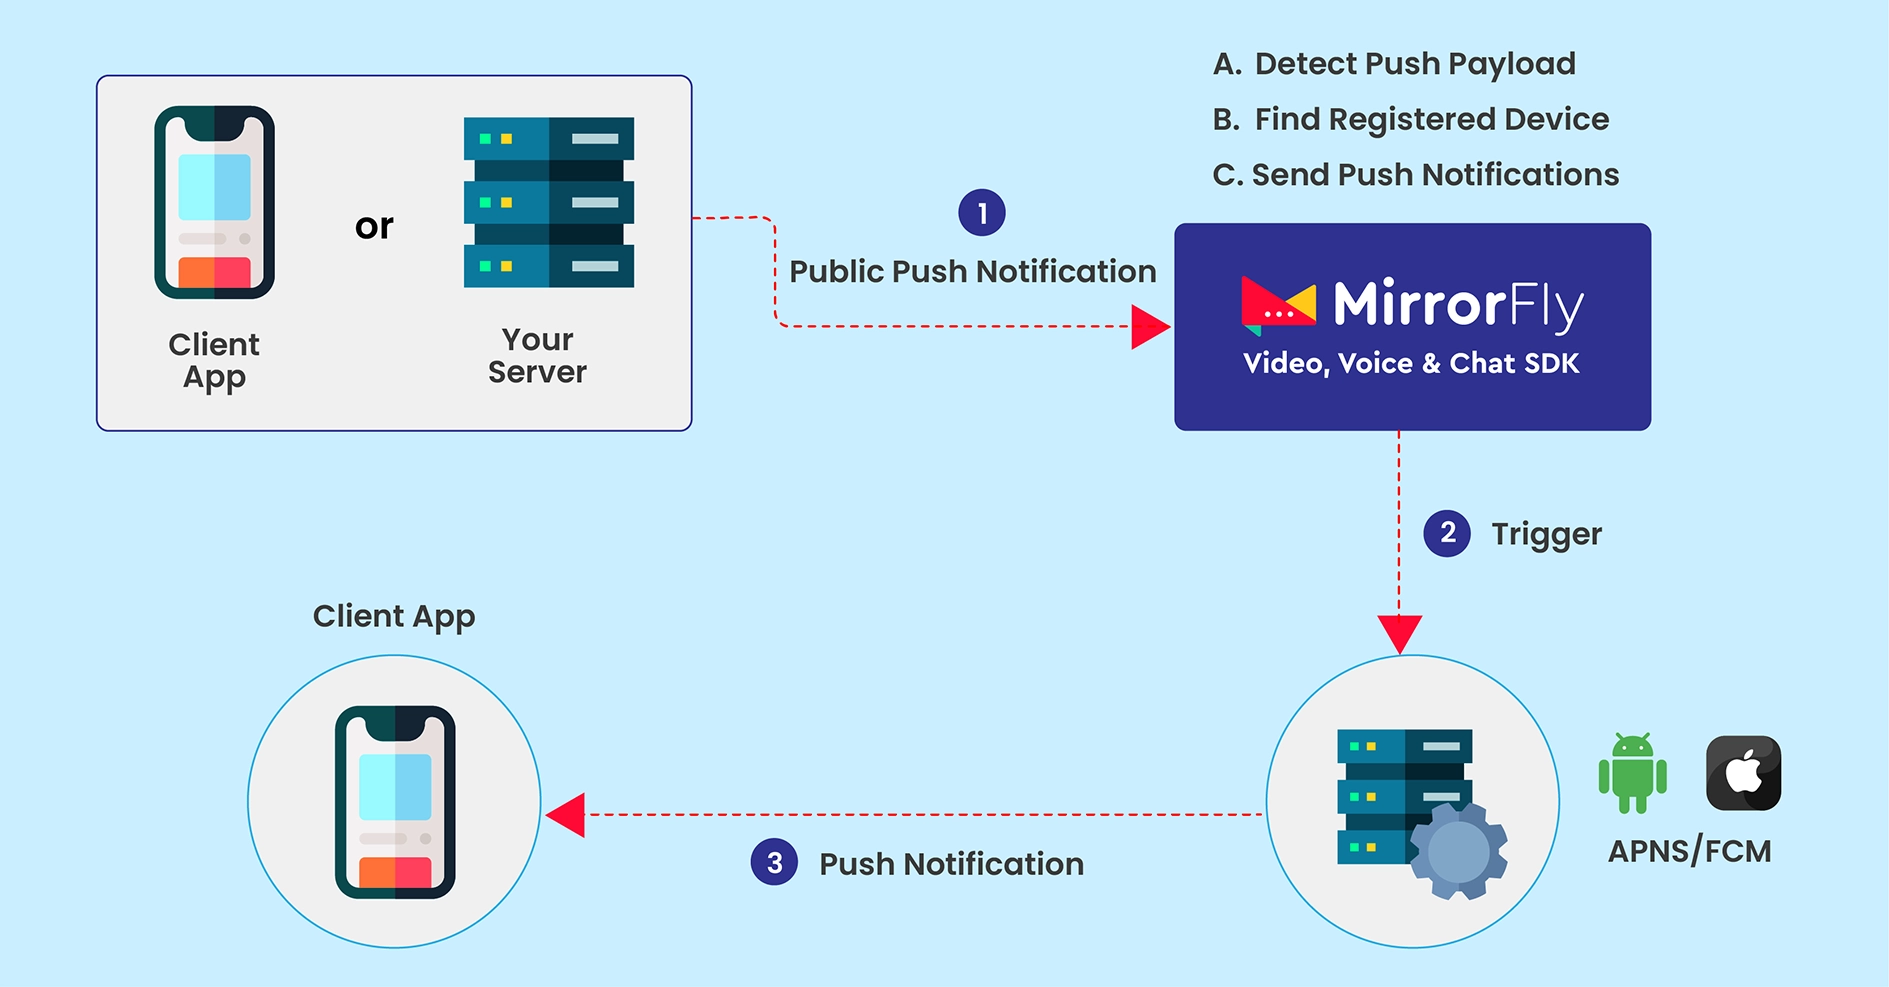
Step 3: Push Notification Delivery by the SDKs
- MirrorFly inspects the push notification payload.
- When a specific payload is identified, it checks for devices that are registered on the channel.
- If the device is found, MirrorFly forwards the push to the specific service provider (FCM push notifications service/Apple Push Notification service).
- Then, the FCM/ APNs get the push notification to the respective Android/ iOS devices.
How to Add Push Notifications into Your Chat Apps with MirrorFly SDKs?
You can enable FCM Push notifications on any chat app by integrating MirrorFly’s enterprise messaging software, in simple steps.The implementation of the codes varies for each operating system. Below, I have explained the step-by-step process of adding push notification features to your Android and iOS apps in 2 consecutive parts.
Let’s begin the development process:
Part I
Android Push Notifications
The first step of integrating push notifications in an Android device is to integrate Firebase and register for push notification service. In the below steps, I have used Java as the development language. You may also build the feature using other flexible languages like Kotlin.
Integration of Firebase into a Chat Application
- Step 1: Go to Firebase Console
- Step 2: Create a New Project with app package name
com.testapp
- Step 3: Download the google-service.json file
- Step 4: In the app folder of your Android chat app project, add the google-service.json file
- Step 5: Add the firebase dependencies to
build.gradlefile of your project
buildscript {
    repositories {
        // Check that you have the following line (if not, add it):
        google()  // Google's Maven repository
   }
   dependencies {
       classpath 'com.google.gms:google-services:4.3.13' // google-services plugin
   }
}

allprojects {
   repositories {
       // Check that you have the following line (if not, add it):
       google() // Google's Maven repository
   }
}
- Step 6: Apply plugin for your android app and google play services as follows:
apply plugin: 'com.android.application'
apply plugin: 'com.google.gms.google-services'

dependencies {
  implementation platform('com.google.firebase:firebase-bom:30.3.1')
}
Add of Firebase Push notification
- Step 1: In the app level of your
build.gradlefile, add the following FCM dependencies.
implementation 'com.google.firebase:firebase-messaging:23.0.6'- Step 2: In the manifest file, add the following command
<service android:name=".MyFirebaseMessagingService"
         android:exported="false">
    <intent-filter>
        <action android:name="com.google.firebase.MESSAGING_EVENT" />
    </intent-filter>
</service>
- Step 3: To create the
FirebaseMessagingService, create theMyFirebaseMessagingServicefile in the project folder of your app.
public class MyFirebaseMessagingService extends FirebaseMessagingService {
    @Override
    public void onMessageReceived(@NonNull RemoteMessage message) {
        //Push message will be received here when push notification triggered for this device
    }

    @Override
    public void onNewToken(@NonNull String token) {
         //Whenever Device token will get updated/changed this method will be triggered
         PushNotificationManager.updateFcmToken(token, isSuccess, message) -> {

                         });
    }
}
- Step 4: Use the below link to enable the FireBase Cloud Messaging
- Step 5: Go to Cloud Messaging Tab > Project Settings > Project Settings > Copy the FCM API Key.
- Step 6: In the chat server, configure the key to enable the reception of calls and messages from the Chat SDK.

- Step 7: Add the below permissions in the AndroidManifest.xml
<uses-permission
android:name="android.permission.INTERNET" />
<uses-permission
android:name="android.permission.ACCESS_NETWORK_STATE" />- Step 8: Add the device token to the cloud message console.
Integration of Firebase Crashlytics
- Step 1: In the project-level
build.gradle, add the Crashlytics as below:
dependencies {
    // Check for v4.3.3 or higher
    classpath 'com.google.gms:google-services:4.3.13'
    classpath "com.google.firebase:firebase-crashlytics-gradle:2.9.1"
}

allprojects {
    repositories {
       // Add repository
        google()  // Google's Maven repository
    }
}
- Step 2: Next, in the app-level
build.gradle, add Crashlytics as shown below:
apply plugin: 'com.android.application'
apply plugin:  'com.google.firebase.crashlytics'

dependencies {
 // Add dependency
  implementation 'com.google.firebase:firebase-crashlytics:18.2.12'
}
Note: When Crashlytics is added to your application for the first time, it will take more than 12 hours to take effect on the Firebase Crashlytics UI
4. Update the FCM push notification device token
To send push notifications, you need to update the FCM token to the server. Use the below command to perform this step:
PushNotificationManager.updateFcmToken(FCM_TOKEN, isSuccess, message) -> {

        });
5. Handling of the received FCM message
Once you receive a firebase push notification in the FCM service, you can easily identify the push notification for the SDK. Now, you can delegate it to the SDK as follows:
  @Override
    public void onMessageReceived(@NonNull RemoteMessage remoteMessage) {
        super.onMessageReceived(remoteMessage);
        Map<String, String> notificationData = remoteMessage.getData();
        if (!notificationData.isEmpty() && notificationData.containsKey("push_from") && notificationData.get("push_from").equals("MirrorFly"))  {
            LogMessage.d(TAG, "RemoteMessage:" + notificationData.toString());
            PushNotificationManager.handleReceivedMessage(notificationData, new NotificationEventListener() {
                @Override
                public void onMessageReceived() {

                    List<Message> unseenMessagesForNotification = ChatManager.getLastNUnreadMessages(7);

                    for (Message message: unseenMessagesForNotification) {
                        String messageFrom = message.getChatUser();
                        if (!ChatManager.isMuted(messageFrom)) {
                            String senderName = ContactManager.getDisplayName(messageFrom);
                            //for profile pic and other info's of group/user
                             ProfileDetails profileDetails = ContactManager.getProfileDetails(messageFrom);
                            String messageType = message.getMsgType();
                           if (ChatType.TYPE_GROUP_CHAT.equals(message.getChatType())) {
                                //group chat sender user name
                                String groupUser = ContactManager.getDisplayName(message.getGroupChatSender());
                                //for profile pic and other info's of group user
                                ProfileDetails groupUserProfile = ContactManager.getProfileDetails(message.getGroupChatSender());
                            }
                            MessageDetail messageDetail = message.getMsgBody();
                            // get message details from message object and build up your notification
                        }
                    }

                }

                @Override
                public void onGroupNotification(@NotNull String groupJid, @NotNull String titleContent, @NotNull String messageContent) {
                  /* Create the notification for group creation with paramter values */
                }

                @Override
                public void onCancelNotification() {
                 // here you have to cancel notification
                }
            });
        }
        }
6. Get Unread Message Count
To acquire the count of unread messages without excluding the muted messages, use the below command:
ChatManager.getUnreadMessageCountExceptMutedChat()7. Last N Unread Message Count
Use the below method to return the last N unread messages from the SDK. This data can be used to create your own notification.
ChatManager.getLastNUnreadMessages(COUNT);8. Recent N Unread Group Message Count
Use the below method to return the count of recent N unread messages across chat groups.
Map<String, List<ChatMessage>> usersWithMessage = ChatManager.getNUnreadMessagesOfEachUsers(COUNT);Part II
iOS Push Notifications
To receive messages while your app is running in the background or is in the killed state, you need to perform the following steps:
Note: The below steps are constructed using programming Language – Swift
- Register for remote notification by conforming
UNUserNotificationCenterDelegatein theAppDelegate. - When the APNS token gets updated, call the below method:
  // APNS Token Update
    VOIPManager.sharedInstance.saveAPNSToken(token: token)
    VOIPManager.sharedInstance.updateDeviceToken()
- Step 1: Enable App Group ID
To access the user defaults and container database between your app and notification extension.
- Enable the app group
- In the
didReceivemethod of theUNNotificationServiceExtensiondelegate, re-initialize the ChatSDK builder
- Step 2: Processing the Push Notification Request
To process the request further, you need to perform the below step:
- Go to the class that extends the
UNNotificationServiceExtension - Validate whether the received payload is for the Chat or not.
NotificationMessageSupport.shared.didReceiveNotificationRequest("NOTIFICATION_CONTENT", "COMPLETION_BLOCK")How MirrorFly Handles Bulk Push Notifications?
When handling bulk notifications, the chat server may face a common bottleneck of data overload. It may result in delayed response or sometimes, unresponsive service.
MirrorFly adopts the following systems to handle these issues:
- Message Queueing:
Whenever there is a data overload, this messaging architecture queues the push notifications and stores them until they get deleted. To perform this MirrorFly uses a messaging broker named RabbitMQ.
In short, RabbitMQ is a messaging middleware that uses the AMQP protocol (Advanced Message Queuing Protocol) to implement the queueing of notifications. It reduces the load on the XMPP server, whenever there is a huge list of push notifications lined up to be delivered.
- Exchange and Exchange Types
When messages are sent to Exchanges , they pick the messages and route it to the queues. These exchanges are AMQP 0-9-1 entities that support Direct, Fanout, Topic, and Headers exchanges using rules called bindings.
- Binding Rules
The Queue Q has to be bound to Exchange E, if E needs to route messages to Q. In this process, the Exchange types use optional key attributes to filter the messages and route them to the respective queues.
Conclusion
It’s a wrap!
Coming to the closure, I’d like to appreciate your persistence in learning more about push notifications with me along with the article.
To give a quick recap, you learnt about what is a push alert notification, its types, the backend process of how to get push notifications on user devices, and its implementation steps.
While this is adequately sufficient to build an interactive feature into your app, MirrorFly just doesn’t stop here. You can use MirrorFly SDKs to build call muting, archiving, presence indicators, and more.
![]() Atchaya Jayabal leads Content at MirrorFly and is an expert in writing Tech, SaaS & B2B. She regularly publishes articles on CPaaS & Conversational AI in blogs.
Atchaya Jayabal leads Content at MirrorFly and is an expert in writing Tech, SaaS & B2B. She regularly publishes articles on CPaaS & Conversational AI in blogs.
Like!! Thank you for publishing this awesome article.