This tutorial will discuss how to use MirrorFly SDKs to build an Android chat app using Java and Kotlin, in the Android Studio IDE.
Before you start, make sure you have:
Let’s get started!
Explore More Features Here
The first step in the integration process is to prepare your app for the integration process.
If you have decided on integrating MirrorFly SDKs, a good starting point would be setting up your app. You may directly try our features into your existing app or make use of our sample app available for instant access.
Click here to download our sample app
Once the app is set up, you will need MirrorFly SDK License Key for the integration process.
If you are an existing user,
If you are a new user, sign up for a free account with MirrorFly.
Step 1 : In the Registration Page, fill in your basic information
Step 2 : Click on the Signup button.
Step 3 : This will take you to the Account Overview page
Step 4 : Note down the License Key under the Application Info Section
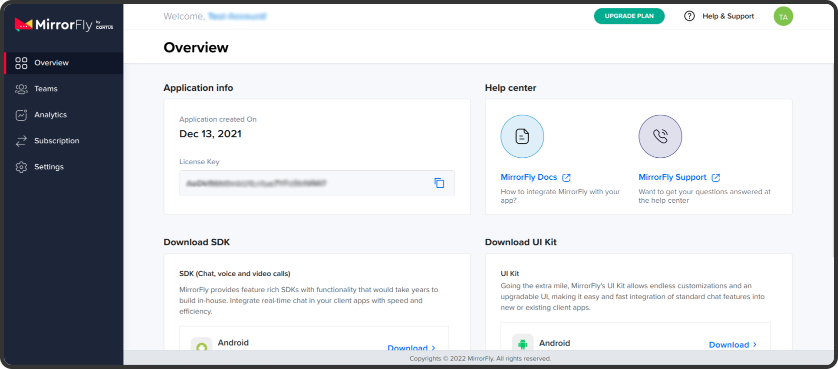
Step 5 : Scroll down to the Download SDK section
Step 6 : Click on the Download button
Step 7 : Your download will begin shortly
Step 8 : The downloaded ZIP folder will contain a set of AAR filesThese files constitute a sample app, SDK files and UI Kit needed for integrating chat into your Android app
Now that you have completed the initial preparation, the next step is to start with the SDK integration process.
Step 1 : Android Studio IDE
Step 2 : Create a new project or Open an existing project
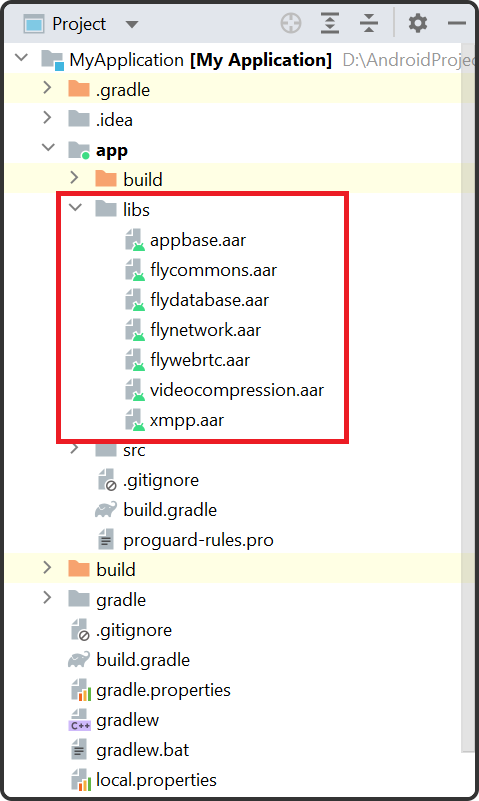
Step 3 : Add the following libraries to your project:
                   appbase.aar
                   flycommons.aar
                   flynetwork.aar
                   flydatabase.aar
                   videocompression.aar
                   xmpp.aar
Step 4 : Configure the methods compileOptions, kotlinOptions and packagingOptions in the app/build.gradle file
                plugins {
                     ...
                     id 'kotlin-android'
                     id 'kotlin-kapt'
                }

                 android {
                                compileOptions {
                                sourceCompatibility JavaVersion.VERSION_1_8
                                targetCompatibility JavaVersion.VERSION_1_8
                        }

                        kotlinOptions {
                            jvmTarget = '1.8'
                            }

                            packagingOptions {
                                exclude 'META-INF/AL2.0'
                                exclude 'META-INF/DEPENDENCIES'
                                exclude 'META-INF/LICENSE'
                                exclude 'META-INF/LICENSE.txt'
                                exclude 'META-INF/license.txt'
                                exclude 'META-INF/NOTICE'
                                exclude 'META-INF/NOTICE.txt'
                                exclude 'META-INF/notice.txt'
                                exclude 'META-INF/ASL2.0'
                                exclude 'META-INF/LGPL2.1'
                                exclude("META-INF/*.kotlin_module")
                             }
                       }
Step : 5 Add the following dependencies in the app/build.gradle file.
                     dependencies {
                     ... // your app dependencies
                    implementation files('libs/appbase.aar')
                    implementation files('libs/flycommons.aar')
                    implementation files('libs/flynetwork.aar')
                    implementation files('libs/flydatabase.aar')
                    implementation files('libs/videocompression.aar')
                    implementation files('libs/xmpp.aar')
                    }
Step 6 : Call the following classes in the app/build.gradle file:
                    dependencies {

                        ... // your app dependencies

                         configurations {
                             all {
                                exclude group: 'org.json', module: 'json'
                                 exclude group: 'xpp3', module: 'xpp3'
                                }
                                 }

                                //For lifecycle listener
                                implementation 'android.arch.lifecycle:extensions:1.1.1'
                                annotationProcessor 'android.arch.lifecycle:compiler:1.1.1'

                                //For GreenDao
                                implementation 'de.greenrobot:greendao:2.1.0'

                                //For gson parsing
                                implementation 'com.google.code.gson:gson:2.8.1'

                                //for smack implementation
                                implementation 'org.igniterealtime.smack:smack-android:4.4.4'
                                implementation 'org.igniterealtime.smack:smack-tcp:4.4.4'
                                implementation 'org.igniterealtime.smack:smack-im:4.4.4'
                                implementation 'org.igniterealtime.smack:smack-extensions:4.4.4'
                                implementation 'org.igniterealtime.smack:smack-sasl-provided:4.4.4'

                                implementation 'androidx.localbroadcastmanager:localbroadcastmanager:1.0.0'
                                implementation 'androidx.multidex:multidex:2.0.1'
                                implementation 'com.google.android.gms:play-services-location:17.0.0'

                                //Dagger Dependencies
                                api 'com.google.dagger:dagger:2.40.5'
                                kapt 'com.google.dagger:dagger-compiler:2.40.5'
                                api 'com.google.dagger:dagger-android:2.40.5'
                                api 'com.google.dagger:dagger-android-support:2.40.5'
                                kapt 'com.google.dagger:dagger-android-processor:2.40.5'

                                //coroutines
                                implementation 'org.jetbrains.kotlinx:kotlinx-coroutines-android:1.3.3'
                                implementation 'org.jetbrains.kotlinx:kotlinx-coroutines-test:1.3.3'

                                //apicalls
                                implementation 'com.squareup.retrofit2:retrofit:2.6.1'
                                implementation 'com.squareup.retrofit2:converter-gson:2.6.1'
                                 implementation 'com.squareup.okhttp3:okhttp:4.2.0'
                                implementation 'com.jakewharton.retrofit:retrofit2-kotlin-coroutines-adapter:0.9.2'

                                //stetho interceptor
                                implementation 'com.facebook.stetho:stetho-okhttp3:1.3.1'

                                //okhttp interceptor
                                implementation 'com.squareup.okhttp3:logging-interceptor:3.14.3'

                                //shared preference encryption
                                implementation 'androidx.security:security-crypto:1.1.0-alpha03'

                                 }
Step 7 : to avoid library conflicts, add the below line in the gradle.properties file
                       <uses-permissionuses-permission android:name="android.permission.INTERNET" />
                       <uses-permission android:name="android.permission.ACCESS_NETWORK_STATE" />
Step 8 : In the AndroidManifest.xml manifest, add the following permissions
                         <uses-permission android:name="android.permission.INTERNET" />
                         <uses-permission android:name="android.permission.ACCESS_NETWORK_STATE" />
To configure the MirrorFly Chat SDK in your Android app, add the following into the app/build.gradle file:
                  buildTypes {
                    debug {
                         buildConfigField 'String', 'SDK_BASE_URL', '"https://api-preprod-sandbox.mirrorfly.com/api/v1/"'
                         buildConfigField 'String', 'LICENSE', '"xxxxxxxxxxxxxxxxxxxxxxxxx"'
                         buildConfigField 'String', 'WEB_CHAT_LOGIN', '"https://webchat-preprod-sandbox.mirrorfly.com/"'
                         buildConfigField "String", "SUPPORT_MAIL", '"contussupport@gmail.com"'
                         }
                         }
To initialize the Chat SDK,
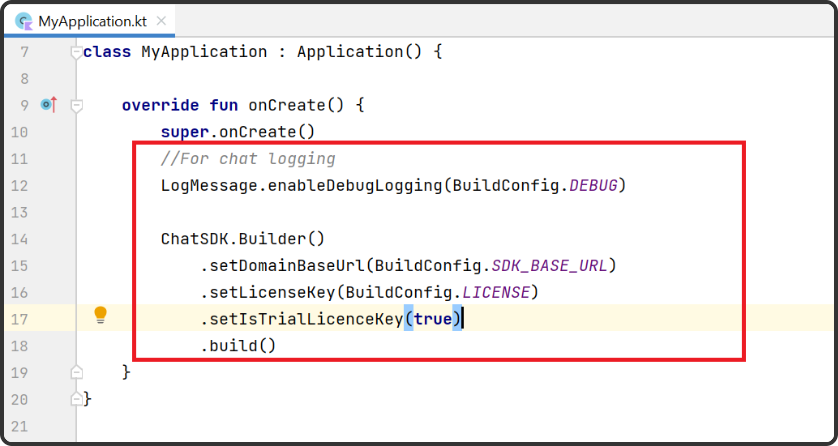
Step 1 : Navigate to your Application class
Step 2 : In the onCreate() method, use the following ChatSDK Builder
                                //For chat logging
                                LogMessage.enableDebugLogging(BuildConfig.DEBUG);
                                ChatSDK.Builder()
                                .setDomainBaseUrl(BuildConfig.SDK_BASE_URL)
                                .setLicenseKey(BuildConfig.LICENSE)
                                .setIsTrialLicenceKey(true)
                                .build();
                                //For chat logging
                                LogMessage.enableDebugLogging(BuildConfig.DEBUG)
                                ChatSDK.Builder()
                                .setDomainBaseUrl(BuildConfig.SDK_BASE_URL)
                                .setLicenseKey(BuildConfig.LICENSE)
                                .setIsTrialLicenceKey(true)
                                .build()
To run the app, we will need a user registered to the App. Use the below method to create an user in the sandbox live mode, based on the setIsTrialLicenceKey provided.
                                           FlyCore.registerUser(USER_IDENTIFIER, (isSuccess, throwable, data ) -> {
                                            if(isSuccess) {
                                            JSONObject responseObject = (JSONObject) data.get("data");
                                            // Get Username and password from the object
                                            } else {
                                                // Register user failed print throwable to find the exception details.
                                                }
                                                });
                            FlyCore.registerUser(USER_IDENTIFIER) { isSuccess, throwable, data ->
                                if(isSuccess) {
                                    val responseObject = data.get("data") as JSONObject
                                    // Get Username and password from the object
                                    } else {
                                        // Register user failed print throwable to find the exception details.
                                         }
                                         }
Once an user is registered, the app must establish a connection with the server to initialize the chat connection. This process will implement the capability of sending and receiving messages from one user to another.
| Argument | Type | Description |
|---|---|---|
| CALLBACK | ChatConnectionListener | callback listener for chat connection |
                                        ChatManager.connect(new ChatConnectionListener() {
                                            @Override
                                            public void onConnected() {
                                                // Write your success logic here to navigate Profile Page or
                                                // To Start your one-one chat with your friends
                                                }
                                                @Override
                                                public void onDisconnected() {
                                                    // Connection disconnected
                                                    //No need implementations
                                                    }

                                                    @Override
                                                     public void onConnectionNotAuthorized() {
                                                        // Connection Not authorized
                                                        //No need implementations
                                                        }
                                                        });
                            ChatManager.connect(object : ChatConnectionListener {
                                override fun onConnected() {
                                    // Write your success logic here to navigate Profile Page or
                                    // To Start your one-one chat with your friends
                                    }

                                    override fun onDisconnected() {
                                        // Connection disconnected
                                        //No need implementations
                                        }

                                        override fun onConnectionNotAuthorized() {
                                            // Connection Not authorized
                                            //No need implementations
                                            }
                                            })
The below method is used to send the messages. For this, we will need a unique user ID. Call the other user's username method String userJID = FlyUtils.getJid(USERNAME) to generate the unique user ID.
| Argument | Type | Description |
|---|---|---|
| USER_IDENTIFIER | String | JID of the end user |
| TEXT | String | Indicates the text message that needs to be sent |
| REPLY_MESSAGE_ID | String | Specifies the Message ID of replied message |
| CALLBACK | SendMessageListener | callback to observe the action status |
                                    FlyMessenger.sendTextMessage(TO_JID, TEXT, new SendMessageListener() {
                                        @Override
                                        public void onResponse(boolean isSuccess, @Nullable ChatMessage chatMessage) {
                                            // you will get the message sent success response
                                            }
                                            });
                            FlyMessenger.sendTextMessage(TO_JID, TEXT, listener = object : SendMessageListener {
                                override fun onResponse(isSuccess: Boolean, chatMessage: ChatMessage?) {
                                    // you will get the message sent success response
                                    }
                                    })
Observe all the incoming messages and other feature listeners by extending the FlyBaseActivity from SDK into your app BaseActivity
public class MainActivity extends FlyBaseActivity { }
class MainActivity : FlyBaseActivity()
Only when the other user sends a message and is received at the user’s end, the listeners will be called.
                            @Override
                             public void onMessageReceived(@NonNull ChatMessage message) {
                                super.onMessageReceived(message);
                                // received message object
                                }
                            override fun onMessageReceived(message: ChatMessage) {
                                super.onMessageReceived(message)
                                // received message object
                                }
It’s a wrap! You now know how to build a fully functional Android Chat App. We hope this tutorial has provided you with a detailed insight into the steps in building your app, with the help of MirrorFly SDKs.
Further, we recommend you to check MirrorFly Tutorials Page for more inspiration and ideas for your upcoming app projects. Best of luck with your development!
Add chat features to your Flutter apps - in 10 minutes - with just a few lines of code.
Request DemoDrive 1 billion + conversations on any Android, iOS, or Web app with 500+ chat features & 100+ UI components.