Let's Integrate our Android Chat SDK in a Few Minutes
Quick Start#
warning
MirrorFly Chat SDK V1 is no longer supported as a new version is released. Check out our latest Chat SDK V2 here.
To migrate from MirrorFly Chat SDK V1 to V2 please follow the Migration guide steps.
Chat SDKs for Android#
With CONTUS MirrorFly Chat SDK for Android, you can easily add real-time chat features to your client app within 30 minutes.
Through our client SDK, you can initialize and configure chat into your app with minimal efforts.
Note : If you're looking for the fastest way to build your app’s UI with MirrorFly Chat SDKs, you can use our sample apps. To get our sample apps, click here
Integrate the Chat SDK#
Requirements#
The requirements for chat SDK for Android are:
- Android Lollipop 5.0 (API Level 21) or above
- Java 7 or higher
- Gradle 4.1.0 or higher
Things To Be Noted Before You Get Started#
SDK License Key#
To integrate MirrorFly Android Chat SDK into your app, you will need an SDK License Key. The MirrorFly server will use this license key to authenticate the SDK in your app.
To get the License Key,#
Step 1: Register here to get a MirrorFly User account. Registration is subject to verification and would take up to 24 hours.
Step 2: Login to your Account
Step 3: Get the License key from the application Info’ section
Step 4: Download the Android SDK
Getting Started#
As soon as the AAR files have been imported from the zip file using Kotlin, you can start over with the integration process.
Step 1: Create a new project or Open an existing project in Android Studio
Step 2: Add the following libraries in app/libs folder in the project
- appbase.aar
- flycommons.aar
- flynetwork.aar
- flydatabase.aar
- videocompression.aar
- xmpp.aar

Step 3: Add the below code in the app/build.gradle file.
Step 4: Add the following dependencies in the app/build.gradle file.
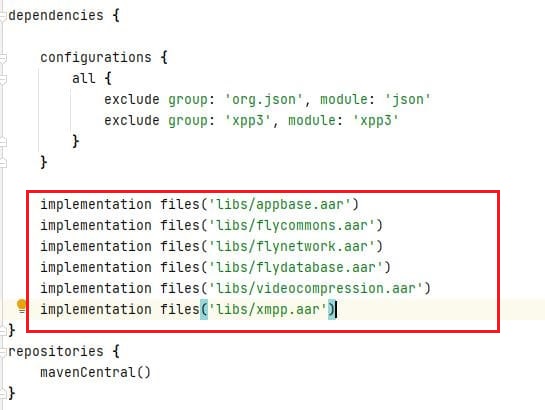
Step 5: Add the below dependencies required by the SDK in the app/build.gradle file.
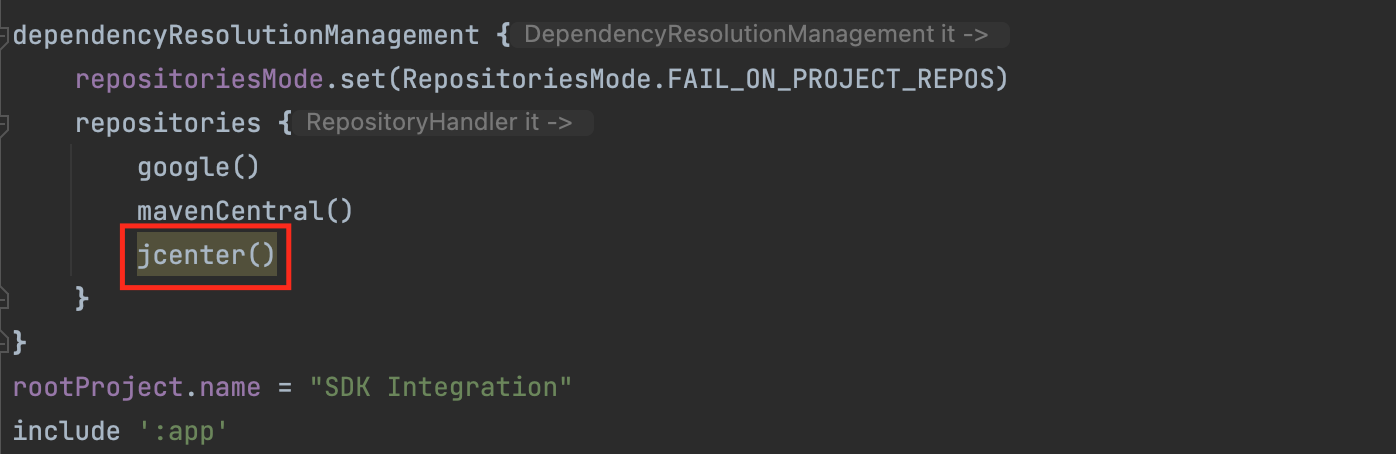
Step 6: Add the below line in the project level build.gradle file, to resolve library dependencies.
Step 7: Add the below line in the gradle.properties file, to avoid imported library conflicts.
Step 8: Open the AndroidManifest.xml and add below permissions.
Configure in app/build.gradle file#
You can copy the license key from the 'Overview’ section in the Console dashboard.
Initialize Chat Android SDK#
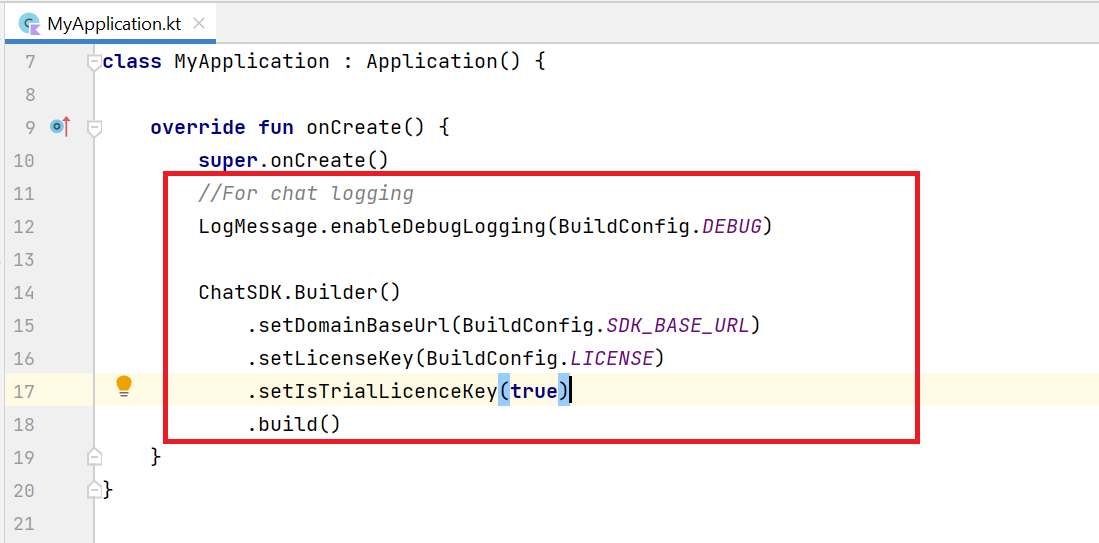
To start using the sdk, there is a need for some basic requirements before proceeding with the initialization process. Thus, the ChatSDK builder class is used to provide the necessary data to the SDK. In your Application class, inside the onCreate() method use the below ChatSDK Builder to provide the necessary data.
- Java
- Kotlin
Chat Builder Function Description#
| Function | Parameter Type | Description |
|---|---|---|
| setDomainBaseUrl | String | Url is provided to make API calls |
| setLicenseKey | String | License key is required to proceed with registration |
| setIsTrialLicenceKey | boolean | If the provided license key is for trial version, display the text as ‘true’ else ‘false’ |
| build | n/a | Initializes the chat configuration |
caution
The base URL must have the Http/Https protocol which must be closed with a ‘slash (/)’, if not an exception - a bug message will pop up.
Registration#
The below method to register a user in sandbox Live mode based on setIsTrialLicenceKey provided.
info
Unless you log out the session, make a note that should never call the registration method more than once in an application
Note: While registration, the below
registerUsermethod will accept theFCM_TOKEN,USER_TYPEandFORCE_REGISTERas an optional param and pass it across.
- Java
- Kotlin
| Argument | Type | Description |
|---|---|---|
| USER_IDENTIFIER | String | A unique Id to Register the User. We accept only the AlphaNumeric String |
| FCM_TOKEN | String | A registration token that is generated by FCM SDK for the user's app instance to send message for free |
| FORCE_REGISTER | boolean | default value true provide true to force the logout of the old session If the registered user has reached the maximum no of multi-sessions or provide false to allow registration till the maximum no of multi-sessions |
| USER_TYPE | String | type of the user |
| CALLBACK | FlyCallback | FlyCallback is used as a callback, implemented and expressed as lambda expression for easy reading |
caution
If FORCE_REGISTER is false and it reached the maximum no of multi-sessions then registration will not succeed it will throw a 405 exception, Either FORCE_REGISTER should be true or one of the existing session need to be logged out to continue registration.
Connect to the Chat Server#
In order to send messages using the Chat SDK, at first you need to establish the connection to the server. SDK provides methods for initialize the chat connection.
Note: The ChatManager.connect() method should be called only once in an application. SDK will handle the chat server connection and disconnection automatically.
- Java
- Kotlin
| Argument | Type | Description |
|---|---|---|
| CALLBACK | ChatConnectionListener | callback listener for chat connection |
Terminology#
Some of the most common terminologies used in Chat SDK with description
| keyword | Explanation |
|---|---|
| userID/userBareID | Unique ID assigned for each user Ex: 12345678 (any alphanumeric). The below characters is not allowed in userId: U+0022 (") U+0026 (&) U+0027 (') U+002F (/) U+003A (:) U+003C (<) U+003E (>) U+0040 (@) userID should follow below specification: https://xmpp.org/extensions/xep-0106.html |
| userJid (or) JID | userID+@+domain of the chat server Ex. 12345678@xmpp.chatsystem.dev.contus.us |
| groupID/groupBareID | Unique ID assigned for each group Ex: group123456 (any alphanumeric). GroupJID = groupID +@mix.+domain of the chat server Ex: group123456@mix.xmpp.mirrorfly.dev.contus.us` |
info
SDK will have built-in functions to prepare the JID, Group JID, and more.
Send a One-to-One Message#
Use the below method to send a text message to other user,
Note: To generate a unique user id, you must call the other user's
usernamemethodString userJID = FlyUtils.getJid(USERNAME)
- Java
- Kotlin
| Argument | Type | Description |
|---|---|---|
| TO_JID | String | JID of the end user |
| TEXT | String | Indicates the text message that needs to be sent |
| REPLY_MESSAGE_ID | String | Specifies the Message ID of replied message |
| CALLBACK | SendMessageListener | callback to observe the action status |
Receive a One-to-One Message#
You can extend the FlyBaseActivity from SDK into your app BaseActivity, and observe all the incoming messages and other feature listeners.
- Java
- Kotlin
Moreover, here the listeners would be called only when a new message is received from other user. To get more details please visit this callback listeners
- Java
- Kotlin