In this tutorial, you will learn how to add 500+ chat features to your apps using Flutter. We will use MirrorFly SDK to add the features to your app in less than 20 mins.
Let’s get started!
To start the development, you will need the following requirements:
Step 1 : Signup for a MirrorFly account
Step 2 : Verify your account via your registered email
Step 3 : Log into your account
Step 4 : Go to the ‘Application info’ section in your Account Overview
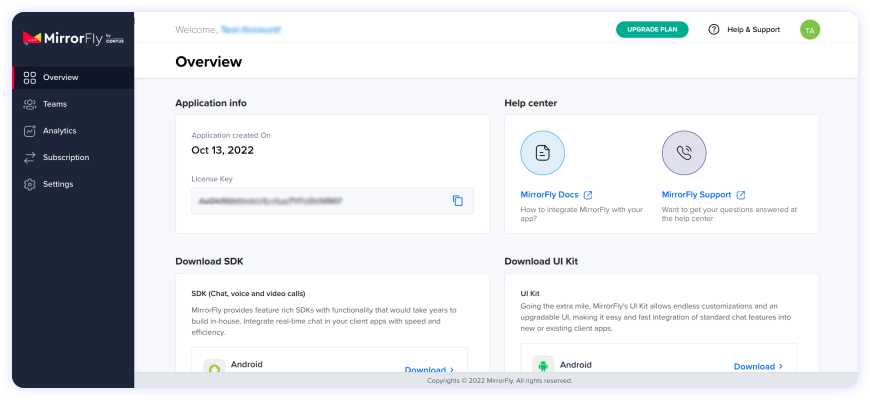
Note down the License key, which will be used to authenticate your SDK to the server.
Android Dependencies:
                   allprojects {
                        repositories {
                            google()
                           mavenCentral()
                           jcenter()
                           maven {
                                 url "https://repo.mirrorfly.com/release"
                           }
                        }
                      }
                      android {
                      packagingOptions {
                      exclude 'META-INF/AL2.0'
                      exclude 'META-INF/DEPENDENCIES'
                      exclude 'META-INF/LICENSE'
                      exclude 'META-INF/LICENSE.txt'
                      exclude 'META-INF/license.txt'
                      exclude 'META-INF/NOTICE'
                      exclude 'META-INF/NOTICE.txt'
                      exclude 'META-INF/notice.txt'
                      exclude 'META-INF/ASL2.0'
                      exclude 'META-INF/LGPL2.1'
                      exclude("META-INF/*.kotlin_module")
                      }
                   }
iOS Dependencies:
                      post_install do |installer|
                         installer.pods_project.targets.each do |target|
                            flutter_additional_ios_build_settings(target)
                            target.build_configurations.each do |config|
                               config.build_settings['IPHONEOS_DEPLOYMENT_TARGET'] = '12.1'
                               config.build_settings['ENABLE_BITCODE'] = 'NO'
                               config.build_settings['APPLICATION_EXTENSION_API_ONLY'] = 'No'
                               config.build_settings['BUILD_LIBRARY_FOR_DISTRIBUTION'] = 'YES'
                               config.build_settings["EXCLUDED_ARCHS[sdk=iphonesimulator*]"] = "arm64"
                            end
                         end
end Goto Project -> Target -> Signing & Capabilities -> Click + at the top left corner -> Search for ‘App Groups’ 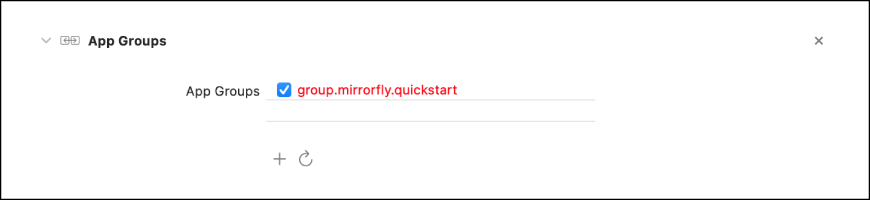
Flutter Dependencies:
dependencies: mirrorfly_plugin: ^0.0.13 import 'package:mirrorfly_plugin/mirrorfly.dart';
                   void main() {
                      WidgetsFlutterBinding.ensureInitialized();
                      Mirrorfly.initializeSDK(
                         licenseKey: LICENSE_KEY,
                         iOSContainerID: iOS_APP_GROUP_ID,
                         chatHistoryEnable: ENABLE_CHAT_HISTORY);
                      runApp(const MyApp());
                   }
                   Mirrorfly.registerUser(userIdentifier).then((value) {
                   // you will get the user registration response
                   var userData = registerModelFromJson(value);
                   }).catchError((error) {
                      // Register user failed print throwable to find the exception details.
                      debugPrint(error.message);
                   });
var userJid = await Mirrorfly.getJid(username);
                   Mirrorfly.sendTextMessage(message, jid).then((value) {
                      // you will get the message sent success response
                      var chatMessage = sendMessageModelFromJson(value);
                   });
                   Mirrorfly.onMessageReceived.listen(result){
                      // you will get the new messages
                      var chatMessage = sendMessageModelFromJson(result)
                   }
To conclude, by now you would have known how to use MirrorFly's Flutter Chat SDKs to add messaging functionalities to your Android apps.
Apart from chat, MirrorFly's SDK also lets you integrate voice and video calling capabilities to your mobile and web apps easily.
If you are ready to get started with our Flutter SDKs, we suggest a few tutorials:
Hope you find this tutorial helpful. Happy developing!
Add chat features to your Flutter apps - in 10 minutes - with just a few lines of code.
Request DemoHere's how you can easily implement real-time chats in Flutter:
Step 1 : Get your license key after signing up with MirrorFly
Step 2 : Download the Flutter chat SDK package
Step 3 : Create a new project and add dependencies
Step 4 : Initialize the MirrorFly plugin
Step 5 : Register a user
Step 6 : Add required chat features
Step 7 : Test and deploy.
Flutter chat usually includes the following components; chat interface, message rendering, user authentication, chat window, notification handling, backend integration, user presence, and several others.
Surprisingly, the Flutter framework can be used for both backend and frontend development. But in most of the development scenarios, Flutter is preferred for building intuitive and interactive UIs for web and mobile apps.
The real-time chat plugin in Flutter is used by developers to add instant messaging features to Flutter apps. Upon successfully adding this plugin to chat apps, users can send messages, images, and other multimedia content to their peers in real-time.
Yes. Flutter comes as a good option for designing chat UIs as it provides developers with a rich suite of customizable widgets and libraries to build stunning chat interfaces. Additionally, Flutter being a cross-platform compatible framework, you can design UI once and share it across other platforms.
Get Started with MirrorFly SDK and Improve your overall in-app conversion, engagement, and retention.