Let's Integrate our Audio & Video Call SDKs for Android App
Quick Start#
warning
MirrorFly Chat SDK V1 is no longer supported as a new version is released. Check out our latest Chat SDK V2 here.
To migrate from MirrorFly Chat SDK from V1 to V2 please follow the Migration guide steps.
Audio/Video Call SDKs for Android#
With MirrorFly Voice & Video Room SDK for Android, you can easily add real-time call features to your client app within 10 minutes.
Through our client SDK, you can initialize and configure call into your app with minimal efforts.
Note : If you're looking for the fastest way to build your audio room app's + UIKit with MirrorFly Audio Call SDKs, you can use our sample apps. To get our sample apps, To build your app in 10 mins, integrate MirrorFly Audio call SDK + UI Kit into our pre-built Sample App. click here
Integrate the Voice & Video Call SDK#
Requirements#
To build your Android app with MirrorFly Video Call SDK + Audio room, you’ll need the following:
- Android Lollipop 5.0 (API Level 21) or above
- Java 7 or higher
- Gradle 4.1.0 or higher
Things To Be Noted Before You Get Started#
SDK License Key#
caution
Skip this step if you are already having your license key.
To integrate MirrorFly Kotlin Audio SDK into your app, you will need an SDK License Key. The MirrorFly server will use this license key to authenticate the SDK in your application.
To get the License Key,#
Step 1: Register here to get a MirrorFly User account. Registration is subject to verification and would take up to 24 hours.
Step 2: Login to your Account
Step 3: Get the License key from the application Info’ section
Step 4: Download the Android SDK
Getting Started#
The SDK is already compiled into an AAR file. To use the SDK, the below AAR file has to be imported into the project. To start integrating the SDK's, follow the below steps. If you already integrated the chat sdk initialization only takes adding few additional changes to chat sdk. Call sdk needs kotlin support in your project.
Step 1: Create a new project or Open an existing project in Android Studio
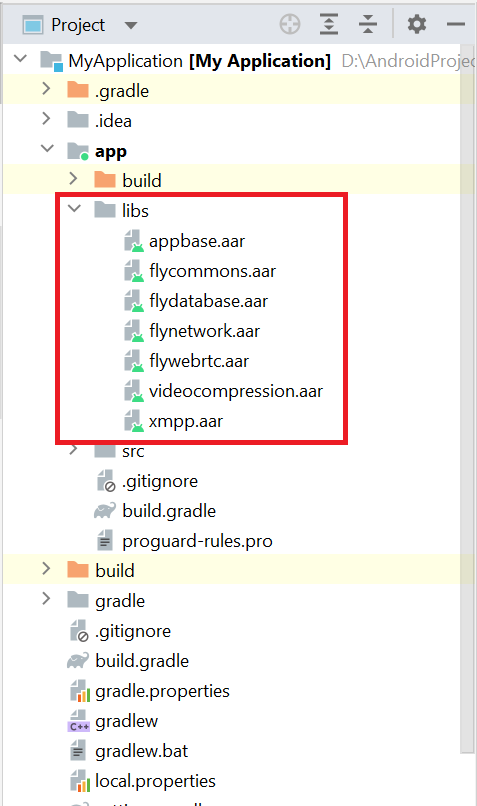
Step 2: Add the following libraries in app/libs folder in the project
- appbase.aar
- flycommons.aar
- flynetwork.aar
- flydatabase.aar
- videocompression.aar
- xmpp.aar
- flywebrtc.aar

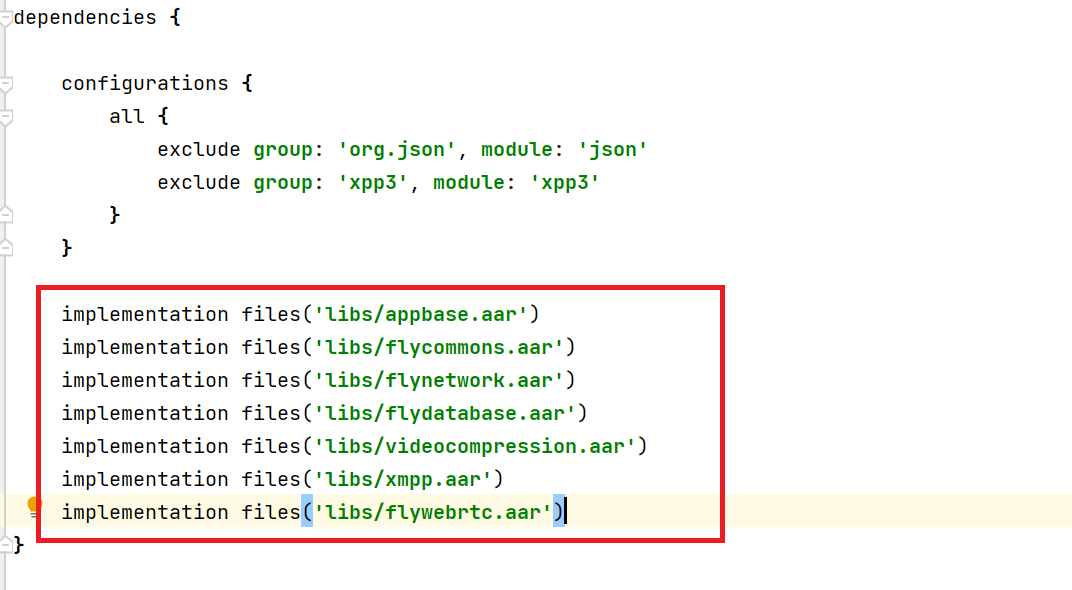
Step 3: Add the below code in the app/build.gradle file.
Step 4: Add the following dependencies in the app/build.gradle file.

Step 5: Add the below dependencies required by the SDK in the app/build.gradle file.
Step 6: Add the below line in the gradle.properties file, to avoid imported library conflicts.
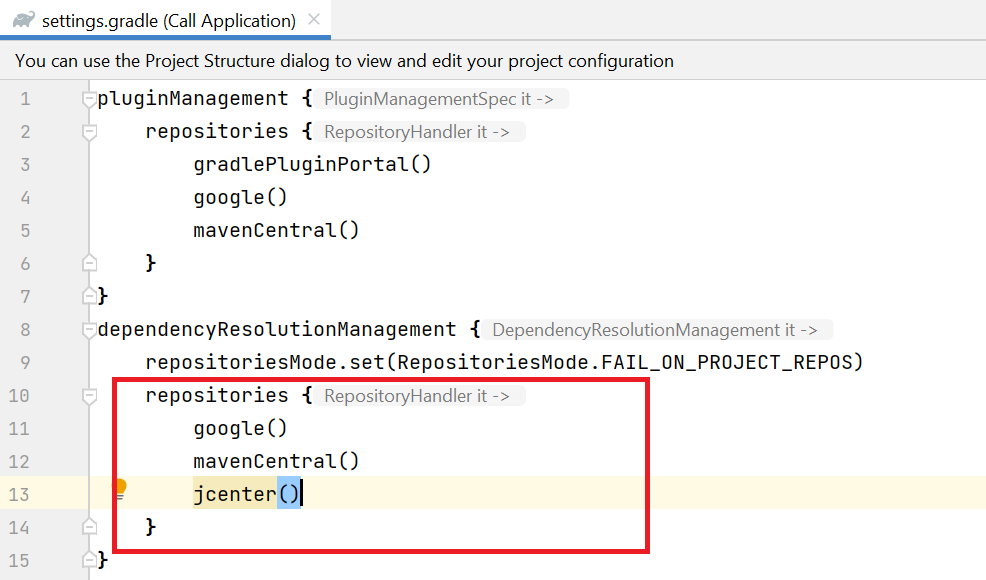
Step 7: Add the below line in the setting.gradle file, To resolve webrtc dependencies.

Step 8: Open the AndroidManifest.xml and add below permissions.
Configure in app/build.gradle file#
You can copy the license key from the 'Overview’ section in the Console dashboard.
Initialize Data for Calls#
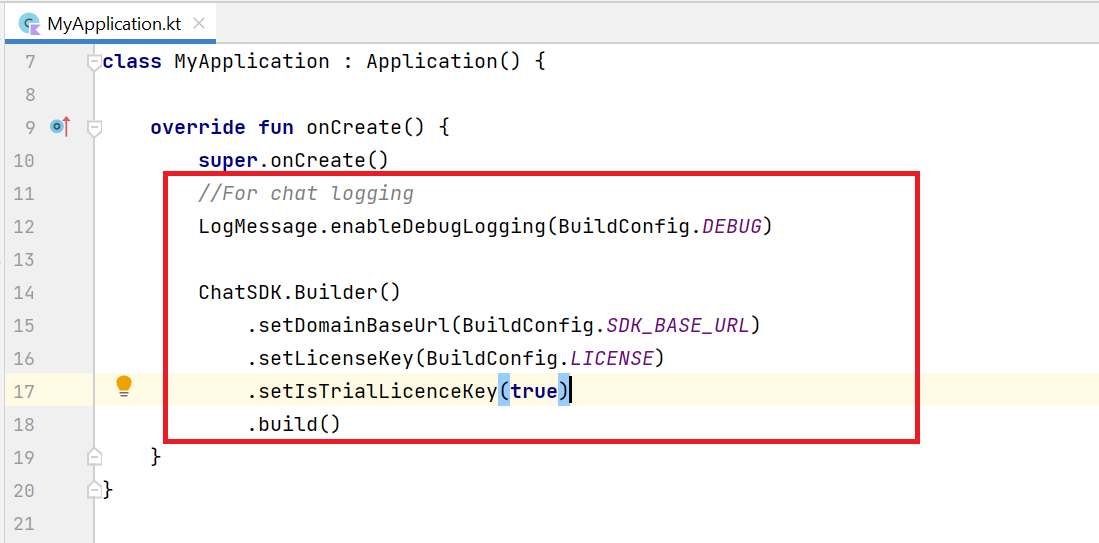
To start using the call sdk, there are few data that were critical for the Calls SDK to function properly. For which we make use of the ChatSDK builder class to provide data to Calls SDK. In your Application class, inside the onCreate() method use the below ChatSDK Builder to provide the necessary data. An example can be found below.

- Java
- Kotlin
Chat Builder Function Description#
| Function | Parameter Type | Description |
|---|---|---|
| setDomainBaseUrl | String | Url is provided to make API calls |
| setLicenseKey | String | License key is required to proceed with registration |
| setIsTrialLicenceKey | boolean | If the provided license key is for trial version, display the text as ‘true’ else ‘false’ |
| build | n/a | Initializes the chat configuration |
caution
The base URL must have the Http/Https protocol which must be closed with a ‘slash (/)’, if not an exception - a bug message will pop up.
Registration#
caution
Skip this step if you are already completed the Registration in your application.
The below method to register a user in sandbox Live mode based on setIsTrialLicenceKey provided.
info
Unless you log out the session, make a note that should never call the registration method more than once in an application
Note: While registration, the below
registerUsermethod will accept theFCM_TOKEN,USER_TYPEandFORCE_REGISTERas an optional param and pass it across.
- Java
- Kotlin
| Argument | Type | Description |
|---|---|---|
| USER_IDENTIFIER | String | A unique Id to Register the User. We accept only the AlphaNumeric String |
| FCM_TOKEN | String | A registration token that is generated by FCM SDK for the user's app instance to send message for free |
| FORCE_REGISTER | boolean | default value true provide true to force the logout of the old session If the registered user has reached the maximum no of multi-sessions or provide false to allow registration till the maximum no of multi-sessions |
| USER_TYPE | String | type of the user |
| CALLBACK | FlyCallback | FlyCallback is used as a callback, implemented and expressed as lambda expression for easy reading |
caution
If FORCE_REGISTER is false and it reached the maximum no of multi-sessions then registration will not succeed it will throw a 405 exception, Either FORCE_REGISTER should be true or one of the existing session need to be logged out to continue registration.
Connect to the Chat Server#
caution
Skip this step if you are already connected to the Chat server in your application.
In order to send messages using the Chat SDK, at first you need to establish the connection to the server. SDK provides methods for initialize the chat connection.
Note: The ChatManager.connect() method should be called only once in an application. SDK will handle the chat server connection and disconnection automatically.
- Java
- Kotlin
| Argument | Type | Description |
|---|---|---|
| CALLBACK | ChatConnectionListener | callback listener for chat connection |
Terminology#
Some of the most common terminologies used in Chat SDK with description
| keyword | Explanation |
|---|---|
| userID/userBareID | Unique ID assigned for each user Ex: 12345678 (any alphanumeric). The below characters is not allowed in userId: U+0022 (") U+0026 (&) U+0027 (') U+002F (/) U+003A (:) U+003C (<) U+003E (>) U+0040 (@) userID should follow below specification: https://xmpp.org/extensions/xep-0106.html |
| userJid (or) JID | userID+@+domain of the chat server Ex. 12345678@xmpp.chatsystem.dev.contus.us |
| groupID/groupBareID | Unique ID assigned for each group Ex: group123456 (any alphanumeric). GroupJID = groupID +@mix.+domain of the chat server Ex: group123456@mix.xmpp.mirrorfly.dev.contus.us` |
info
SDK will have built-in functions to prepare the JID, Group JID, and more.
Initialize Call SDK#
In your Application class, inside the onCreate() method add the below lines:
| Argument | Type | Description |
|---|---|---|
| CALL_UI_ACTIVITY | Class | Activity which needs to be invoked during incoming call. when a incoming call is received Call sdk will start this activity with the call details |
- Java
- Kotlin
Note:
setCallNameHelperis optional, if it is not configured then user name will be empty in theincommingandongoingcall notification. Note:sendCallMessagemethod is used to send initial calling payload to the callee
Setup your call activity#
Call UI Activity should be defined like below in your manifest
You need to call the below method on your call activityonCreate() to configure the call activity.
- Java
- Kotlin
| Argument | Type | Description |
|---|---|---|
| ACTIVITY | Activity | instance of the call activity |
You need to call the below method on onStart() from your call activity to notify
the call sdk to remove the ongoing call notification.
- Java
- Kotlin
You need to call the below method on onStop() from your call activity to notify
the call sdk to show the ongoing call notification.
- Java
- Kotlin
Make a call#
Call feature is essential for the modern day communication. Call sdk allows users to make a one to one audio/video call with the another sdk user.
Note: You need to check the required runtime permissions before calling call sdk methods. if required permissions are not available
isSuccesswill befalseand error message will be given in callback.
Required runtime permissions#
For audio call, we need a below permissions:
You can use the below method to check audio call permissions:
- Java
- Kotlin
From Android 12, ensure that
android.permission.BLUETOOTH_CONNECTandandroid.permission.READ_PHONE_STATEruntime permissions are granted for your app for seameless audio routing and gsm call handling. If theandroid.permission.BLUETOOTH_CONNECTpermission is not granted, call audio will not be routed to BT Headset even though it is connected. If theandroid.permission.READ_PHONE_STATEpermission is not granted, gsm call related functionalities will not work in sdk.
Note: From Android 13, CallSDK need below permission to show ongoing call notification.
You can use the below method to check call notification permission:
- Java
- Kotlin
Make a voice call#
Make voice call feature allows users to make a one to one audio call with the another sdk user. You can make a voice call using the below method.
- Java
- Kotlin
| Argument | Type | Description |
|---|---|---|
| TO_JID | String | jid of the call receiver |
| CALLBACK | CallActionListener | callback to observe the action status |
caution
If one to one call feature unavailable for your plan then it will throw 403 exception.
Receive a call#
Whenever you receive the audio call from the another sdk user, call sdk will show notification if device android
version is greater than or equal to Android 10 (API level 29), otherwise the activity which you set using the
CallManager.setCallActivityClass() method during call sdk initialisation will be started with the call details.
sample call ui will be available for quick integration.
caution
Please don't forget to set activity class for call sdk using CallManager.setCallActivityClass().
Answer the call#
Whenever you receive the audio call from the another sdk user, depending upon the android version, you activity may be started so whenever user presses accept button from your call UI , you need to call the below sdk method to answer the call and notify the caller.
Note: if the required permissions are not available then call be will be automatically declined even though you answered a call
| Argument | Type | Description |
|---|---|---|
| CALLBACK | CallActionListener | callback to observe the action status |
- Java
- Kotlin
Decline the call#
Whenever you receive the audio call from the another sdk user, depending upon the android version, you activity may be started so whenever user presses decline button from your call UI , you need to call the below sdk method to decline the call and notify the caller.
- Java
- Kotlin
Disconnect the ongoing call#
Whenever you make the audio call to the another sdk user and you just want to disconnect the call before getting connected or if you want to just disconnect a connected call after the end of conversation, whenever user presses the disconnect button from your call UI , you need to call the below sdk method to disconnect the call and notify the caller.
Note: The below method accepts
CallActionListeneras a optional paramter. you can pass the listener to get disconnect success callback
- Java
- Kotlin