Chat apps are becoming so popular in the market, especially after the Covid-19 situation. In particular, many companies have started to use their own apps for internal communication, with the rising remote work culture. As the demand for custom communication apps are increasing, this is a great time to learn how to build a chat app, all by yourself!
Since Google announced Kotlin as its official language, many companies have started to switch to this technology for various reasons including interoperability with Java.
In this tutorial, we'll take a closer look into creating a chat app using Kotlin and the MirrorFly SDK. Let's break it down step by step!
If you are starting with your Android app development, MirrorFly chat SDK is a great place to start with. Instead of writing codes from scratch, MirrorFly offers you pre-built messaging features that you can add to your existing app.
Want to know more about MirrorFly? Explore here.
We will be developing a messaging app in Kotlin for Android using MirrorFly SDK.
Here’s what you’ll learn in the upcoming sections:
Let’s start building.
You’ll need the following:
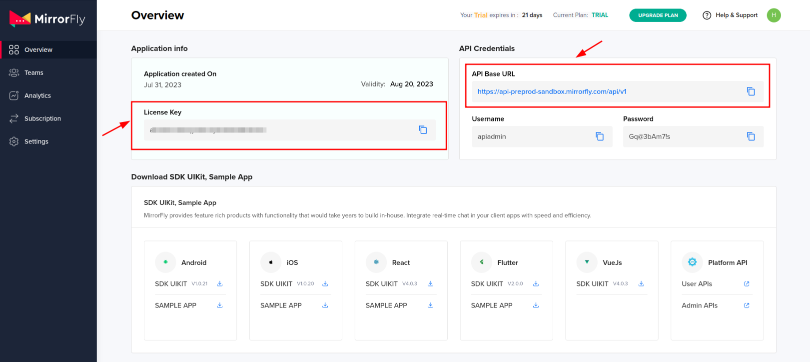
Step 1 : To start developing the chat app, the first thing you need to do is sign up for an account on MirrorFly.
Step 2 : On our official contact page, provide your information. Our expert will reach out to you for the next steps regarding your account.
Step 3 : Sign into your account and get the license key.
Step 1 : Start a new project or open an existing one in Android Studio IDE.
Step 2 : If your Gradle version is 6.8 or newer, use the below code in your settings.gradle file. If it's 6.7 or older, add the code to your main build.gradle file. Check the release notes for more details on Gradle updates.
                         dependencyResolutionManagement {
                         repositories {
                            mavenCentral()
                            google()
                            jcenter()
                            maven {
                               url "https://repo.mirrorfly.com/release"
                            }
                         }
                      }
Step 3 : Include the below dependencies in the app/build.gradle file.
                          dependencies {
                            implementation 'com.mirrorfly.sdk:mirrorflysdk:7.9.9'
                         }
Step 4 : Use the following line into the gradle.properties file to prevent conflicts with imported libraries.
android.enableJetifier=true
Step 5 : Access the AndroidManifest.xml file and enable the mentioned permissions.
<uses-permission android:name="android.permission.INTERNET" />Before you begin using the SDK, ensure you meet some basic requirements. In the onCreate() method of your Application class, use the provided method from ChatManager to render the required data during the initialization process.
                   ChatManager.initializeSDK("LICENSE_KEY"){ isSuccess, _, data ->
                      if (isSuccess) {
                         Log.d("TAG", "initializeSDK success ")
                      } else {
                         Log.d("TAG", "initializeSDK failed with error message"+ data["message"])
                      }
                   }
Include the newly created MyApplication in the AndroidManifest.xml file.
<?xml version="1.0" encoding="utf-8"?> <manifest xmlns:android="http://schemas.android.com/apk/res/android"
                           <package="com.example.uikitapplication">
                           <application
                           <android:name=".MyApplication"  // Add this line.
                           <android:icon="@mipmap/ic_launcher"
                           <android:label="@string/app_name"
                           <android:roundIcon="@mipmap/ic_launcher_round"
                           <android:theme="@style/AppTheme">
                           <activity android:name=".MainActivity">
                           <intent-filter>
                        <action android:name="android.intent.action.MAIN" />
                            ...
                               <category android:name="android.intent.category.LAUNCHER" />
                               </intent-filter>
                               </activity>
</application>Use the following method to register a user in sandbox Live mode by setting the trial license key using setIsTrialLicenceKey.
                         FlyCore.registerUser(USER_IDENTIFIER) { isSuccess, throwable, data ->
                         if(isSuccess) {
                               val isNewUser = data["is_new_user"] as Boolean
                               val userJid = data["userJid"] as String
                               val responseObject = data.get("data") as JSONObject
                               val username = responseObject.getString("username");
                               val password = responseObject.getString("password");
                         } else {
                               // Register user failed print throwable to find the exception details.
                         }
                      }
Once you've signed up successfully, ChatSDK will automatically attempt to link up with the Chat Server. ChatSDK will monitor the changes in how your app is running, and it adjusts its connection to the Chat Server accordingly, either connecting or disconnecting as needed.
Once you've set up the ChatConnectionListener, you'll get information about the connection status through the callback method described below.
                      ChatManager.setConnectionListener(object : ChatConnectionListener {
                      override fun onConnected() {
                         // Write your success logic here to navigate Profile Page or
                         // To Start your one-one chat with your friends
                      }

                      override fun onDisconnected() {
                         // Connection disconnected
                      }

                      override fun onConnectionFailed(e: FlyException) {
                         // Connection Not authorized or Unable to establish connection with server
                      }

                      override fun onReconnecting() {
                         // Automatic reconnection enabled
                      }
                   })
Make use of the below method to send a text message to another user.
                    val textMessage = TextMessage().apply {
                      toId = TO_JID
                      messageText = TEXT
                   }

                   FlyMessenger.sendTextMessage(textMessage, object : SendMessageCallback {
                      override fun onResponse(isSuccess: Boolean, error: Throwable?, chatMessage: ChatMessage?) {
                         if (isSuccess) {
                            // you will get the message sent success response
                         }
                      }
                   })
To receive and keep track of all the messages sent to you, make sure to set up the MessageEventsListener observer.
                 ChatEventsManager.setupMessageEventListener(object : MessageEventsListener {
                      override fun onMessageReceived(message: ChatMessage) {
                            //called when the new message is received
                      }
                   })
Additionally, these listeners will only be activated when you receive a new message from another user. For more information, please visit the callback listeners page.
                   override fun onMessageReceived(message: ChatMessage) {
                   super.onMessageReceived(message)
                   // received message object
                   }
And we’re done! This tutorial took you through the complete process of building a chat app in Kotlin, with the help of MirrorFly Chat SDKs. If you’ve found this guide simple and easy, you may also check out our other features and experiment with them.
Want us to do the integration? You can hire our tech engineer and they’ll integrate the SDK into your app end-to-end.
Until then, happy chat app development!
Add chat features to your Flutter apps - in 10 minutes - with just a few lines of code.
Request DemoDrive 1 billion + conversations on any Android, iOS, or Web app with 500+ chat features & 100+ UI components.