

In this article, you’ll learn how to build an ecommerce chat app for iOS using MirrorFly’s swift chat SDKs. At the end of this guide, you will be able to connect the sellers, buyers, and other stakeholders in your online marketplace business via in-app chat.
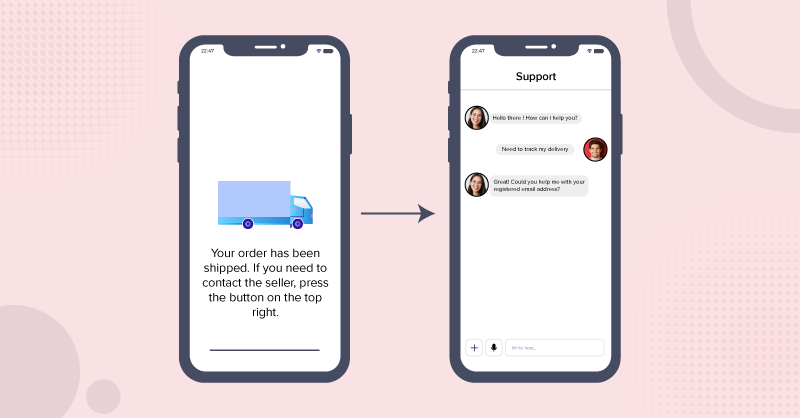
When completing the steps instructed, you will have a completely built iOS chat app for e-commerce that is similar to the screenshot below:
Prerequisites
To create an e-commerce app in iOS using Swift, you will need,
- Development Environment: Xcode 13+
- Programming Language: Swift 5.0+
- Platform: iOS 13+
- In App SDKs: MirrorFly Video SDKs
Note: If you’d like to build the swift ecommerce chat on our sample app, you can check out our GitHub repositories.
10 Easy Steps to Integrate MirrorFly Chat SDK for iOS Apps (Swift)
We have explained the step-by-step instructions in this tutorial, along with the required codes and screenshots for your reference:
- Step 1: Create a New Xcode Project
- Step 2: Get the MirrorFly License Key
- Step 3: MirrorFly SDK Integration
- Step 4: Configure the MirrorFly SDK Server & Data
- Step 5: Initialization of Chat SDK
- Step 6: User Registration
- Step 7: Connect the Chat SDK to the MirrorFly Server
- Step 8: Disconnect the Chat Server
- Step 9: Add One-to-One Chat
- Step 10: Add Group Chat Feature into eCommerce
Step 1: Create a New Xcode Project
- Launch Xcode on your device
- Create a new project or open an existing project
- From the Template grids, choose SingleView App
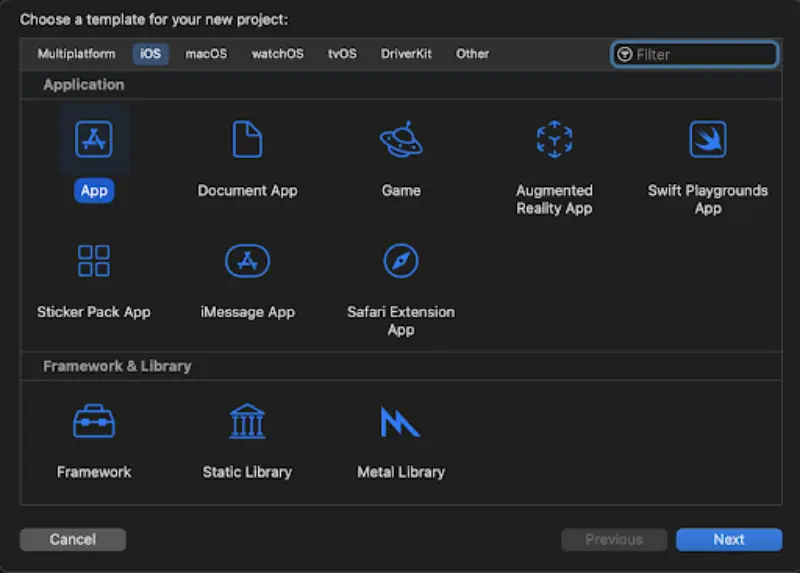
- A form page will open. Fill in all the required fields and configure your project.
Step 2: Get the MirrorFly License Key
A license key is needed for the server to authenticate your SDK. To acquire one, you’ll need an account with MirrorFly
- Signup with MirrorFly and complete the account setup process
- After verification, log in to your MirrorFly Account
- From the Account Overview page, download the iOS SDK file

- Complete Source Code
- Lifetime Data Ownership
- Deploy on Own Server
Step 3: MirrorFly SDK Integration
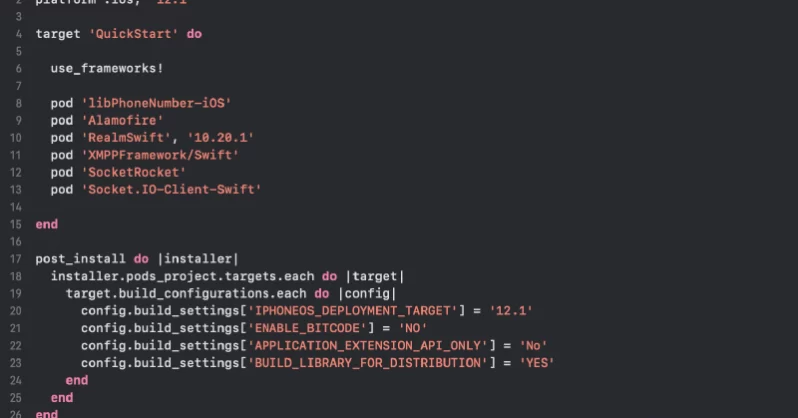
- Add the following ChatSDK pod to your Podfile. If the pod hasn’t been initialized yet, create a Podfile by executing the pod init command.
pod 'MirrorFlySDK', '5.12.0'2. Add the below-given pod hook code block at the end of the pod file and thus, finally install the pods by executing the pod install command.
post_install do |installer|
installer.pods_project.targets.each do |target|
target.build_configurations.each do |config|
config.build_settings['IPHONEOS_DEPLOYMENT_TARGET'] = '12.1'
config.build_settings['ENABLE_BITCODE'] = 'NO'
config.build_settings['APPLICATION_EXTENSION_API_ONLY'] = 'No'
config.build_settings['EXCLUDED_ARCHS[sdk=iphonesimulators*]'] = 'arm64'
config.build_settings['BUILD_LIBRARY_FOR_DISTRIBUTION'] = 'YES'
end
end
end
3. Now, disable the bitcode for your project
Goto Project -> Build Settings -> Filter the term `Bitcode` -> and select No from the dropdown
4. Initiate and add the pod hook block at the end of the pod file as mentioned below. And then, continue to install the pods.
post_install do |installer|
  installer.pods_project.targets.each do |target|
    target.build_configurations.each do |config|
      config.build_settings['IPHONEOS_DEPLOYMENT_TARGET'] = '12.1'
      config.build_settings['ENABLE_BITCODE'] = 'NO'
      config.build_settings['APPLICATION_EXTENSION_API_ONLY'] = 'No'
      config.build_settings['BUILD_LIBRARY_FOR_DISTRIBUTION'] = 'YES'
    end
  end
end
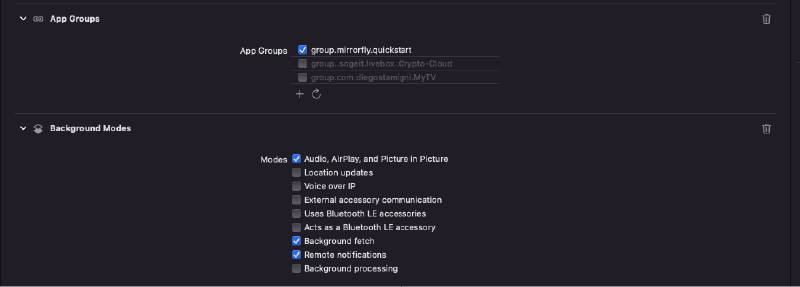
5. Configure The Capabilities For Your E-commerce Chat App
- Go to Project
- Click on Target
- Choose Signing & Capabilities
- Click ‘+’ at the top left corner
- Search for the capabilities: App groups and Background Mode
- Right under Background Mode, you need to enable the below capabilities:
- Audio, Airplay, and Picture in Picture
- Remote notifications
- Background fetch
Step 4: Configure the MirrorFly SDK Server & Data
- In this step, you need to add the details including the License key (downloaded in Step 1), and configure the server. This action will take you a step closer to adding chat functionality for user messaging in your ecommerce app.
- Add the necessary server information to the AppDelegate class.
let LICENSE_KEY = "xxxxxxxxxxxxxxxxxxxxxx"Step 5: Initialization of Chat SDK
- Provide the basic data needed to build the messaging SDK
- Further, use the AppDelegate class within the didFinishLaunchingWithOptions method.
ChatSDK.Builder.setAppGroupContainerID(containerID: CONTAINER_ID)

      .setLicenseKey(key: LICENSE_KEY)
      .isTrialLicense(isTrial: true)
      .setDomainBaseUrl(baseUrl: BASE_URL)
      .buildAndInitialize()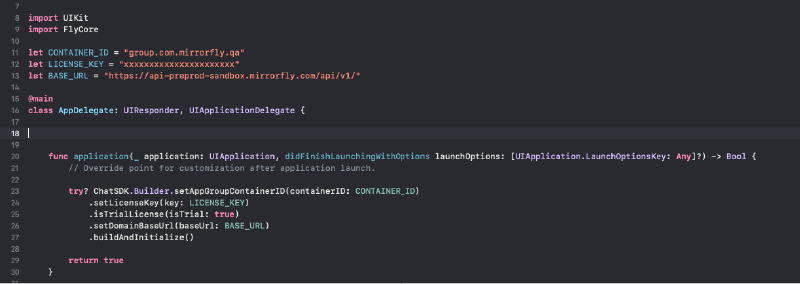
Step 6: User Registration
To register a user in the sandbox mode or in the live mode, use the below method in the ChatSDK.Builder class
try! ChatManager.registerApiService(for:  USER_IDENTIFIER ) { isSuccess, flyError, flyData in
        var data = flyData
        if isSuccess {
         // This is your Password
           guard let password = data["password"] as? String else{
               return
           }
           // This is your Username
           guard let username = data["username"] as? String else{
               return
           }
        }else{
            let error = data.getMessage()
            print("#chatSDK \(error)")
        }
    }
Step 7: Connect the Chat SDK to the MirrorFly Server
A server connection is needed to send or receive messages within your Ecommerce Chat App. To establish the connection, use the below method:
ChatManager.connect()
Step 8: Disconnect the Chat Server
To disconnect the connection between the chat server and the SDK, you need to call the below method:
ChatManager.disconnect()Step 9: Add One-to-One Chat
Send one-to-one Chat:
You need to use the below method to send one-to-one messages:
FlyMessenger.sendTextMessage(TO_JID, TEXT) { isSuccess,error,chatMessage in
     if isSuccess {
        // Update the UI
     }else{
        // Handle the error
     }
 }

Receive One-to-one Messages
To see other incoming messages, you need to set the delegate in your ViewController’s viewDidAppear method and confirm the MessageEventsDelegate class.
ChatManager.shared.messageEventsDelegate = selfAfter setting up the delegate, you will start receiving incoming messages from other SDK users.
func onMessageReceived(message: ChatMessage, chatJid: String) {
      // Message received from chatJid, content is message.messageTextContent
}
Step 10: Add Group Chat Feature into eCommerce Web & Apps
You can create groups for the stakeholders in your business to drive more engagement and transactions. The following steps will guide you through.
Prepare the Group Chat jid
To prepare the group JID. FlyUtils.getGroupJid(groupId : String), the SDK provides the below utility method.
FlyUtils.getGroupJid(groupId : String)Group Creation
In order to create a group, you need to call the below method
GroupManager.shared.createGroup(groupName: "ABCXYZ", participantJidList: [jids], groupImageFileUrl: "", completionHandler: { [self] isSuccess, flyError, flyData in
    if isSuccess {
        // Update the UI
    } else{
        // failure case of the group creation
    }
})
Create the Group Profile
From the server or local, you need to get a group profile using the below method.
GroupManager.shared.getGroupProfile(groupJid: groupId, fetchFromServer: fromServer, completionHandler: { isSuccess, flyError, flyData in
    if isSuccess {
        let data =  (flyData.getData() as?
        ProfileDetails)
        // Update the UI
    } else{
        // failure case of get group profile
    }
})
Get the Participants List
You need to call the below method to get the group members from the server
GroupManager.shared.getParticipants(groupJID: groupId)Add Participants to a Group
You need to call the below method to add new particpants to a group in your eCommerce chat app.
GroupManager.shared.addParticipantToGroup(groupId: groupId, newUserJidList: selectedItemArray) { isSuccess, flyError, flyData in
    if isSuccess {
       // Update the UI
    } else{
       // failure cases
    }
Remove Participants from a Group
Call the below method to remove a participant from your ecommerce chat app group
GroupManager.shared.removeParticipantFromGroup(groupId: groupId, removeGroupMemberJid: userJid) { isSuccess, flyError, flyData in
    if isSuccess {
        // Update UI
    } else{
        // failure cases
    }
}
Get Groups
In order to get the groups from local or server, you need to call the below method
GroupManager.shared.getGroups(fetchFromServer: true) { isSuccess, flyError, flyData in
    var data  = flyData
    if isSuccess {
        // Update UI
    } else{
        // failure cases
    }
}
Call the below method to add or update the group image
GroupManager.shared.updateGroupProfileImage(groupJid: groupId, groupProfileImageUrl: selectPath, completionHandler: { isSuccess, flyError, flyData in
    if isSuccess {
       // Update UI
    } else{
       // failure case
    }
})
Removal of Group Image
Call the below method to remove the group image using swift in your ecommerce app
GroupManager.shared.removeGroupProfileImage(groupJid: groupId, completionHandler: { isSuccess, flyError, flyData in
    if isSuccess {
        // Updat UI in success case
    } else{
        // failure case
    }
})
Group Name Update
In order to update a group image, you need to call the below method
GroupManager.shared.updateGroupName(groupJid: groupId, groupName: "Changing Group Name wXyZ 123", completionHandler: { isSuccess, flyError, flyData in
    if isSuccess {
        // Update UI
    } else{
        // failure case
    }
})
Give Admin Control to a Participant in your eCommerce Chat App
Call the below method to make a participant an admin.
GroupManager.shared.makeAdmin(groupJid: groupId, userJid: userJid, completionHandler: { isSuccess, flyError, flyData in
    if isSuccess {
        // update UI
    } else{
        // failure case
    }
})
Exit from Group
For a participant to exit from a group, you need to call the below method:
GroupManager.shared.leaveFromGroup(groupJid: groupId, userJid: userJid, completionHandler: { isSuccess, flyError, flyData in
    if isSuccess {
        // update UI
    } else{
        // failure case
    }
})
Delete a Group
To delete a group in your Ecommerce Chat App, call the below method.
GroupManager.shared.deleteGroup(groupJid: groupId, completionHandler: { isSuccess, flyError, flyData in
    if isSuccess {
        // update UI
    } else{
        // failure case
    }
})
Congratulations!
You’ve successfully built an iOS ecommerce chat app using MirrorFly’s SDKs. Your app is now capable of connecting people across your marketplace business via instant group messages.
To learn more about personalizing the theme, color, style, and fonts of your in-app chat, you can check out our guide to customizing in-app chat with MirrorFly UI Kit. Besides this, if you are interested in building a self-managed chat solution, talk to our experts.
Comment below what other features you’d like to add to your app. My team and I will work on it shortly and get back to you with interesting in-app chat guides. Until then, happy coding!
Get Started with MirrorFly’s Most Secure Chat API Today!
Drive 1+ billions of conversations on your apps with highly secure 250+ real-time Communication Features.
Contact Sales 200+ Happy Clients
-
Topic-based Chat
-
Multi-tenancy Support

Frequently Asked Questions (FAQ)
You can add chat to iOS by using Swift or simply integrate in-app chat made with the native Swift platform for iOS from providers like MirrorFly, ApphiTect, Apptha, etc. By integrating in-app chat from third-party providers, you can easily implement chat functionalities and enriched features into your iOS apps.
Both Flutter and Swift have unique advantages in their own way. Flutter is an open-source application developed by Google to support cross-platform applications. Swift is an open-source application developed by Apple to support native apps such as MacOS, iOS, watchOS, and so on. If you are planning to build a native iOS platform, Swift provides enhanced performance.
Yes, Firebase works fine with iOS, macOS, watchOS, and TVOS. Firebase finds it difficult to work only with app clips. In order to integrate Firebase into your app, you have to register your app with the Firebase project.
Both Flutter and Swift have their own unique advantages and are used for different purposes. Meanwhile, Flutter replacing Swift or Swift replacing Flutter might not be possible in the near future. In the long run, it depends on the unique and constantly upgraded features of both platforms.
Here are some of the popular messaging apps for e-commerce sites: Gorgias, Livechat, Intercom, Drift, Tawk.to, Freshdesk, Zendesk Chat, Olark, etc. Apart from these apps, e-commerce sites are nowadays moving into in-app chat APIs from providers like MirrorFly, ApphiTect, Twilio, Sendbird, etc.
You can integrate chat into a web application in two ways. One is to build your own chat app from scratch, spending more money, development time, and effort. The second is to easily integrate in-app chat APIs from third-party providers like MirrorFly, ApphiTect, etc. Here are the steps to integrate in-app chat APIs. 1. Setup your account. 2. Download APIs and SDKs. 3. Integrate with your web app.
![]() Atchaya Jayabal leads Content at MirrorFly and is an expert in writing Tech, SaaS & B2B. She regularly publishes articles on CPaaS & Conversational AI in blogs.
Atchaya Jayabal leads Content at MirrorFly and is an expert in writing Tech, SaaS & B2B. She regularly publishes articles on CPaaS & Conversational AI in blogs.
Your article helped me a lot, is there any more related content? Thanks!
Reading your article helped me a lot and I agree with you. But I still have some doubts, can you clarify for me? I’ll keep an eye out for your answers.
Hello! This is Scarlett Conner. I live in Europe and am building an online shopping app that will sell clothing to customers around the world. I’m planning to add chat features to my app where my clients can discuss the cost and transaction details. How safe are your APIs for global users?
Hi Ms. Conner. Your business sounds interesting! Our APIs are built with end-to-end encryption protocols like AES-256 and TLS/SSL. This makes our APIs stand out in terms of safety. Above that, our chat features are built with complete adherence to industry regulations like GDPR, HIPAA and ISO. So, well without any doubt, we call our chat APIs completely safe for online shopping conversations.
Hi, I am Marlon Cox. I’d like to know why group jid is used and not group id in step to prepare a group ID
Hello Mr. Cox. Almost every SDK method accepts jid as an input parameter and treats id as a string. This is why, we’ve called groupjid method. The FlyUtils.getGroupJid() uses the [com.contusflysdk.api.ChatConnectionManager.initialize] method to convert any string input in the groupid to jid parameters. For more details, get in touch with our experts now!