Building a chat app is quick and easy with MirrorFly. In this article, you'll learn how to create the best chat app in just 10 Mins.
Most businesses these days have an app for their brand, and many of them include a chat feature. This is in fact a great way to engage users, convert visitors and retain them for long.
If you are an iOS app developer looking to build such an app with chat functionality & UI elements, this tutorial is for you. In this guide, we'll focus on building a chat app for iOS devices using MirrorFly Chat SDK.
Before we get started, here are some prerequisites to build your messaging application.
For your iOS app development, you’ll need the following:


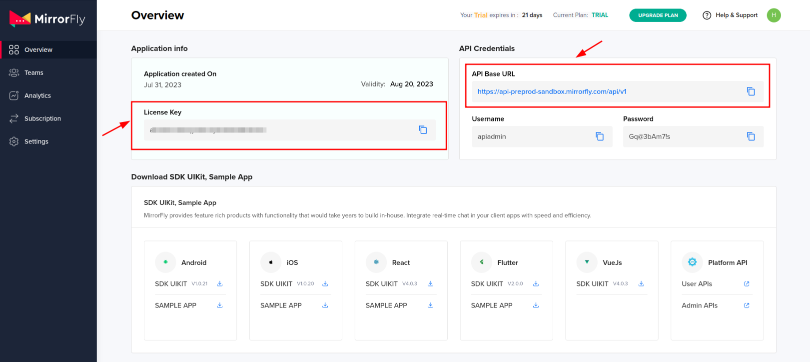
The first step in building an app on iOS with MirrorFly chat SDK is to get a license key. You’ll need this license key to authenticate the SDK in your app.
So, here is what you need to do to get the license key.
Step 1 : To add the Chat SDK to your project, use the below code in your Podfile. If you haven't started using pods yet, make a Podfile by typing 'pod init'.
pod 'MirrorFlySDK', '5.13.6'
Step 2 : Use the below pod hook code block at the end of your pod file, then install the pods by typing 'pod install'.
                                                 post_install do |installer|
                                                 installer.pods_project.targets.each do |target|
                                                     target.build_configurations.each do |config|
                                                     config.build_settings['IPHONEOS_DEPLOYMENT_TARGET'] = '12.1'
                                                     config.build_settings['ENABLE_BITCODE'] = 'NO'
                                                     config.build_settings['APPLICATION_EXTENSION_API_ONLY'] = 'No'
                                                     config.build_settings['EXCLUDED_ARCHS[sdk=iphonesimulators*]'] = 'arm64'
                                                     config.build_settings['BUILD_LIBRARY_FOR_DISTRIBUTION'] = 'YES'
                                                     end
                                                 end
                                                 end
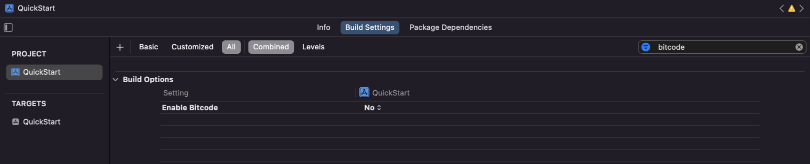
Step 3 : Next, turn off bitcode for your project.
Goto Project -> Build Settings -> Filter the term `Bitcode` -> and select No from the dropdown
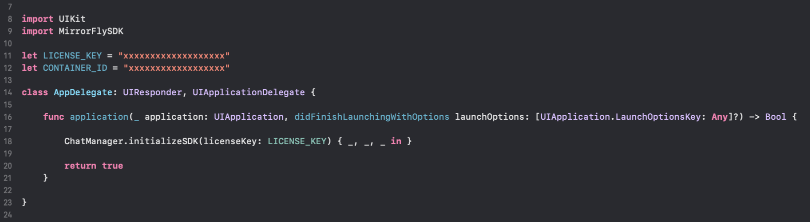
Step 4 : Now, fill the server details in the SDK and make the data accessible everywhere using the AppDelegate class.
let LICENSE_KEY = "xxxxxxxxxxxxxxxxxxxxxx"
Before you use the SDK anywhere in your project, make sure to add the following import statement below:
import MirrorFlySDK
To get the SDK working smoothly, we need some basic data. We use the initializeSDK function to check the license key and get the necessary information from the server for the SDK setup.
In your project, inside the didFinishLaunchingWithOptions method in the AppDelegate class, call the initialization method by passing the license key. Here's an example to help you understand.
ChatManager.initializeSDK(licenseKey: LICENSE_KEY) { isSuccess, flyError, flyData in }
Call the method below to register a new user. This method handles both Sandbox mode registration and Live mode registration.
                             try! ChatManager.registerApiService(for:  USER_IDENTIFIER ) { isSuccess, flyError, flyData in
                                 var data = flyData
                                 if isSuccess {
                                          // This is your Password
                                          guard let password = data["password"] as? String else{
                                          return
                                     }
                                     // This is your Username
                                     guard let username = data["username"] as? String else{
                                              return
                                     }
                                     // This is your JID
                                     guard let username = data["userJid"] as? String else{
                                              return
                                     }
                                 }else{
                                          let error = data.getMessage()
                                          print("#chatSDK \(error)")
                                 }
                             }
To create a unique user ID, use the following method by passing the username: let userJID: String = try FlyUtils.getJid(USERNAME)
After a successful registration, ChatSDK will automatically try to connect to the Chat Server. The ChatSDK also observes the changes in the application state, and it will attempt to connect or disconnect from the Chat Server accordingly.
To keep track of the connection status, use the ConnectionEventDelegate. Set the 'delegate' in your ViewController's viewDidAppear method like this:
                            ChatManager.shared.connectionDelegate = self
                             }
After setting the ConnectionEventDelegate, you'll receive the connection status through the delegate method mentioned below:
                            func onConnected() {
                            // Navigate to Conversation screen
}The below method is used to send a text message from one user to another.
                                   var textMessage = TextMessage()
                                     textMessage.toId = TO_JID
                                     textMessage.messageText = TEXT

                                     FlyMessenger.sendTextMessage(messageParams: textMessage) { isSuccess, error, chatMessage in
                                     if isSuccess {
                                     // Update the UI
                                     }else{
                                     // Handle the error
                                     }
                                     }
In your ViewController's viewDidAppear method, set the delegate using the syntax below. Confirm the MessageEventsDelegate class to be able to see other incoming messages and related events.
                                  func onMessageReceived(message: ChatMessage, chatJid: String) {
                                     // Message received from chatJid, content is message.messageTextContent
                                 }
ChatManager.shared.messageEventsDelegate = self
Once the delegate is set, you'll receive incoming messages in the method mentioned below. To learn more about other methods in MessageEventsDelegate, refer to the documentation.
                                  func onMessageReceived(message: ChatMessage, chatJid: String) {
                                     // Message received from chatJid, content is message.messageTextContent
                                 }
In conclusion, this tutorial guided you through creating a chat app on Xcode, integrating MirrorFly Swift SDK, and deploying your app on the MirrorFly server. The complete code for this tutorial is available on our Github repository.
Happy coding!
Add chat features to your Flutter apps - in 10 minutes - with just a few lines of code.
Request DemoDrive 1 billion + conversations on any Android, iOS, or Web app with 500+ chat features & 100+ UI components.