

Learning is a constantly evolving process. From school education to mastering a field of expertise, people thrive to adapt changes in order to get the education they aspire for. In the same row, technology is connecting educators and students in an online space with interactive, collaborative and secure tools and features. Yes, we are talking about Virtual classrooms and we will be discussing this technology in detail in the sections ahead.
This article will introduce or reintroduce you to the technology, discuss its benefits and help you to build your own Virtual classroom app in less than 30 minutes. Ready for some interesting insight? Let’s get started!
What is a Virtual Classroom App?
A Virtual Classroom is an online learning environment where instructors and participants can interact and engage, regardless of their location across the globe. This setup gives an in-class experience, with tools to teach, raise questions, make discussions, and conduct examinations.
A virtual classroom app makes it more easy and convenient for students and instructors to join sessions, access learning materials and submit assignments, from any device and on any platform.
In a virtual classroom app, an instructor can:
- Share screen and use whiteboard features to teach a topic/ subject
- Record the session and share it with students as documents or multimedia files
- Divide participants into groups and allocate them separate breakout rooms
- Conduct quizzes and polls
- Moderate student with access control on entry, exit and muting options
Benefits Of Virtual Classroom
There are several benefits of using a virtual classroom for both instructors and participants. They include,
- Easy Access: Virtual classrooms make it easy for students to attend classes from anywhere. Only with an internet connection, it is possible to join any session, seminar or webinar.
- Saves Cost & Time: Virtual Classrooms eliminate the need for travel to learning facilities or schools. This saves a lot of expenses in travel and amenities.
- Extends The Learning Horizon: Apart from the regular classes, students can also avail lessons on subject of their interest from Educators around the globe.
- Improved Interaction and Collaboration: Online discussion forums and learning activities can drive more interaction from participants.
- Resources: Participants can exchange learning materials with each other, participate in competitive exams and access lecture recordings
Steps to Build a Virtual Classroom App or Website
While Virtual Classrooms is becoming an essential tool for learning, the need for feature-rich virtual classroom apps is naturally increasing. Well, this article is written to serve your interest in building a virtual classroom app.
In this guide, you will learn how to develop a video conferencing app for educational purposes with the help of end-to-end encrypted SDKs from MirrorFly.
This tutorial was built using:
- Xcode 13+
- Swift 5.0+
- iOS 13+
- MirrorFly Video SDKs
Note: If you’d like to build the video call on our sample app, you can check out our GitHub repositories.
Set Up Your iOS Virtual Classroom Project
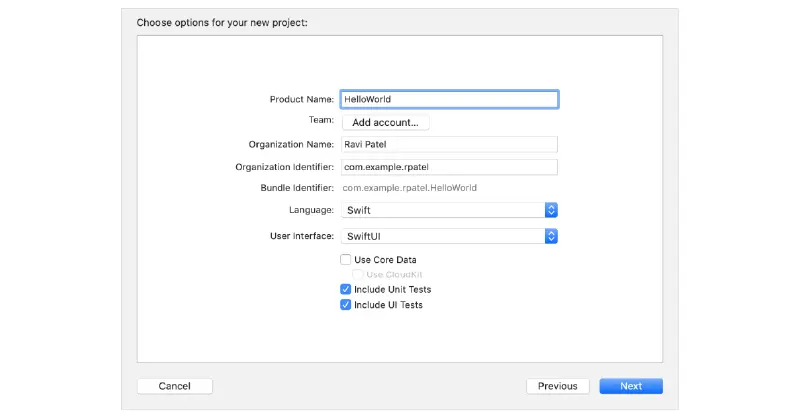
Step 1: Create an Xcode Project
- Launch Xcode
- Create a New Project
- Select Single View App from the Template grids
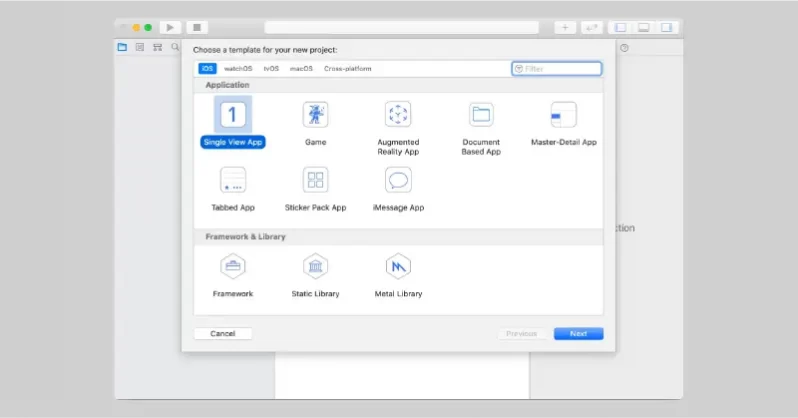
- In the following form, configure your project with the necessary details
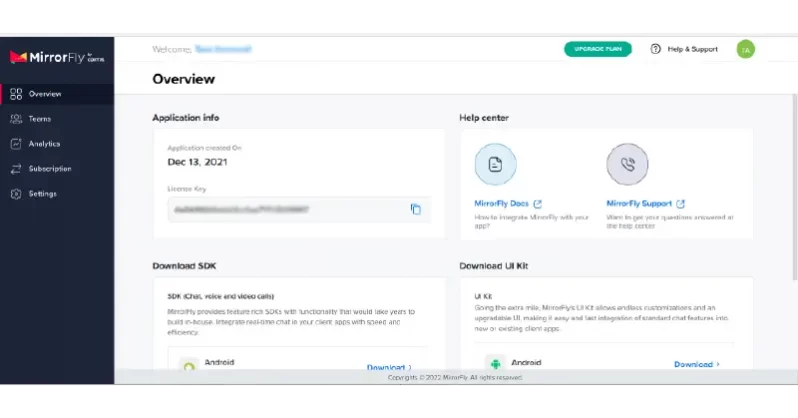
Step 2: Get MirrorFly License Key
- Go to MirrorFly Console Page
- Fill in your basic details
- Click on Sign Up
- Verify your account using your registered email ID
- Login to your MirrorFly Account
- In your Account Overview page, download the iOS SDK file
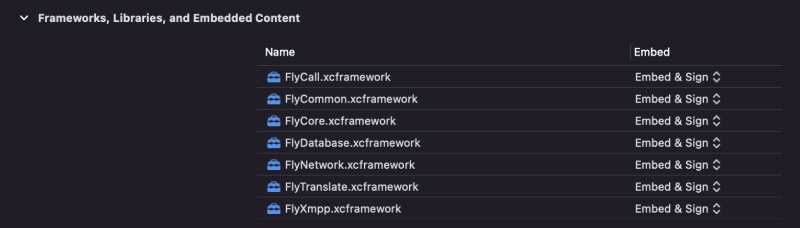
Step 3: Integrate MirrorFly SDKs
i. Extract and Import the framework files into the Project
- From the downloaded SDK package, extract the framework files
FlyCall.xcframework
FlyCore.xcframework
FlyCommon.xcframework
FlyNetwork.xcframework
FlyDatabase.xcframework
FlyXmpp.xcframework
FlyTranslate.xcframework- Go to Project
- Select Target, then General
- Click on Frameworks, libraries, and Embedded Content
- Against all the xcframeworks, select Embed & Sign
ii. Disable the bitcodes
- Go to Project
- Click on Build Settings
- Search for the term ‘Bitcode’ and filter it
- Select ‘No’ from the dropdown

- Iii. Initiate the Pods for your Project
 pod 'libPhoneNumber-iOS'
 pod 'Alamofire'
 pod 'RealmSwift', '10.20.1'
 pod 'XMPPFramework/Swift'
 pod 'SocketRocket'
 pod 'Socket.IO-Client-Swift'
 pod 'GoogleWebRTC'
iv. At the end of the pod file, add the pod hook block and continue to install the pods
post_install do |installer|
  installer.pods_project.targets.each do |target|
    target.build_configurations.each do |config|
      config.build_settings['IPHONEOS_DEPLOYMENT_TARGET'] = '12.1'
      config.build_settings['ENABLE_BITCODE'] = 'NO'
      config.build_settings['APPLICATION_EXTENSION_API_ONLY'] = 'No'
      config.build_settings['BUILD_LIBRARY_FOR_DISTRIBUTION'] = 'YES'
    end
  end
end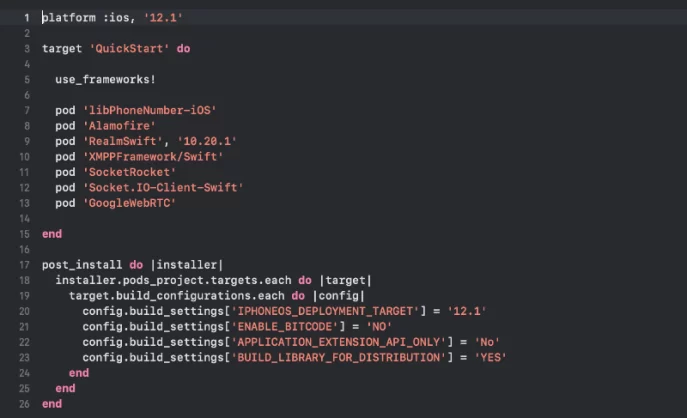
v. Configure your project with the below capabilities
- Go to Project
- Select Target > Signing & Capabilities
- Click ‘+’ at the top left corner
- Search for the capabilities: App groups and Background Mode
- Under Background Mode, enable the following:
- Audio, Airplay, and Picture in Picture
- Remote notifications
- Voice over IP
- Background fetch

vi. Enable the permissions for audio and video
- In this step, grant access to the camera and Microphone in your plist
Step 4: Perform SDK Configuration
- Use the AppDelegate class and configure server details in the SDK
- Provide the License Key you generated in the first step of this tutorial
let BASE_URL = "https://api-preprod-sandbox.mirrorfly.com/api/v1/"
let LICENSE_KEY = "xxxxxxxxxxxxxxxxxxxxxx"
let CONTAINER_ID = "group.com.mirrorfly.qa"
Step 5: User Registration
Next, you need to register a user in sandbox and live mode. Use the below method in the ChatSDK.Builder class.
try! ChatManager.registerApiService(for:  USER_IDENTIFIER ) { isSuccess, flyError, flyData in
        var data = flyData
        if isSuccess {
         // This is your Password
           guard let password = data["password"] as? String else{
               return
           }
           // This is your Username
           guard let username = data["username"] as? String else{
               return
           }
        }else{
            let error = data.getMessage()
            print("#chatSDK \(error)")
        }
    }
Step 6: Initialization of the Call SDK
- Once you complete with the registration process, you need to call the below method:
try! CallManager.initCallSDK()Step 7: Connect the SDK to the Chat Server
- You need to establish a chat server connection to transfer the initial call data payload
ChatManager.connect()Step 8: Disconnect the SDK from the Chat Server
- Use the below method to disconnect the SDK from the Chat Server
ChatManager.disconnect()Step 9: Observe Connect Events of Your Virtual Classroom App
- Confirm the ConnectionEventDelegate to track and monitor the connection status of your iOS app.
- You can do this by setting up ‘delegate’ in the viewDidAppear method of the ViewController
ChatManager.shared.connectionDelegate = self- Once you set the ConnectionEventDelegate, you will receive the status of the connection in the delegate as given below
func onConnected() {
  // Navigate to Conversation screen
  }
Step 10: Observation of the Call Events
- To observe you call events, you need to create and set a Singleton Class.
- Then, pass the object to the below method
CallManager.setCallEventsDelegate(delegate:CALLMANAGER_DELEGATE)Step 11: Set Up the Call UI of Your Online Classroom App
- This step will implement the Call UI that will be displayed on the user screen of your classroom app during an outgoing call.
- To do this, you need to pass an instantiated view controller object as mentioned below:
CallManager.setCallViewController(CALL_VIEW_CONTROLLER)Step 12: Present the Call UI for an Outgoing Call
- To present the call UI of an outgoing call, you need to call the below method after declaring the call SDK or before making a call.
CallManager.setViewToPresentController("VIEW_TO_PRESENT")Step 13: Make a Virtual Group Video Call
Connect multiple students and staff in the same call using the below method
CallManager.makeGroupVideoCall(USERID_LIST, GROUP_ID, (isSuccess, message) -> {
}Step 14: Add Students/Staff to the Call
- To add students or staff to an ongoing live video call by inviting them using the below method.
- Once the invited participant accepts the call, he/she will be added to the online classroom.
CallManager.inviteUsersToOngoingCall(USERID_LIST);Step 15: Receive an Incoming Video Call
- The NotificationCenter will report to the FlyCallSDK, whenever a participant receives an incoming call from other users.
- To set this up, you need to use the below method:
NotificationCenter.default.post(name: NSNotification.Name("CallPayloadReceived"), object: messageDict)Step 16: Disconnect an Ongoing Call
- When a student or staff needs to leave the ongoing classroom, the below method will disconnect the participant from the ongoing call.
CallManager.disconnectCall()That’s a Wrap
Yes, you’ve made it! I hope this guide gave you all the details to help you build a fully functioning EdTech app that can work on any iOS device. You can also experiment our features using our sample app that is available in our github repo. Above this, if you’d like to add 100% customizable video, voice and chat features to your online education app, we have a self-hosted solution you can get for a one-time license cost. Interested? Talk to our sales team now!
Drive 1+ billions of conversations on your apps with highly secure 250+ real-time Communication Features.
Contact Sales 200+ Happy Clients
-
Topic-based Chat
-
Multi-tenancy Support

![]() Atchaya Jayabal leads Content at MirrorFly and is an expert in writing Tech, SaaS & B2B. She regularly publishes articles on CPaaS & Conversational AI in blogs.
Atchaya Jayabal leads Content at MirrorFly and is an expert in writing Tech, SaaS & B2B. She regularly publishes articles on CPaaS & Conversational AI in blogs.