This guided documentation explains how to build a React Native Chat App using MirrorFly’s instant messaging SDK.
The good news is, the SDK is completely customisable and can be tailored to unique workflows of businesses. Now, this is on the client-side.
On the server-side, you have the freedom to deploy on your own servers or choose MirrorFly’s cloud servers.
Whichever type of hosting you choose, MirrorFly’s works perfectly on the infrastructure delivering a chat performance with 99.999% uptime SLA and average response time below 3ms.
Sounds like a deal? Now, without any further delay, let’s build a chat app with MirrorFly’s React Native Chat SDK.
| Note Want a pre-built app to get started with? Download this sample app from MirrorFly and start adding messaging capabilities right away. |
MirrorFly Chat SDK is your go-to solution to quickly build, deploy, and manage in-app chat into your react native messaging apps. Quick start your development by downloading our sample app. Click here
Steps to Build a React Native Chat App Tutorial
Requirements
With MirrorFly React Native, make sure that you install all the below mentioned peer dependencies with their specific versions.
- Node >= 18.20.4
- npm – 10.7.0
- react-native >= 0.73.0 <=0.75.4
Getting Started
SDK License Key
| Caution Skip this part if you are already having your license key. |
To add MirrorFly’s React Native Chat SDK into your app, you are going to need a license key. The MirrorFly server uses this key to check and make sure your app’s allowed to use the SDK.
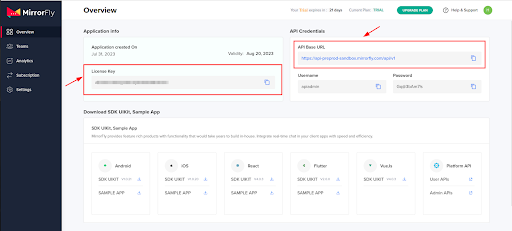
To get the License Key
Step 1: Register here to get a MirrorFly User account.
Step 2: Login to your Account
Step 3: Get the License key from the application info section
Step 1: First, go ahead and update all your package.json files.
Step 2: Then check if there’s any duplicate in your packages, especially if things ain’t working right on iOS.
Integrate Using Npm package
Step 3: Go on and install the MirrorFly SDK into your React Native app.
npm i mirrorfly-reactnative-sdk@2.2.0Step 4: Just import the SDK into your app wherever you need it.
import { SDK } from "mirrorfly-reactnative-sdk";
Chat SDK Integration: npm Dependencies Addition
{
   '@react-native-community/netinfo' : '^11.4.1',
   "react-native-get-random-values": "1.11.0", //must use version >=1.7.1
   'realm': "^20.1.0",
   'react-native-fs':  "^2.20.0",
   'moment': "2.30.1",
   //add the below calls related dependencies
   "react-native-webrtc": "124.0.4" // must use version "124.0.4"
   "react-native-background-timer": "^2.4.1",
   'react-native-permissions':'^5.2.1'
 }
Initialisation of MirrorFly React Native Messaging SDK
Before you get the real-time React Native Chat SDK up and running, just make sure you have the data that keeps track of any connection changes in your app.
Next, drop the license key into the licenseKey param and use the method below to pass that data into the SDK so it can process everything right.
Note:
You can find the sandbox server details later in the Sandbox section. Use that part when you wanna test things out.
In your main App file (like App.tsx or App.js), import the SDK and call the initializeSDK function with the needed params.
const initializeObj = {
 apiBaseUrl: `API_URL`,
 licenseKey: `LICENSE_KEY`,
 isTrialLicenseKey: `TRIAL_MODE`,
 callbackListeners: {},
};
await SDK.initializeSDK(initializeObj);
Sandbox Details
You can get the apiUrl and licenseKey info from the Overview section in your MirrorFly Console Dashboard.

function connectionListener(response) {
 if (response.status === "CONNECTED") {
   console.log("Connection Established");
 } else if (response.status === "DISCONNECTED") {
   console.log("Disconnected");
 }
}
const initializeObj = {
apiBaseUrl: "https://api-preprod-sandbox.mirrorfly.com/api/v1",
licenseKey: "XXXXXXXXXXXXXXXXX",
isTrialLicenseKey: true,
callbackListeners: {
connectionListener
},
};
await SDK.initializeSDK(initializeObj);| Note To learn more about callback listeners, go to the Callback Event Listener Section. |
Example Response
{
 "statusCode": 200,
 "message": "Success"
}
"This method was deprecated and will be removed in the future release"
Device ID Module
Step 1: First, download the Android file from the link above. Then find the needed Android files and copy them into the android/app/src/main/java/com folder.
Step 2: Next, download the iOS files from the same link. After that, open Xcode, use Add Files to [Your Project], and add those files in. Then just follow the steps listed below.
User Registration
Step 1: You can use the method below to register a new user.
Step 2: After registering, you’ll get a username and password which you can use to connect with the server using the connect method.
await SDK.register(USER_IDENTIFIER, FCE_TOKEN,
VOIP_DEVICE_TOKEN, MODE, REGISTER_META_DATA,
FORCE_REGISTER);
The above method is migrated as below
const registerObject = {
        userIdentifier,
        fcmtoken,
        voipDeviceToken,
        mode,
        registerMetaData,
        forceRegister,
     }
await SDK.register(registerObject);
Sample Response:
{
 statusCode: 200,
 message: "Success",
 data: {
   username: "123456789",
   password: "987654321"
 }
}| Caution username is the unique id that allows you to connect with other users to send or receive messages. |
Server Connection
Step 1: You can use the login details you got during registration to connect with the server.
Step 2: If the connection goes through fine, you’ll get a success message with a statusCode of 200. If not, you’ll see an error instead.
Step 3: You can also keep track of the connection status using the connectionListener callback function.
Step 4: In case something goes wrong while trying to connect, you’ll get an error message through the callback too.
await SDK.connect(`USERNAME`, `PASSWORD`);Sample Response:
{
 message: "Login Success",
 statusCode: 200
}
Send a Message
And finally, to send a message to another user, you can just use the method shown below.
| note You can use the const userJid = SDK.getJid(USER_ID) method, to generate a JID for any user. |
await SDK.sendTextMessage(`TO_USER_JID`, `MESSAGE_BODY`,`MESSAGE_ID`,`REPLY_TO`);Response Format:
{
   "message": "",// String - Success/Error Message
   "statusCode": "" // Number - status code
   }
Receive a Message
To receive messages from other users, you’ll need to implement the messageListener function. This function gets triggered whenever there’s a new message or a related event in either one-to-one or group chats.
Additionally, while initializing the SDK, be sure to include the callback method provided below as part of the setup process
function messageListener(response) {
 console.log("Message Listener", response);
}
Why Choose MirrorFly React Native SDK To Build Your Chat App?
If you’re a developer or a business trying to build a secure chat app, MirrorFly’s React Native SDK is a great pick. It’s easy to see why many developers love the solution.
MirrorFly’s known for being super developer-friendly, full of features, while letting you customize and launch it the way you need. It saves a lot of time and is easy to use. Even without any expertise in tech, teams can integrate the SDK with well-guided documentation.
Here are the top reasons why MirrorFly claims itself as the leader in the industry, especially in a market that’s in need of React native messaging applications and React Native apps.
- 100% Customizable: You can add, remove or modify any part of MirrorFly’s chat, voice, and video features however you want.
- White-label Ready: Want your app to look like it’s 100% yours? You can totally do that by adding your own logo, colors and
- Flexible Hosting: Host on your own server, on the cloud, or even on-premise, the option that suits you best.
- Custom Security: You’re in control of how secure your chat needs to be. Add your own encryption, policies, and any layer of security and privacy as you need above MirrorFly’s built-in chat security.
- Unlimited Chats & Calls: Doesn’t matter if it’s just a few users or millions. MirrorFly handles it all without any impact on the performance and quality of call and message delivery.
- Full Ownership: With MirrorFly’s self-hosted solution, you get everything from code, data, and access. It’s all yours.
- Dedicated Dev Team: Need more hands? You can hire a team from MirrorFly to work just for you.
- Safe Migration: Already using another chat platform? MirrorFly helps move everything over, safely.
So yeah, if you’re looking for a secure, flexible, and dev-friendly chat SDK that lets you build your app just the way you want without any limitations, MirrorFly’s React Native SDK is definitely worth a shot.
Want to know more about the solution? Talk to MirrorFly’s Team of Experts and they’ll take every step of your React Native chat app development right from there!
Ready to Build Custom React Native Chat app with MirrorFly?
MirrorFly makes it easy & quick! Add up to 1000+ in-app Messaging features for Android, iOS or Web apps.
Contact Sales Complete Ownership
-
Custom Security
-
On-Premise Hosting

Related Articles:
- Top 5 Features of Voice Call API
- Build a Video Conferencing App like Zoom
- Build a Chat App with React Native Gifted Chat
- Build a Gaming Chat App Like Discord
![]() Atchaya Jayabal is a passionate content writer specializing in SaaS, B2B and Technical Writing. She is best known for her adept expertise in curating tech content that resonates with readers.
Atchaya Jayabal is a passionate content writer specializing in SaaS, B2B and Technical Writing. She is best known for her adept expertise in curating tech content that resonates with readers.