Let's Integrate our React Native Chat SDK in a Few Minutes
Chat SDKs for React Native#
MirrorFly React Native Chat SDK makes the integration quick and easy for every client app & web, with its robust features and functionalities.
On client-side implementation, our chat SDK allows you to initialize and configure the messaging features easily. On server-side implementation, we ensure the most reliable infra-management services for chat features in the react native web & mobile app.
This guided documentation demonstrates how to integrate MirrorFly React Native Chat Messaging SDK in your app in simple steps, so that you can send and receive the messages without any interruption.
note
MirrorFly Chat SDKs use the fastest way in action, to experience the same you must use our trial app to enhance your existing real-time react native messaging app. Download our sample app and make a start with your app development. Click here to download the sample app.
MirrorFly Chat SDK is your go-to solution to quickly build, deploy, and manage in-app chat into your react native messaging apps. Quick start your development by downloading our sample app. Click here
Requirements#
The requirements for chat SDK for React Native Mobile App are:
React-Native>= 0.73.0 <=0.79.5Node Version>= 18.20.4npm- 10.7.0
Note: If your React Native version is greater than
0.76, ensure the New Architecture is disableafter setup.iOS – To enable/disable New Architecture in
Podfile:Android – To enable/disable New Architecture in
gradle.properties:
Things To Be Noted Before You Get Started#
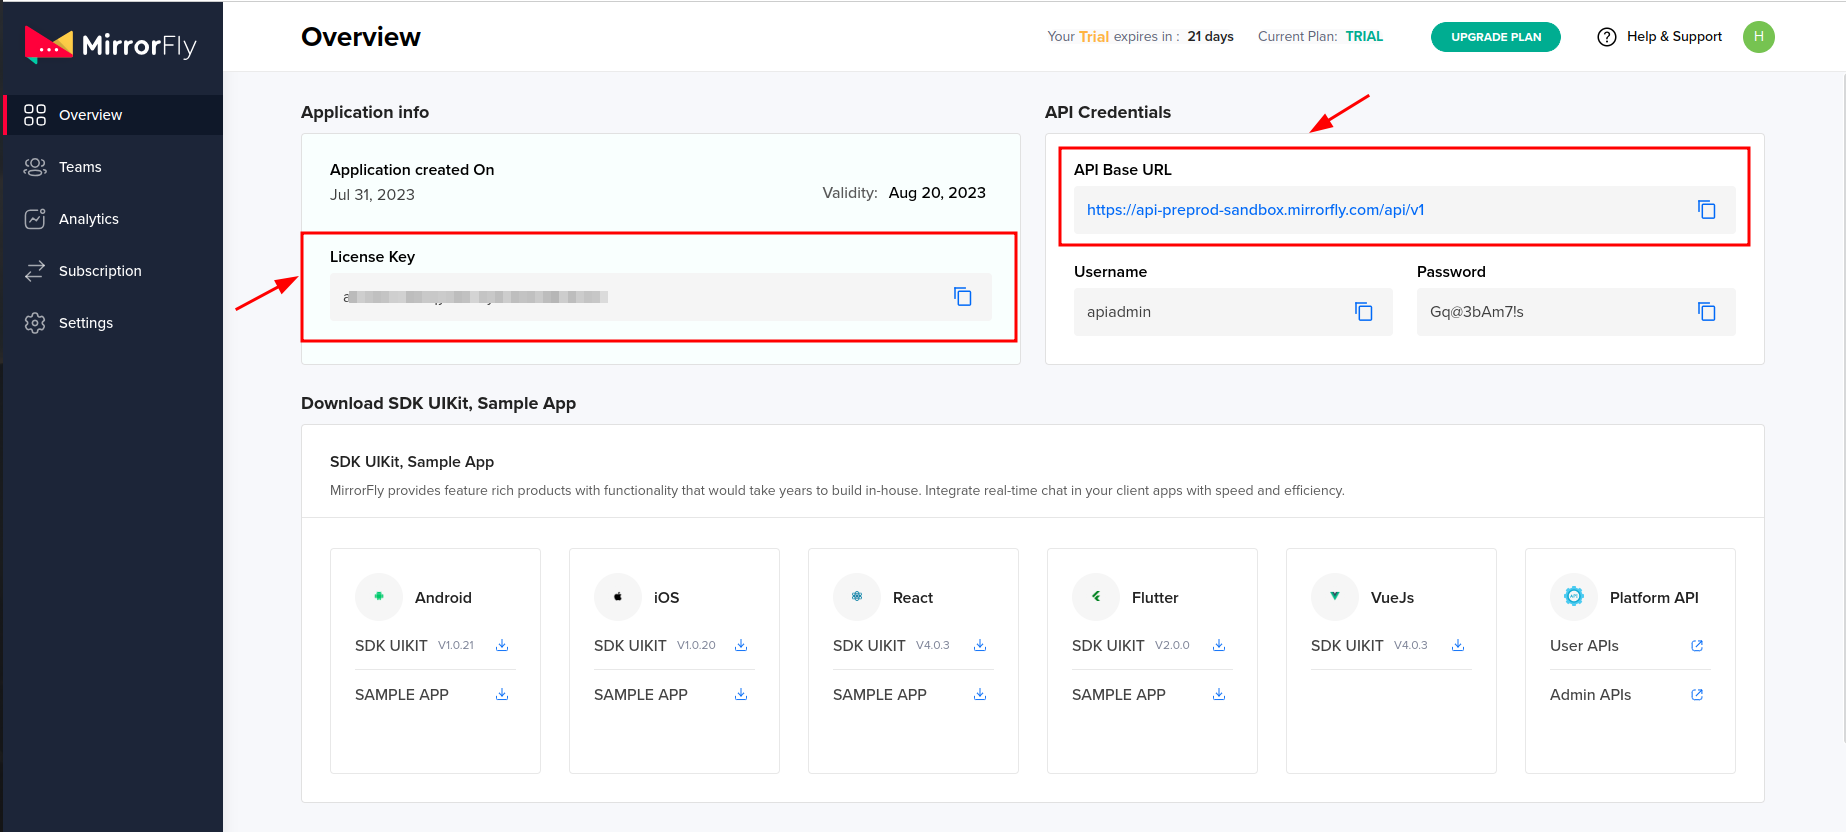
SDK License Key#
caution
Skip this part if you are already having your license key.
To integrate MirrorFly Chat SDK into your app, you will need a SDK License Key. The MirrorFly server will use this license key to authenticate the SDK in your application.
To get the License Key,#
Step 1: Register here to get a MirrorFly User account. Registration is subject to verification and would take up to 24 hours.
Step 2: Login to your Account
Step 3: Get the License key from the application Info’ section
Integrate the Chat SDK#
Step 1: Update all your packages.json files.
Step 2: Check your packages files have any duplicate if it is not working in iOS.
Integrate Using Npm package#
note
Install mirrorfly-reactnative-sdk npm package by using the below command.
Step 3: Install MirrorFly SDK in your React Native app.
Step 4: Import the SDK into your application where you want
Adding NPM package dependencies to Integrate the Chat SDK#
Initialize the React Native Messaging SDK#
Before you initialize the real-time React Native Chat SDK, you should have the data which responds to the changes in the connection status of the client app.
Now, paste the license key on the licensekey param and use the below given method to pass these data through the SDK for further processing.
In your App file (e.g., index.tsx or index.js), import the SDK and call the initializeSDK function with the appropriate parameters:
note
You can find the sandbox server details in the further Sandbox section for testing purposes.
Request Params#
| Arguments | Description | Type | Required |
|---|---|---|---|
| licenseKey | Mirrorfly's License Key | String | true |
| callbackListeners | Check here for callback listerners | Object | true |
Response Params#
| Arguments | Description | Type |
|---|---|---|
| statusCode | Status Code | Number |
| message | Success/Error Message | String |
Sandbox Details#
The apiUrl and licenseKey details can get it from the 'Overview' section in the mirrorfly Console dashboard.
note
To learn more about callback listeners, go to the Callback Event Listener Section.
Example Response#
Device ID Module#
Step 1: Download the Android file from the link above, Locate the necessary Android files, and copy them into the android/app/src/main/java/com directory.
Step 2: Download the files from the link above, locate the necessary iOS files, and add them using Add Files to [Your Project] in Xcode. Then, follow the steps below
Register User#
Step 1: You can use the below given method to register a new user.
Step 2: Once you are registered, you will be provided with a username and password that you can utilize to make the connection with the server via connect method.
Request Params#
| Status | Description | Type | Required |
|---|---|---|---|
| userIdentifier | Unique Id to Register the User. SDK only accepts the AlphaNumeric String, hyphens(-) and underscores(_) | String | true |
| fcmtoken | A registration token that is generated by FCM SDK for the user's app instance to send message for free | String | true |
| voipDeviceToken | Token to register VoIP device (optional) | String | true |
| mode | Determines the build environment for VoIP push notifications. Set to true in production mode and false in development mode. | String | true |
| registerMetaData | list of key - value pair of metadata object. Maximum size is 3 | String | true |
| forceRegister | default value false, provide true to force the logout of the old session If the registered user has reached the maximum no of multi-sessions or provide false to allow registration till the maximum no of multi-sessions | String | true |
Response Params#
| Arguments | Description | Type |
|---|---|---|
| statusCode | Status Code | Number |
| message | Success/Error Message | String |
| data | Username and Password | Object |
Sample Response:#
caution
username is the unique id that allows you to connect with other users to send or receive messages.
Connect to MirrorFly Server#
Step 1: You can use the credentials that you have obtained while registration to make the connection with the server.
Step 2: Once you have created the connection successfully, you will be responded with an approval message as ‘statusCode of 200’ or else will get an execution error.
Step 3: With this you can also trace the connection status that you receive in connectionListener callback function.
Step 4: If you face any error while making a connection with the server, you will receive an error message with callback.
Request Params#
| Status | Description | Type | Required |
|---|---|---|---|
USERNAME | Username | String | true |
PASSWORD | Password | String | true |
Response Params#
| Arguments | Description | Type |
|---|---|---|
| statusCode | Status Code | Number |
| message | Success/Error Message | String |
Sample Response:#
note
To learn more about all possible logins and profile related setup, go to Profile Section.
Send a Message#
Finally, to send a message to another user you can use the below given method,
note
You can use the const userJid = SDK.getJid(USER_ID) method, to generate a JID for any user.
Request Param#
| Status | Description | Type | Required |
|---|---|---|---|
TO_USER_JID | JID of the To User. username + "@" + xmppSocketHost | JID String | true |
MESSAGE_BODY | Text Message Body | String | true |
MESSAGE_ID | Text Message Id | String | true |
REPLY_TO | Specifies the Message ID of replied message (Optional) | String | true |
Response Params#
| Arguments | Description | Type |
|---|---|---|
| statusCode | Status Code | Number |
| message | Success/Error Message | String |
Response Format:#
Receive a Message#
To receive a message from another user you must implement the messageListener function. It’s a function that will be triggered whenever you receive a new message or related event in one-to-one or group chat. Further to initialize the SDK, you need to add the below callback method during the process.
note
To learn more on 'message listener callbacks,' see the Message Callback Event Listener Section