“What Are Video Codecs & How They Affect Video Call Quality and Streaming“
A 2-hour live meeting streams without delay. A 10-second reel plays the moment you upload it. So why don’t these videos stutter, buffer, or slow down, despite their huge file sizes?
Video Codecs reduces the audio and video file size making it easy to stream and store – without affecting the quality.
In this guide, you’ll learn what video codecs are, how they work behind every video, the various types our mobiles and computers use today, and some really interesting tips to choose the right codec for your videos.
In this guide, we’ll cover the following,
- What Is A Video Codec?
- Codecs Vs Containers
- Types Of Video Compression
- 3 Types Of Video Compression
- 3 Major Video Codecs & Standards
- How Video Codecs Work?
- How Video Codecs Work? (10 Steps)
- 7 Video Codec Trends in 2026
- How To Choose The Right Codec?
What Is A Video Codec?
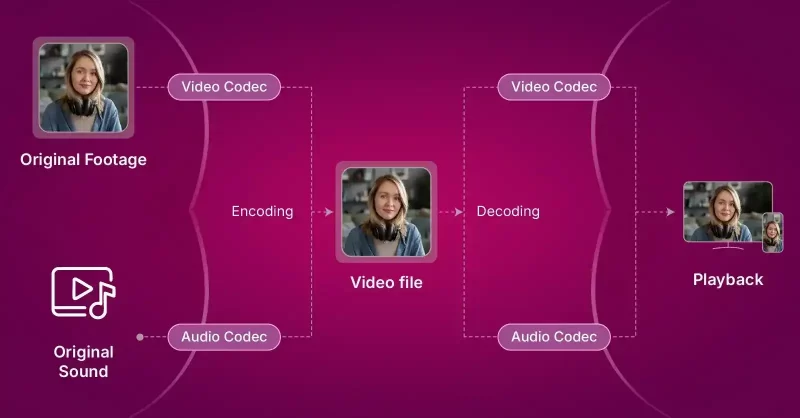
Video codec is a software or system that manages visual content by compressing or decompressing data for easier storage or faster streaming over networks.
The technology uses algorithms to reduce massive voice and video files smaller.
Codecs convert the raw data into byte-sized sequences so they can easily transmit across networks and reach the end-points as voice and video.
Codecs Vs Containers
In video apps,
Video Format = Codec + Container
Codec is a software that uses algorithms to encode and decode video and audio data. The key purpose of a codec is to simplify parts of the files and make them more manageable.
Codec = Encoder + Decoder
It removes the redundant information in data, converts them into byte sequences and decompresses back into playable video and audio.
On the other hand, a Container is the file format or wrapper of the video and audio. It organizes the byte-sized content that the codec generates after compression.
Container = File Format → File Extension (.mp4, .mov)
Container wraps the video streams and meta data together in a single file. The meta data usually contains related information like bitrate, resolution, device type, sub-titles and date of creation.
Here is a practical scenario explaining the difference between a codec and a container in video apps:
3 Types Of Video Compression
Video compression, performed by codecs, relies on methods to reduce file size and manage quality.
There are 3 primary types of video compression: lossy compression, lossless compression and hybrid/ enhancement layers.
1. Lossy Compression

Lossy compression reduces file size by removing redundant data from the original file.
It uses a technique known as Quantization to discard the high-frequency coefficient identified in the prediction error.
This method is suitable when the bandwidth is limited and is commonly used by modern codecs like H.264/AVC and H.265/HEVC.However, a key drawback of this method is that the output video looks pixelated.
2. Lossless Compression
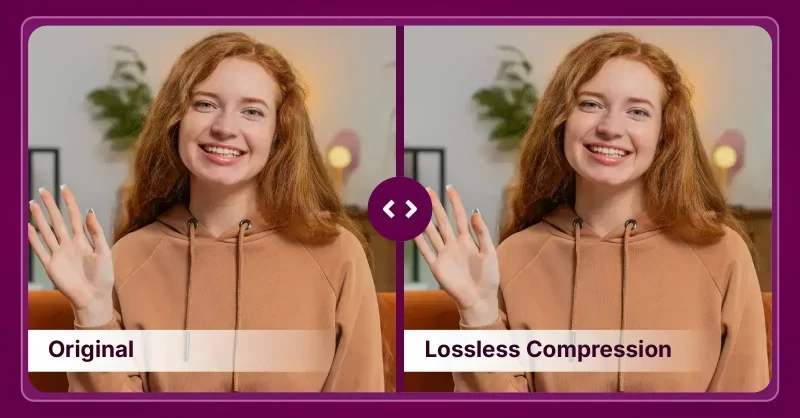
Lossless compression is a technique used in reducing the file size without any loss of quality.
This method uses a technique called entropy coding. Typically, it reduces the statistical redundancy by assigning shorter codes to frequent symbols and longer codes to less frequent symbols.
Lossless compression is majorly used in professional post-production workflows and codecs like FLAC (Free Lossless Audio Codec) adopt this technique to produce high-quality outputs where file-size is not a concern.
3. Hybrid / Enhancement Layers
In this method, codecs use a combination of 2 compression types: spatial (individual images) and temporal (sequence of images).
A. Inter-Frame Compression (Temporal Compression)
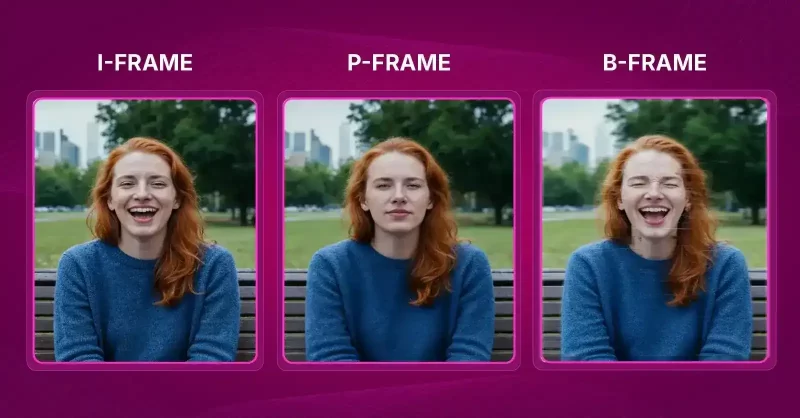
Inter-frame compression is a technique where the codecs store some of the frames in the video as key frames (I-frames) and the other frames in-between the key frames as delta frames.
When stored in this method, the codecs can identify the redundancy in between the consecutive frames. This sequence of frames is known as Group of Pictures (GOP), and it typically contains 3 types of frames:
- I-frames (Intra-frames): These are frames containing complete pictures without any reference to other coded pictures.
- P-frames (Predictive frames): These frames look at a previous frame to identify if there are any differences in motion.
- B-frames (Bi-predictive frames): These frames look at the motion in previous frames and predict the motion that may occur in the next frame.
On the whole, when the codecs categorize the frames based on the above criteria, it causes changes in the reference frames.The resulting incremental value of changes lead to reduction in the data volume, helping the codec achieve compression without losing data.
B. Intra-Frame Compression (Spatial Compression)
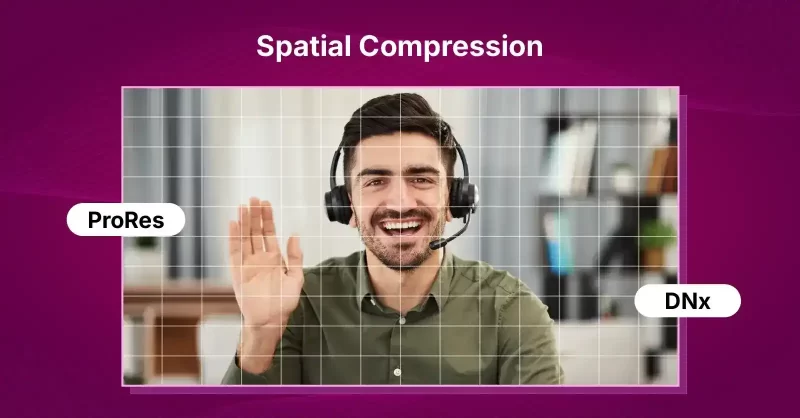
In this method, the codecs access each frame independently and compress them individually.
Owing to this, the technique is otherwise known as All-I or All-Infra compression.The technique is specifically used to test the prediction tools and spot the errors. Intermediary codecs like ProRes and DNx generally use it since each frame is easily accessible and the results of the compression is generally high-quality.
C. Enhancement Layers (Modern Codec Tools)
This technique involves incorporating advanced enhancement layers and tools to make the compression outcomes more efficient. Some of the modern codec tools include:
- Intra Sub-partitions (ISP): Intra-coded blocks can be split into smaller parts, probably two or four. The first part’s reconstructed signal is then used to predict the next part. This reduced the need for additional signaling for prediction modes.
- Combined Inter and Intra Prediction (CIIP): In this method, the codec creates 2 predictions – one with a regular inter-prediction and another with a limited intra-prediction. The codec then uses weighted averaging to combine both these predictions to form the final prediction.
- Intra Block Copy: Intra Block Copy is a tool that chooses a region of an already reconstructed part, and duplicates it to predict the current block.
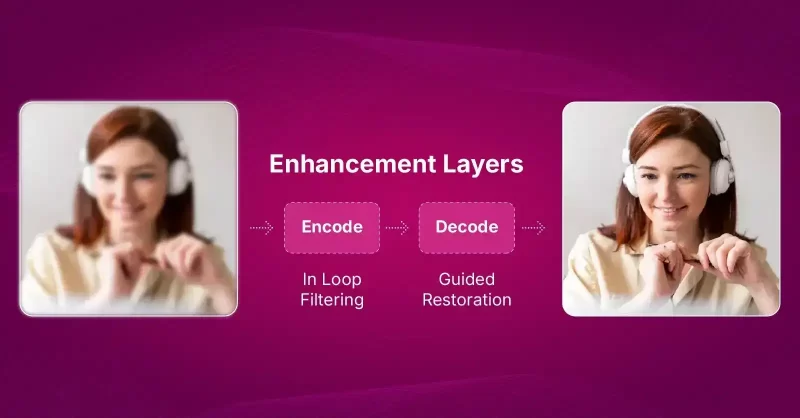
- Super-Resolution: In the super-resolution technique, the video is first downscaled and encoded at a lower resolution. During decoding, the signal is upscaled back to its original resolution. After that, in-loop filtering and guided restoration are applied to improve visual quality.
3 Major Video Codecs & Standards
Below is a breakdown of major video codecs in use today.
1. Current and Dominant Standardized Codecs
For years, organizations like ISO, IEC, and ITU-T have set the standards for most video codecs used worldwide.
A. H.264 / AVC / MPEG-4 Part 10
☑️ Best For: YouTube, social media, video conferencing, and general streaming
H.264 is the most common video codec across devices and platforms.
It’s known as MPEG-4 Part 10 or AVC because it was jointly developed by MPEG and ITU-T. H.264 mainly works as an inter-frame codec, meaning it stores only keyframes (I-frames) and the changes between them (P- and B-frames), which keeps file sizes small.
However, it can also work as an intra-frame codec, where every frame is stored independently for professional workflows.H.264 is considered the codec of the 1080p HD years and is used for recording, editing, and streaming. Popular implementations include x264 and Sony’s XAVC-S, usually wrapped in an MP4 container.
- Excellent balance between quality and file size
- Widely supported across all devices, browsers, and platforms
- Relatively fast to encode and decode
- Mature tools and optimized encoders (like x264)
- Less efficient compression compared to newer codecs (HEVC, AV1)
- Not royalty-free (some commercial licensing applies)
- Limited optimization for 4K and HDR content
B. H.265 / HEVC / MPEG-H Part 2
☑️ Best For: 4K streaming, Ultra HD Blu-ray, high-quality camera recordings
H.265, or HEVC, became the official successor to H.264 in 2013. It can cut video file sizes by about 40 – 60% while maintaining similar image quality, making it twice as efficient as H.264.
This efficiency makes it the codec of the 4K years, used in Ultra HD Blu-ray, streaming, and high-resolution cameras.
However, H.265 is more demanding on processing power and requires licensing fees. The main reference software is HM, and x265 is the most popular optimized encoder.
- About 40–60% smaller files than H.264 at the same visual quality
- Excellent for 4K and HDR video
- Supported by major streaming services and Ultra HD Blu-ray
- Heavy on processing power (slower to encode/decode)
- Patent-encumbered; licensing can be costly
- Limited browser support compared to H.264 and AV1
C. MPEG-2 / H.262
☑️ Best For: DVDs, SD television broadcasts, archival legacy formats
MPEG-2 is an older codec but still important. It uses inter-frame compression like H.264 but is far less efficient, producing larger files.
It remains widely used in DVDs and standard-definition TV broadcasts.
- Simple and stable, easy to decode
- Compatible with all legacy systems
- Still widely used in broadcast and DVDs
- Very low compression efficiency (large files)
- Poor performance for HD or 4K content
2. Next-Generation and Open-Source Codecs
A. VVC (Versatile Video Coding)/ H.266

☑️ Best For: Next-gen 4K/8K streaming, broadcast, and future-ready media production
VVC is the next official standard after HEVC. Its test version, VTM, shows the highest compression efficiency among modern codecs, outperforming AV1 by about 5% overall and up to 20% for 4K video.
It uses advanced tools like flexible block partitioning, better prediction models, and adaptive filtering to improve quality while reducing data use.
- Up to 50% smaller files than HEVC for the same quality
- Handles 4K, 8K, HDR, and 360° video extremely well
- Highly efficient for both streaming and broadcast
- Very slow to encode (computationally heavy)
- New and not yet widely supported in hardware or software
- Licensing terms still evolving
B. AV1 (AOMedia Video 1)

☑️ Best For: YouTube, Netflix, and other web streaming platforms (especially for 4K and HDR)
AV1 is a royalty-free, open-source codec created by the Alliance for Open Media (AOM), which includes companies like Google, Amazon, and Netflix. It combines ideas from VP9, Daala, and Thor.
AV1 offers strong compression efficiency beating x264 and x265 and performs especially well for screen recordings and lower-resolution videos.
It supports advanced features like motion compensation and Intra Block Copy for better screen-content compression.The trade-off is that it’s slow and complex to encode, though tunable for speed.
- Royalty-free and open source
- Better compression efficiency than H.265 in many cases
- Supported by major tech giants (Google, Netflix, Amazon, etc.)
- Great for streaming and web delivery
- Extremely slow to encode (especially at higher quality settings)
- Not fully supported by all hardware yet (especially older devices)
- Decoding can be power-hungry without hardware acceleration
C. JEM (Joint Exploration Model)
☑️ Best For: Research and codec development
JEM was developed to test new compression ideas for what eventually became VVC.
It delivers excellent efficiency, second only to VTM, but with very high computational cost, especially on the decoding side (up to 8× slower than HEVC’s reference software).
It includes tools like advanced block structures, extra prediction modes, and adaptive filters.
- Testbed for top-tier compression research (excellent efficiency)
- Introduced many tools later used in VVC
- Not practical for real-world use (too slow and complex)
- Intended for research only, not production
D. VP9 (Video Processor 9)

☑️ Best For: YouTube, web streaming, and browser playback
VP9, developed by Google, is a free and open alternative to H.265.
It creates smaller video files and streams more smoothly, making it popular for YouTube and web streaming. It was the direct predecessor to AV1.
- Free and open source (no licensing fees)
- Smaller file sizes than H.264
- Supported by most web browsers and YouTube
- Faster than AV1 to encode
- Not as efficient as AV1 or VVC
- Limited hardware support on older devices
- Lower quality than HEVC at the same bitrates in some cases
3. Professional and Editing Codecs
Professional and editing codecs focus on quality and ease of editing rather than small file sizes.
They use intra-frame compression, where every frame is complete and independent.
A. ProRes
☑️ Best For: Professional video editing and post-production
Developed by Apple, ProRes is widely used in professional editing because it’s high quality and easy to work with.
It produces large files since every frame is fully stored. There are several versions, from ProRes 422 Proxy (smaller) to ProRes 4444 XQ (highest quality).
- Easy to edit and playback (less CPU-intensive)
- Very high image quality
- Supported natively in Apple and professional workflows
- Large file sizes (not ideal for streaming or storage)
- Apple proprietary (limited support on non-Apple platforms)
B. DNxHD / DNxHR

☑️ Best For: Film and TV editing, professional post-production workflows
Created by Avid, these codecs are similar to ProRes. DNxHD supports up to 1080p resolution, while DNxHR handles 4K and higher.They’re commonly used in professional editing systems and stored in MXF or MOV containers.
- Excellent editing performance (frame-accurate)
- Openly documented and widely supported in professional tools
- Scales well across HD and 4K resolutions
- Large file sizes
- Limited use outside professional environments
C. Motion JPEG (MJPEG)
☑️ Best For: Digital Cinema Packages (DCPs), older cameras, and projection systems
MJPEG compresses each video frame as a separate JPEG image. This makes it simple but inefficient.
It’s still used in Digital Cinema Packages (DCPs) for movie theater projection.
- Simple compression (each frame is a JPEG)
- Easy to edit and decode
- No inter-frame dependency (each frame stands alone)
- Inefficient (large files)
- Outdated for modern compression needs
D. AVC Intra
☑️ Best For: Broadcast delivery and professional camera acquisition
Developed by Panasonic, AVC Intra uses H.264 compression but only stores full frames (All-I).
It’s widely used by broadcasters, especially in HD program delivery.
- High quality with predictable data rates
- Uses H.264 compression for efficiency
- Widely used by broadcasters and production houses
- Larger files than inter-frame codecs
- Limited outside broadcast and professional workflows
E. Historical Codecs
☑️ Best For: Legacy systems, research, and educational use
Older codecs paved the way for modern standards. Early examples include MPEG-1, MPEG-4 Visual, H.261, and H.263. VP8, Daala, and Thor were open-source projects that merged into AV1.
VP8 was often compared to H.264 as a free alternative during its time.
- Lightweight, easy to decode
- Historically important and widely supported in older systems
- Outdated compression and poor efficiency
- No HDR or high-resolution support
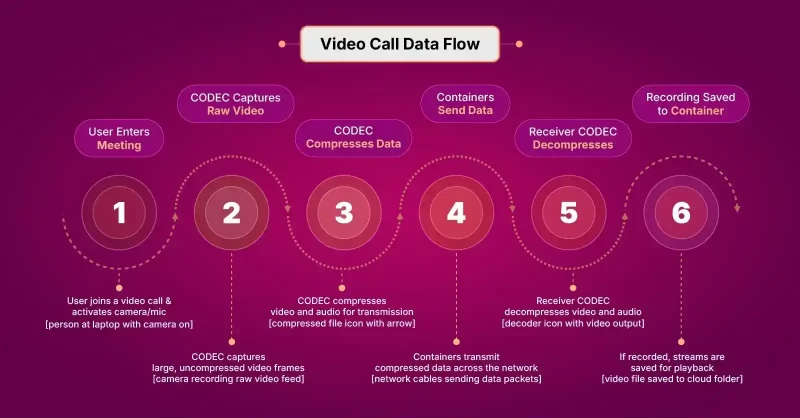
How Video Codecs Work? (10 Steps)
Codecs use algorithms to analyze a video and reduce its size, so they can be easily stored, transmitted or streamed.
In this section, we will break down the working of a video codec into sequential steps that happen across 3 phases: Prediction and Compression, Transformation and Quantization, and Final Encoding and Decoding.
Phase I: Prediction and Compression
One full digital video is nothing but a series of still frames. Codecs use prediction algorithms to identify redundant information in and out of these frames, remove them and compress the frames to limit the file size. To initiate this process, the codec first starts with block partitioning.
Step 1: Block Partitioning
The video picture is first divided into large units. These large units are partitioned into smaller blocks so the codecs can easily process different parts of the image.
To understand this more clearly, let us see how images are split in a High Efficiency Video Coding (HEVC).
- Blue Grid: CTU boundaries.
- Green Boxes: CUs.
- Orange Boxes: TUs (smaller blocks inside the CUs).
- Red Boxes: These typically represent CUs that have chosen a different prediction mode or a different CU depth. If they are the smallest final partitions, they could be TUs or PUs that use a specific coding type.
In HEVC, the image is split typically up to 64×64 pixels. However, modern codecs like Joint Exploration Model (JEM) and Versatile Test Model (VTM) use larger CTUs (up to 128 x 128) to reduce the signaling overhead.
Step 2: Selecting the Prediction type:
We’ve discussed the types – intra-frame and inter-frame. Once the blocks are partitioned, the codec must choose between these 2 types of prediction models. For this, you need to configure your encoder by choosing only intra-only mode or adjusting the GOP (Group of Pictures) structure.
Based on the configuration, your codec will choose the prediction method.
Step 3: Prediction Error Calculation
The codec compares its prediction with the actual content to figure out if there are any prediction errors or residual signals.
Phase II: Transformation and Quantization
At this stage, the codec process has a prediction error identified and compression begins.
How does the codec eliminate the prediction error?
Step 4: Transform Coding
The original form of this residual signal is a simple grid of numbers in a matrix.
These numbers represent the difference in the pixels of the original and predicted content in the spatial domain.
Hence, the Residual Signal (R) is a 2 × 2 block representing the difference between the original. pixels and the predicted pixels. Now in the spatial domain (actual pixels), the energy (or variation) is spread out across all pixels in the block. There is high correlation between each neighboring pixel.
Now, the DCT (Discrete Cosine Transform) / DST (Discrete Sine Transform) converts this correlated data into an array of transform coefficients in the frequency domain
Input: Residual Signal (Spatial Domain) → Output: Transform Coefficients (Frequency Domain)
T(R) → Ct

Ct = (8   2

      2   0)
Ct = Transform coefficients
Look at the resulting Ct matrix.
| Position | Original Signal R Value | Transformed Coefficient Ct Value | Interpretation |
| (0, 0) | Avg. \approx 2 | 8 (DC Coefficient) | Contains the bulk of the energy. Represents the average brightness difference. It’s the largest number. |
| (0, 1) | 2 | 2 (AC Coefficient) | Low horizontal frequency. Still meaningful. |
| (1, 0) | 2 | 2 (AC Coefficient) | Low vertical frequency. Still meaningful. |
| (1, 1) | 0 | 0 (High-Frequency AC) | Energy has been compacted. Represents high-frequency changes (sharp edges/noise) which are negligible in this residual. |
This is a typical example of a frequency domain. The signal energy becomes highly concentrated in just a few coefficients. The top-left of the matrix typically represents the low-frequency values.
The high-frequency coefficients, usually very small or close to zero, occupy the bottom-right of the matrix, as they represent only fine details, noise, or sharp edges.
- The coefficient at position (0, 0) is the DC coefficient, which represents the average energy or brightness of the entire block. This coefficient contains the most energy and is the most important.
- All other coefficients are AC coefficients, representing increasingly higher spatial frequencies (how quickly the pixel values change across the block).
The key is that the transform has concentrated the energy (4+2+2+0=8) mainly into the single DC coefficient (8), leaving the highest frequency coefficient as 0. We’ve reduced the magnitude of every non-zero number, and created one 0. These smaller integer values require fewer bits to represent.
This transformation and conversion of the residual signal to transform coefficient is very important for the next step → Quantization.
Step 5: Quantization
Quantization is the step where the actual removal of the redundant data happens. Once the codec gets 0s after transformation coding, quantization can safely eliminate them and drastically reduce the value of the other small coefficients, leading to a much smaller file size.
The purpose here is to aggressively round down the coefficients to introduce redundancy (zeros), which is achieved by dividing by the Quantization Step Size (Qstep). We’ll use Qstep =3
Transformed Coefficient Matrix (Ct) = (8   2
                                       2   0)

Quantization step size = 3

Quantization = Ct/ Qstep

             = (8/3  2/3
                2/3  0/3)

             = (2.67  0.67
                0.67  0.0)
At this step, aggressive round down happens to yield the Quantized Coefficient (Cq)
Cq = Round (Ct/ Qstep)
= Round (2.67 0.67

         0.67  0.0)

Cq = (3 1

      1 0)
Result of Quantization:
- The largest coefficient (8) is now just (3).
- The medium coefficients (2) are now just (1).
- The zero coefficient remains 0.
We’ve reduced the magnitude of every non-zero number, and created one 0. These smaller integer values require fewer bits to represent.
This stage is the lossy compression phase where the codec permanently removes data from the video file to reduce its size.
The transform coefficients are quantized, meaning the high-magnitude coefficients (which represent the main information) are kept, while low-magnitude coefficients (which represent fine detail and noise) are discarded or reduced in precision.
Phase III: Final Encoding and Decoding
This is the final phase of the compression cycle where the data is reversed, reconstructed and packaged for the final visual output.
Step 6: Entropy Coding (Lossless Compression)
This is the final encoding step, where the data is packaged for transmission.
During this stage, the encoder takes the quantized coefficients Cq that contains many zeros and converts them into a compact bitstream using 2 methods:
- Serialization: The Cq matrix is scanned (often in a zigzag or directional pattern) into a one-dimensional list: List of coefficients = [3,1,1,0]
- Context-Adaptive Binary Arithmetic Coding (CABAC: To this input, a statistical algorithm known as CABAC is applied.
The algorithm checks the “context” of surrounding elements and assigns shorter codes to most frequent symbols and longer codes to less frequent ones.
For example, instead of encoding [3,1,1,0] the encoder signals the magnitude of the non-zero values and the position of the last non-zero coefficient.
Since the last non-zero coefficient is in the third position (value 1), the encoder knows everything after that must be 0 and does not need to encode the final 0.
Step 7: Decoding and Reconstruction (Reversing the Process)
This step shows the loss introduced by quantization. The decoder needs to reconstruct the residual signal.
During the initial encoding process (quantization), we divided the large coefficients (Ct) by the quantization step size (Qstep) assuming it as 3 and then rounded the result to get the quantization coefficients (Cq) in small integers.
Typically during the lossy encoding, our formula was Cq = Round (Ct/ Qstep)
Now, for inverse quantization, the decoder needs to get back the magnitude of the coefficients to a useful level, so they can be converted back into pixels. Since the encoder is divided by Qstep, the decoder must multiply by it.
Hence our formula becomes,
Decoding (Inverse): C’t = Cq x Qstep
So C't = (3x3 1x3
          1x3 0x3)

   C't = (9 3 3 0)
Step 8: Inverse Transform (Frequency to Spatial Domain)
This step converts the frequency-domain data (C’t) back into pixel difference values in the spatial domain, yielding the reconstructed residual signal (R’) We apply the Inverse Transform T⁻¹ which is the mathematical reverse of the DCT/DST.
R’ = T⁻¹ (C’t)
The result of this inverse transformation (which is a matrix multiplication) is the reconstructed residual signal:
R’ = (4.5 1.5 1.5 0)
The 9 turned into 4.5 through the process of the Inverse Transform T⁻¹. It didn’t simply divide by 2. The energy it represented was mathematically dissolved and merged with the energy from the other coefficients to form the final four spatial pixel difference values (4.5, 1.5, 1.5, 0).
This is the decoder’s best estimate of the original difference between the actual block and the prediction. Note that it contains floating-point values, which are typically rounded back to integers for the final image.
Step 9: Reconstruction of Prediction
The decoder now reconstructs the Prediction Block (P) using the information found in the bitstream. Since the decoder has access to the exact same reference frames as the encoder, this prediction is perfectly reconstructed and involves zero loss.
For this example, let’s assume the encoder originally predicted the block with the following pixel values (this would have been based on pixels in a previously decoded reference frame):
P = (150 148 148 150)
Step 10: Final Picture Synthesis
The final picture is synthesized by adding the reconstructed residual signal (R’) which holds the corrected details and errors, back to the prediction block (P).
Decoded Block (D) = Prediction Block (P) + Reconstructed Residual (R’)
D = (150 148     +   (4.5 1.5
     148 150)         1.5 0.0)

D = (154.5 149.5
     149.5 150.0)
The resulting decoded block D contains the pixel values that will be used for the final displayed image.
When you compare with the original (hypothetical) block, the decoded block is very close, with the small differences being the final, permanent loss from the quantization step.
In-loop Filtering: This final step makes sure the decoded image looks as clear and natural as possible. During compression, the quantization process can create visible issues like blocky patterns (blocking) or ripples near edges (ringing).
To fix this, codecs use In-loop Filters that clean up the picture before saving it as a reference for future frames. These filters smooth out block edges, adjust pixel brightness to correct color shifts, and use smart algorithms to restore lost details without adding noise.
The result is a cleaner, higher-quality image that improves how later frames are predicted and displayed.
7 Video Codec Trends in 2026
Recent Trends:
1. Standardization of Next-Generation Coding
The world is consuming videos more and more, every day. This demands codecs that deliver higher compression efficiency.
For example, businesses prefer Versatile Video Coding (VVC) over AV1 for its bitrate savings (BD-rate), where AV1 can fall behind as much as 20%.
Similarly, VVC uses intra prediction mode 67 over HEVC’s mode 33.
On the other hand, modern apps require advanced tools like Affine Motion Compensated Prediction and Combined Inter and Intra Prediction (CIIP) for better image quality.
2. Competition from Open Source and Royalty-Free Codecs
Royalty-free codecs like AV1 are gaining attention in recent years.
Although the bitrate saving is higher with VVC, AV1 performs better than it especially for screen content and low-resolution videos.
Besides, we can also witness royalty-free codecs like VP9, Daala, Thor, MKV (Matroska), WebM, and FLAC.
3. Higher Efficiency = Huge Cost + Complexity
Businesses can’t agree more that each time they upgrade to higher efficiency, the set up turns complex and expensive.
Even a small efficiency gain points to massive increase in complexity.
A practical example is – when you use codecs like JEM, VTM or AV1 to encode a single 4K frame at maximum efficiency, it can take up to 30 mins or more.
4. Post-Production Codecs Moving Into Acquisition
The finest examples of this trend include ProRes (Apple) and Avid DNx. These codecs were initially used only for post-production.
But recently they are being used directly in cameras or external recorders like Atomos Ninja V.
These codecs store each frame as a complete image through All-Intra (All-I) compression making it easier to edit faster when compared to compression techniques like LongGOP (IPB) which depends on referencing other frames
Future Trends
5. Machine Learning and AI Integration
Many video conferencing apps have started adopting AI already.
They can predict the motion and textures in frames accurately and can fill in the missing or corrupted data better than traditional methods.
They can also make the best recommendations for optimizing the encoders.
6. Metrics Based On Perception
You can analyze the performance of a video codec with objective measurements like PSNR. But technology has evolved beyond that. Perceptual metrics can measure what exactly the users see and feel about it in your video apps.
One such measurement indicator is the VMAF (Video Multimethod Assessment Fusion) that combines both regular quality metrics with ML to predict how users feel about the video outcomes.
7. Advanced Prediction and Transform Techniques
Video codec technology is leaning more towards modern prediction and transformation tools like:
- Affine motion compensation that uses multiple parameters to model complex movements accurately.
- Advanced in-loop filtering that cleans up encoding artifacts using filters like adaptive loop filtering (ALF), AV1’s CDEF and guided restoration
- Sub-block motion prediction to predict motion on smaller block levels to attain perfect precision of output.
- Multiple Transform Selection (MTS) that best compresses the frames by choosing from different transform types like DCT or DST.
How To Choose The Right Codec?
New codecs have been introduced frequently in recent years. Each one of them is optimized for different intents and technical requirements. Honestly, there is no “silver bullet” solution to finding the best codec for your platform. But if you need to find the most suitable one, you need to be clear with what exactly you want.
We’ve come up with 8 useful considerations when you pick a codec for your video app.
1. Codecs are created for one of these intents:
- acquisition (to capture video and record it, used by camera),
- intermediary (primarily for editing and post-production) or
- delivery (for streaming or distribution).
Which of these tasks must your codec do on your app?
2. If you are focusing on minimizing the bit rate and file size, go with VTM or AV1. They generally deliver high efficient compression.
3. Practically, the more efficient your encoding is, the more complex it gets. It’s recommended to use presets and optimized encoders over maximum efficiency settings.
4. During high-intensity editing, choose All-I (intra-frame) codec. This makes cutting and accessing frames much smoother. Because interframe codecs with configurations like LongGOP/ IPB have to decode the B-frames and P-frames before and after them to compile a full picture and that may seriously impact the editing performance and compression time.
5. Each codec performs best for specific content types. Here is a quick table you might find useful:
| Content Type | Recommended Codec(s) |
| 4K / 8K UHD (High-Resolution) | VVC > AV1 > HEVC |
| Screen Content (e.g., slides, desktop sharing) | AV1 ≈ VVC-SCC > HEVC-SCC |
| Gaming / High-Motion Video | VVC > HEVC > AV1 |
| Talking-Head / Video Calls | AV1 > VP9 ≈ HEVC |
| Animation / Cartoon / CGI | AV1 ≈ VVC > HEVC |
| Surveillance / Security Video | VVC > HEVC |
| Live Streaming / Low Latency | HEVC > AV1 > AVC |
| Mobile / Low-Resolution (≤720p) | AV1 > VP9 > H.264 |
6. Each project requires a specific resolution, bitrate and decoding speeds. Here is a recommendation table to match the codec level to resolution and frame rate.
| Target Resolution & Frame Rate | Approx. Bitrate Range | H.264 (AVC) Level | H.265 (HEVC) Level | AV1 Level | VVC (H.266) Level |
| 480p @ 30fps (SD) | 1–2 Mbps | Level 3.0 | Level 2.0 | Level 2.0 | Level 2.0 |
| 720p @ 30fps (HD) | 2–4 Mbps | Level 3.1 | Level 3.0 | Level 3.0 | Level 3.0 |
| 720p @ 60fps (HD High FPS) | 3–6 Mbps | Level 3.2 | Level 3.1 | Level 3.1 | Level 3.1 |
| 1080p @ 30fps (Full HD) | 4–8 Mbps | Level 4.0 | Level 4.0 | Level 4.0 | Level 4.0 |
| 1080p @ 60fps (Full HD High FPS) | 6–12 Mbps | Level 4.2 | Level 4.1 | Level 4.1 | Level 4.1 |
| 1440p @ 30fps (2K) | 8–16 Mbps | Level 5.0 | Level 4.1 | Level 4.2 | Level 4.2 |
| 1440p @ 60fps (2K High FPS) | 10–20 Mbps | Level 5.1 | Level 4.2 | Level 4.3 | Level 4.3 |
| 2160p (4K) @ 30fps (UHD) | 15–25 Mbps | Level 5.1 | Level 5.0 | Level 5.0 | Level 5.0 |
| 2160p (4K) @ 60fps (UHD High FPS) | 25–40 Mbps | Level 5.2 | Level 5.1 | Level 5.1 | Level 5.1 |
| 4320p (8K) @ 30fps | 50–80 Mbps | Not supported | Level 6.0 | Level 6.0 | Level 6.0 |
| 4320p (8K) @ 60fps | 80–120 Mbps | Not supported | Level 6.1 | Level 6.1 | Level 6.1 |
7. Use codec profiles (e.g., High, High10) that support the required bit depth (example, 8-bit or 10-bit) and chroma subsampling (example, 4:2:0, 4:2:2, or 4:4:4). Higher numbers (like 4:4:4) generally indicate better quality.
8. For high-stake delivery, use VMAF (Video Multimethod Assessment Fusion) to perform the quality assessment. This usually calculates both subjective and perceptual quality unlike conventional metrics like PSNR which have limitations.
Want Help Choosing The Right Video Codec?
Ultimately, there are 10+ video codecs and each one works best in their own way. We believe our guide helped shortlist a few. However, to pick ‘The One’, you may need expert help!
Our team of developers can help you analyze and pick the right video codec right away. Above this, our team can help you build your own video calling platform.
How?
MirrorFly provides a white-label video calling solution that can help you build custom features and workflow, without any limitations. The solution is highly preferred for its 100% customization, full data control, custom security, self-hosting flexibility, and AI-powered capabilities.
Want more details? Contact our Sales Team!
MirrorFly Video API delivers smooth real time video with adaptive encoding and low latency across all devices.
Request Demo Smart compression
-
Fast encode decode
-
Scalability

![]() Atchaya Jayabal is a passionate content writer specializing in SaaS, B2B and Technical Writing. She is best known for her adept expertise in curating tech content that resonates with readers.
Atchaya Jayabal is a passionate content writer specializing in SaaS, B2B and Technical Writing. She is best known for her adept expertise in curating tech content that resonates with readers.