


I’ve built over 9+ video calling apps in different programming languages. Of all, building in Angular seemed to offer cross-platform benefits truly better. In this guide, I’ve created a simple tutorial explaining how to build a video calling app in Angular in 13 easy steps.
13 Steps To Build A Video Calling App: TL;DR
To develop an app with video calling capabilities in Angular. In this guide we will use MirrorFly’s Angular video calling solution.
- Get SDK license key: Obtain the credentials for MirrorFly Angular SDK
- Add NPM package: Install the Angular video SDK package
- Integrate call SDK: Add the video calling features to your Angular app
- Initialize call SDK: Configure and initialize the SDK
- Register User: Add a user with the SDK
- Connect to MirrorFly server: Connect the SDK with the server
- Prepare user JID: Format the user’s JID
- Make a voice call: Start audio call
- Make a video call: Start video call
- Receive incoming call: Listen for incoming call events
- Answer a call: Accept and join the call
- End a call: Disconnect the active call
- Decline a call: Reject the incoming call
What You’ll Need To Build The App
To build an Angular app, you will need the following:
- Supported browser versions:
- Edge: 13+
- Chrome: 16+
- Firefox: 11+
- Safari: 7+
- Pre-built video call solution
Why Angular for Video Calls?
- Angular is capable of handling multi-user streams without falling into callback loops, by natively integrating RxJS.
- In a group call setting with multiple participants, Angular’s feature ‘Signal’ takes care of updating only the specific user’s tile UI who mutes, speaks, or disconnects.
- Angular uses XSS scripting and HTML sanitization to prevent injection of malicious code into video tile overlays and text-chat payloads.
- It’s easy to maintain the server integrations and WebRTC media setups in Angular.
How To Create A Video Chat App In Angular (Complete Guide)
The ideal process to create a fully functional chat app is to begin with MVP development. You’ll focus only on building the basics first, test it out and then move ahead with developing other parts of the platform as per your business needs.
Step 1: Get SDK license key
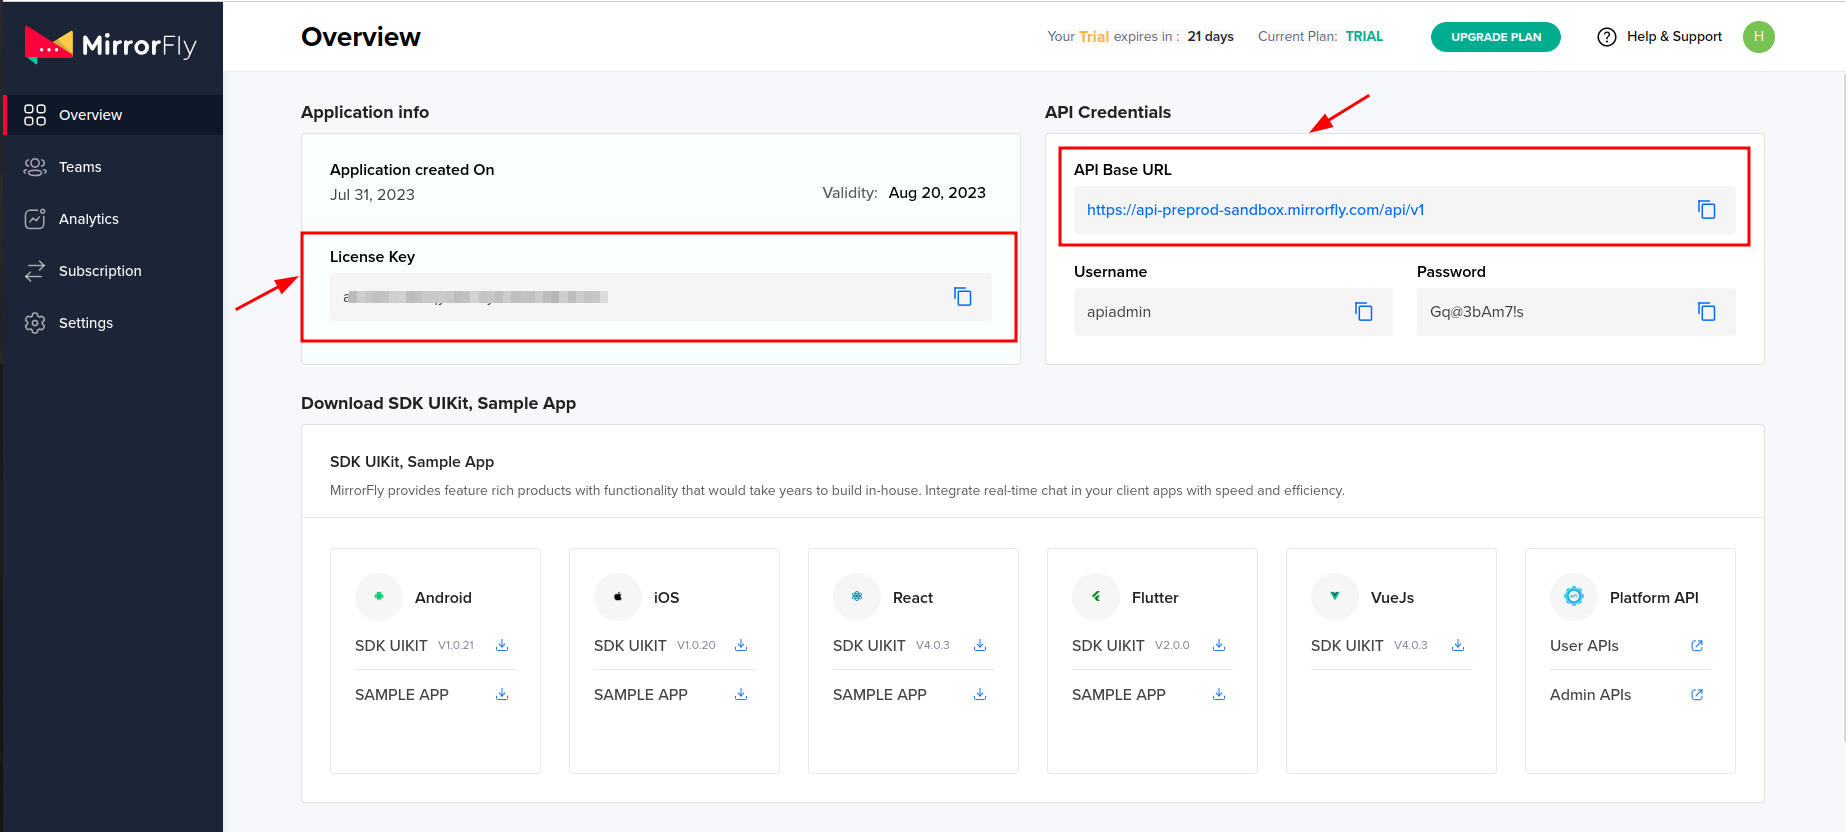
- Contact MirrorFly’s sales team
- Get a MirrorFly developer account
- Login to your account
- Navigate to the ‘Application Info’ section
- Get the license key
Step 2: Add NPM package
- Install the MirrorFly Angular video chat SDK
npm i mirrorfly-sdk- Inside your chat app, choose where you want to import the SDK and import it.
import * as SDK from "mirrorfly-sdk";Step 3: Integrate Angular Call SDK
- Go to your MirrorFly account dashboard, and click on the Download button or use the Angular video SDK package.
- Extract the files from the ZIP folder, and import them into the app’s root folder.
- After copying the file, include the script file into the index.html
- Open angular.json. Navigate the buttons build > options > scripts and then search the property. This is where you will find the array of scripts.
- Here, add the relative file paths of respective downloaded SDK JS files.
- Now, add the @ Component before the Decorator in the Root component.
declare var SDK: any;- After adding the SDK into Root component’s ngOnInit, initialize the Angular SDK within the angular’s initialization method.
Step 4: Initialize call SDK
- For the SDK initialization process to start, you will need the client app’s connection status data.
- Use the below method, and add the license key in the licensekey param to process the initialization further.
const incomingCallListener = (res) => {};
const callStatusListener = (res) => {};
const userTrackListener = (res) => {};
const muteStatusListener = (res) => {};
const missedCallListener = (res) => {};
const callSwitchListener = (res) => {};
const inviteUsersListener = (res) => {};
const mediaErrorListener = (res) => {};
const callSpeakingListener = (res) => {};
const callUsersUpdateListener = (res) => {};
const callUserJoinedListener = (res) => {};
const callUserLeftListener = (res) => {};
const callConnectionQualityListener = (res) => {};
const helper = {}

const initializeObj = {
  licenseKey: "XXXXXXXXXXXXXXXXX",
  callbackListeners: {
    connectionListener,
    incomingCallListener,
    callStatusListener,
    userTrackListener,
    muteStatusListener,
    missedCallListener,
    callSwitchListener,
    inviteUsersListener,
    mediaErrorListener,
    callSpeakingListener,
    callUsersUpdateListener,
    callUserJoinedListener,
    callUserLeftListener,
    callConnectionQualityListener,
    helper
  },
};

await SDK.initializeSDK(initializeObj);
Step 5: Register User
- Use the below method to register a new user to the application.
- After registering, you will have a username and password. Use these credentials in the connect method to start the connection with the server.
await SDK.register(`USER_IDENTIFIER`);Step 6: Connect to MirrorFly server
- After establishing the server connection, you will receive an approval message as ‘statusCode of 200’ if successful. Otherwise, the SDK will return an execution error.
- Use the connectionListener callback function to trace the status of the connection.
await SDK.connect(`USERNAME`, `PASSWORD`);Step 7: Prepare user JID
- Use the below code to generate a JID for any user:
const userJid = SDK.getJid(USER_NAME)Step 8: Make a voice call
- To start a call, use the callee’s user JID in the makeVoiceCall method. As the call starts, the SDK triggers a callStatusListener callback. This will listen to the status of the call connection.
SDK.makeVoiceCall(['USER_JID'], null, metadata, (success, error) => {
  if (error) {
    // Error occured while making the call
  }
  if (success) {
    // Call has been made successfully
  }
});
Step 9: Make a video call
- Now, to make a video call, use the callee’s user JID into the makeVideoCall method. Similar to the above step, the callStatusListener callback will track the status of the video call connection.
SDK.makeVideoCall(['USER_JID'], null, metadata, (success, error) => {
  if (error) {
    // Error occured while making the call
  }
  if (success) {
    // Call has been made successfully
  }
});
Step 10: Receive incoming call
- Now to start receiving incoming calls, the callee’s client app will need an incomingCallListener callback. In this callback, the callee user will receive the data related to the call whenever an user makes a call to another user.
// Callback Response Argument Structure
{
  allUsers:["USER1_JID", "USER2_JID",...],
  callMode: "onetoone|onetomany",
  callTime: 1681905421215,
  callType: "audio|video",
  from: "USER_JID|FROM_USER_JID",
  groupId: null|GROUP_ID,
  localUser: BOOLEAN,
  roomId: "wmupbheao",
  roomLink: "ndy-bmkb-eui"
  status: "calling",
  to: "FROM_USER_JID|GROUP_JID",
  toUsers: ["USER_JID"],
  userDetails: {},
  userJid: "FROM_USER_JID",
  usersStatus: [{}]
}
Step 11: Answer a call
- Use the answerCall method to answer the call.
SDK.answerCall((success, error) => {
  if (error) {
    // Error occured while answering the call
  }
  if (success) {
    // Call has been answered successfully
  }
});
Step 12: End a call
- To end ongoing calls, use the endCall method.
SDK.endCall((success, error) => {
  if (error) {
    // Error occured while ending the call
  }
  if (success) {
    // Call has been ended successfully
  }
});
Step 13: Decline a call
- To decline the call, use the declineCall method.
SDK.declineCall((success, error) => {
  if (error) {
    // Error occured while declining the call
  }
  if (success) {
    // Call has been declined successfully
  }
});
Build Your Own Custom Video Call App In Angular
Using a pre-built SDK to build real-time video calling apps is a proven approach to get your app up and running in a few hours. If you wonder if this is the right fit for you, here is a quick checklist of what a pre-built SDK would do for your business.
- Supports 100% customization of features, and workflows.
- A few solutions like MirrorFly and Apphitect gives complete control of data, security and infrastructure.
- Flexible hosting: self-host the solution on-premise, on cloud or any server your business demands.
- Give full access to source code and enable white-labeling the video calls with the company’s brand elements.
Explore MirrorFly video call solution by booking a free demo.
Skip 6+ months of development with production ready video APIs, SDKs, and complete source code.
Contact Sales Global Scalability
-
Custom Security
-
On-Premise Hosting
 Global Scalability
Related Articles
- How to Build a React JS Video Chat App in 2026?
- React.js vs Angular: Which Is Better?
- How to Build an Android Voice and Video Calling App Using Java?
- How to Build a Webinar App With React & React Native?
- How to Build a React Native Video Calling App?
- How to Build a Flutter Video Chat App?
 A technical content marketer specializing in Real-time Communication Solutions, adept at making complex concepts easy to understand.