


After building and testing 7+ video calling apps for enterprises, and startups, I created a clear, step-by-step tutorial on how to build react native video calling apps the easiest way. I’ve also covered the prerequisites to create one, and the tools to build them in 2026.
Steps To Build A Video Calling App: TL;DR
To develop a cross-platform app with video calling capabilities in React Native:
- Get SDK license key: Obtain the credentials for MirrorFly SDK
- Add NPM package: Install the React Native SDK package
- Integrate call SDK: Add the calling features to your app
- Initialize call SDK: Configure and initialize the SDK
- Create a User: Generate a MirrorFly user account
- Register User: Add a user with the SDK
- Connect to MirrorFly server: Connect the SDK with the server
- Prepare user JID: Format the user’s JID
- Make a voice call: Start audio call
- Make a video call: Start video call
- Receive incoming call: Listen for incoming call events
- Answer a call: Accept and join the call
- End a call: Disconnect the active call
- Decline a call: Reject the incoming call
Why React Native for Video Calls?
- You use a single codebase for video streaming, call logic and signaling once, but can run it on both iOS and Android.
- Whichever OS you launch your app in, the experience can be maintained consistently.
- You get to view the modifications instantly with React Native’s Fast Refresh feature, without having to build it from scratch.
- It’s easy to connect the React Native video calling components to system-level call frameworks.
What You’ll Need To Build The App
To build a React Native app for mobile & web, you will need the following:
- React-Native >= 0.73.0 <=0.79.5
- Node Version >= 18.20.4
- npm – 10.7.0
- Pre-built video call solution
How To Create A Video Calling App In React Native
To create a video calling app, you can start with a simple MVP, use a pre-built React Native solution, and expand as your needs grow. Follow the below steps for building video calling app using a custom SDK like MirrorFly’s WebRTC React Native Solution:
Step 1: Get SDK license key
- Contact MirrorFly’s sales team
- Get a MirrorFly developer account
- Login to your account
- Navigate to the ‘Application Info’ section
- Get the license key
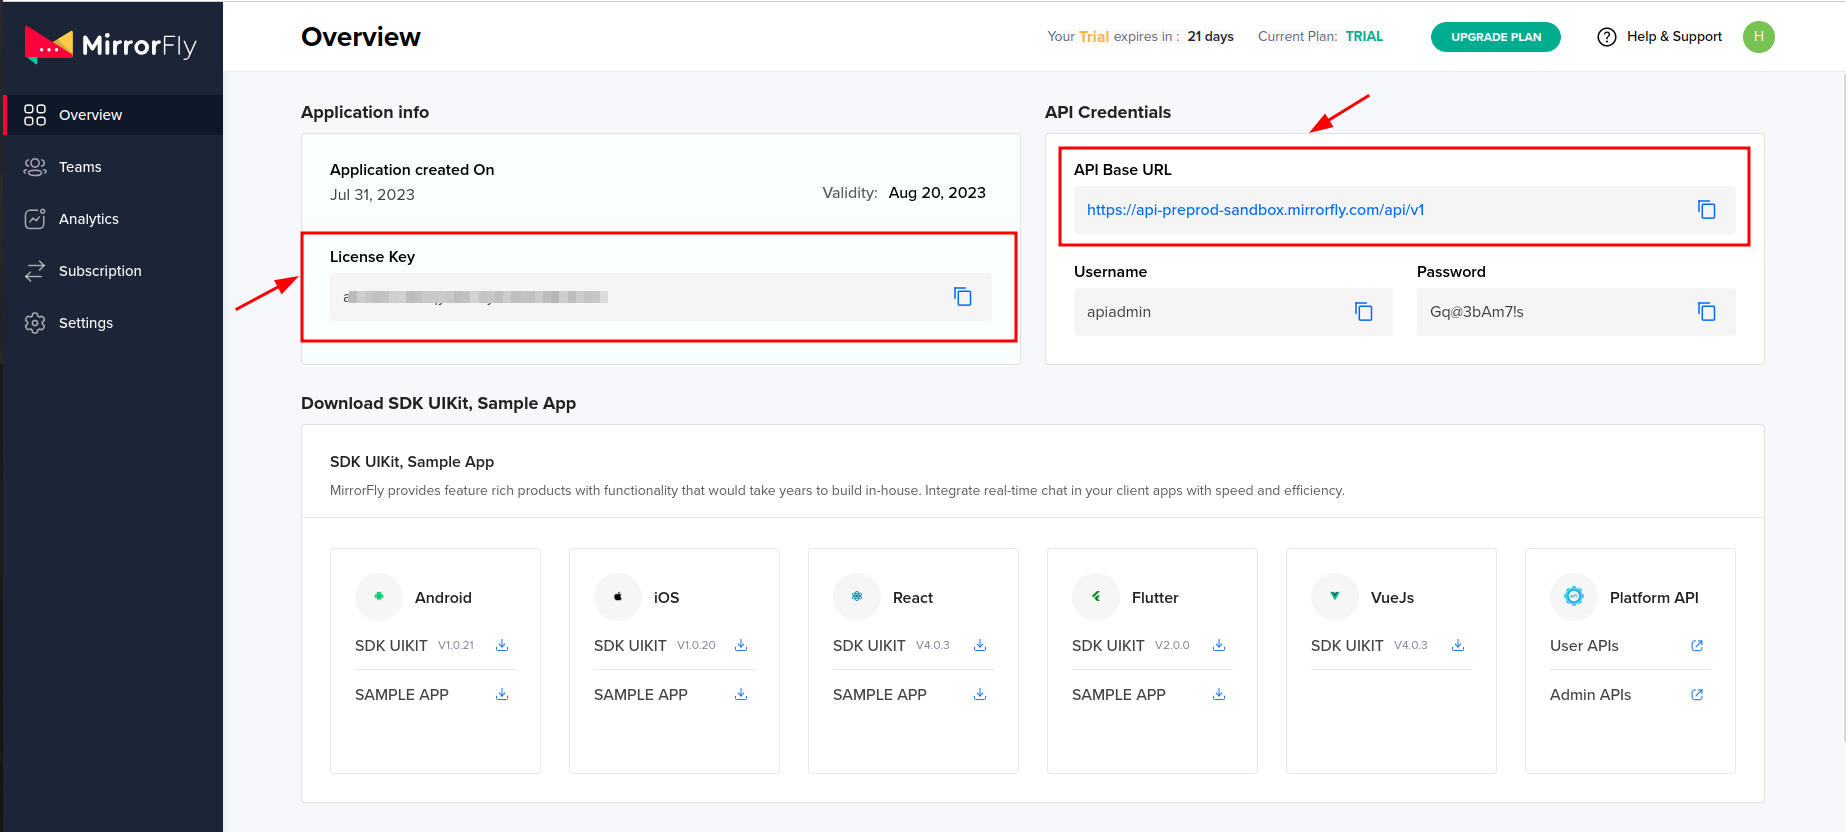
Step 2: Add NPM package
- Install the MirrorFly react native video chat SDK
npm i mirrorfly-reactnative-sdk- Select where you want to import the SDK in your app, and import it.
import { SDK } from "mirrorfly-reactnative-sdk";Step 3: Integrate call SDK
- Into the selected folder, add the dependencies as given below:
{
   // Add chat related dependencies. And then add the below calls related dependencies
   "react-native-webrtc": "124.0.4" // must use version "124.0.4"
   "react-native-background-timer": "^2.4.1",
   'react-native-permissions':'^5.2.1'
}
Step 4: Initialize call SDK
- Before you initialize the react native video call SDK, you will need a few details related to the changes in the connection status of the client app.
- In the space for the license key param, paste the license key you obtained from your MirrorFly account dashboard.
- To pass data through the SDK and process further, use the below method:
const incomingCallListener = (res) => {};
const callStatusListener = (res) => {};
const userTrackListener = (res) => {};
const muteStatusListener = (res) => {};
const missedCallListener = (res) => {};
const mediaErrorListener = (res) => {};
const callSpeakingListener = (res) => {};
const callUsersUpdateListener = (res) => {};
const callSwitchListener = (res) => {};
const userCallLogListener = (res) => {};

const helper = {}

const initializeObj = {
  apiBaseUrl: `API_URL`,
  licenseKey: `LICENSE_KEY`,
  isTrialLicenseKey: `TRIAL_MODE`,
  callbackListeners: {
    connectionListener,
    incomingCallListener,
    callStatusListener,
    userTrackListener,
    muteStatusListener,
    missedCallListener,
    mediaErrorListener,
    callSpeakingListener,
    callUsersUpdateListener,
    callSwitchListener,
    userCallLogListener,
    helper
  },
};
await SDK.initializeSDK(initializeObj);
Step 5: Register User
- Use the below step to register a new user. On registering, you will get a new username and password.
await SDK.register(`USER_IDENTIFIER`, `ANDROID_FCM_TOKEN`, `IOS_VOIP_TOKEN`, `IS_PRODUCTION`);Step 6: Connect to MirrorFly server
- Use the credentials obtained from the above step to connect with the server.
- Once the connection is established, it responds with an approval message ‘statusCode of 200’. Else, it will get an execution error.
await SDK.connect(`USERNAME`, `PASSWORD`);Step 7: Prepare user JID
- To generate a JID for any user, make use the below code:
const userJid = SDK.getJid(USER_NAME)Step 8: Make a voice call
- Add the user JID to the makeVoiceCall method.
await SDK.makeVoiceCall(['USER1_JID']);Step 9: Make a video call
- Add the user JID to the makeVideoCall method.
await SDK.makeVideoCall(['USER1_JID']);Step 10: Receive incoming call
- Register to incomingCallListener to the callee’s client app to start receiving incoming calls.
// Callback Response Argument Structure
{
  allUsers:["USER1_JID", "USER2_JID"],
  callMode: "onetoone",
  callTime: 1681905421215,
  callType: "audio|video",
  from: "USER_JID|FROM_USER_JID",
  groupId: null,
  localUser: BOOLEAN,
  roomId: "wmupbheao",
  roomLink: "ndy-bmkb-eui"
  status: "calling",
  to: "FROM_USER_JID",
  toUsers: ["USER_JID"],
  userDetails: {},
  userJid: "FROM_USER_JID",
  usersStatus: [{}]
}
Step 11: Answer a call
- To answer a call, use the answerCall method.
await SDK.answerCall();Step 12: End a call
- Use the endCall method to end ongoing calls
await SDK.endCall();Step 13: Decline a call
- Use the declineCall method to decline the call
await SDK.declineCall();Build Your Own Custom Video Call App In React Native With MirrorFy
MirrorFly is a secure CPaaS solution that you can use to build real-time video calling features into any web or mobile app. Their React Native Video Chat SDK solution supports over thousands of features.
Here’s why you need MirrorFly for building video calls:
- 100% customizable SDK: You don’t need to worry about rigid features when you build your app. MirrorFly is a fully customizable solution that gives you complete freedom to personalize any part, be it features or workflows, without any limits.
- Full data control: When building a meeting app in React Native, most companies expect their data to stay in their control. Since MirrorFly supports self-hosting, you’ll have full control over the app’s data, including user data that traverses through MirrorFly’s video call SDK.
- Custom Security: One of the major concerns when building react native video calling apps with third-party solutions is the level of security it supports. With MirrorFly, businesses need not worry about this factor. It supports custom security allowing additional layers of privacy that the business demands, along with built-in AES encryption with region-specific compliances.
Explore MirrorFly video call solution by booking a free demo.
Enable high-quality video calls, video meetings, chat, and collaboration features across mobile applications without building from scratch.
Contact Sales Global Scalability
-
Custom Security
-
On-Premise Hosting
 Global Scalability
Related Developer Guides on Video Communication
- How to Build a React Video Chat App
- How to Build a Flutter Video Chat App
- How to Build an Android Video Calling App Using Java
- How to Build a Webinar App With React & React Native
- How to Build an Angular Video Chat App in 2026?
 A technical content marketer specializing in Real-time Communication Solutions, adept at making complex concepts easy to understand.