Let's Integrate our Audio/Video Call SDKs for iOS in 5 Mins
Quick Start#
Audio/Video Call SDKs for iOS#
With MirrorFly Video Call SDK for iOS, you can easily add real-time call features to your client app within 30 minutes.
Through our client SDK, you can initialize and configure chat into your app with minimal efforts.
Note : If you're looking for the fastest way to build your app’s UI with MirrorFly Chat SDKs, you can use our sample apps. To get our sample apps, click here
Integrate Audio & Video Call SDK for iOS App#
Requirements#
The below are the requirements for video chat SDK for iOS App
- Xcode 15.0 or later
- iOS 13.0 or later
- Swift 6.0 or later
Things To Be Noted Before You Get Started#
SDK License Key#
caution
Skip this step if you are already having your license key.
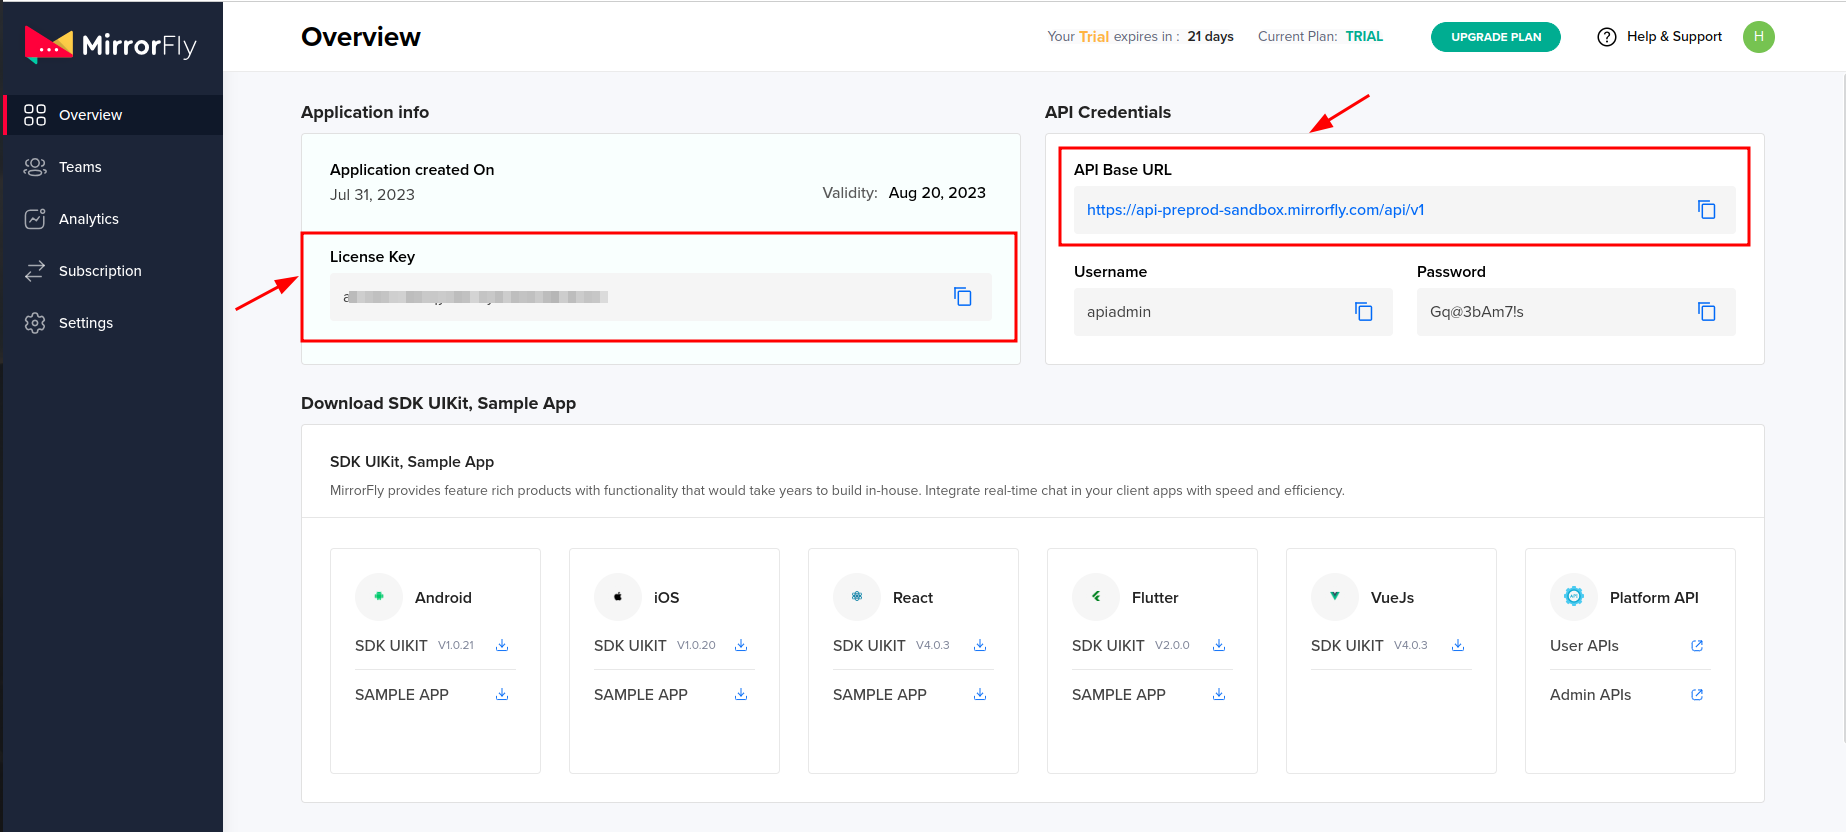
To integrate MirrorFly Video Chat SDK into your iOS app, you will need an SDK License Key. The MirrorFly server will use this license key to authenticate the SDK in your iOS app.
To get the License Key,#
Step 1: Register here to get a MirrorFly User account. Registration is subject to verification and would take up to 24 hours.
Step 2: Login to your Account
Step 3: Get the License key from the application Info’ section
Step 4: Download the iOS SDK
Getting Started#
Step 1: Add the following ChatSDK pod to your Podfile. If pod hasn't been initialised yet means, create a Podfile by executing pod init command.
Step 2: Add the below given pod hook code block at the end of the pod file and thus, finally install the pods by executing pod install command.
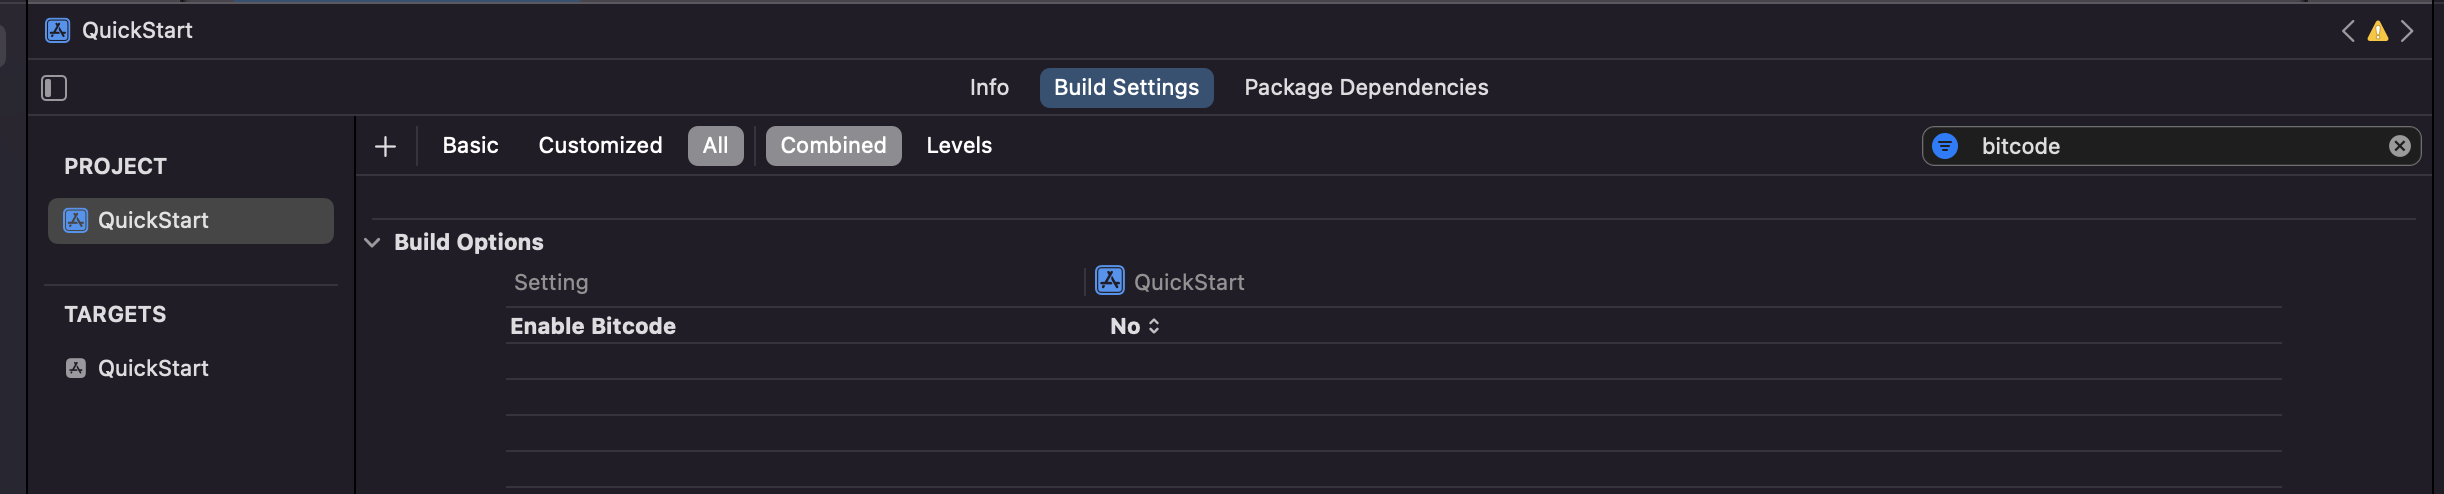
Step 3 : Now, disable the bitcode for your project
Step 4: Now, enable all the below mentioned capabilities into your project.
| Capabilities |
|---|
| Background Modes |
Now, go to the background mode and enable the below given modes
| Background Modes |
|---|
| Voice over IP |

Step 5: Enable Audio and Video record permisions.
Provide Microphone and Camera usage description in the plist file of your project.
Configure the SDK server & Data#
Now, configure the server details in SDK and access the data globally using the AppDelegate class.
Initialize Data for Calls#
To start using the sdk, there are a few basic pieces of data that must be made available for the SDKs to function perfectly.
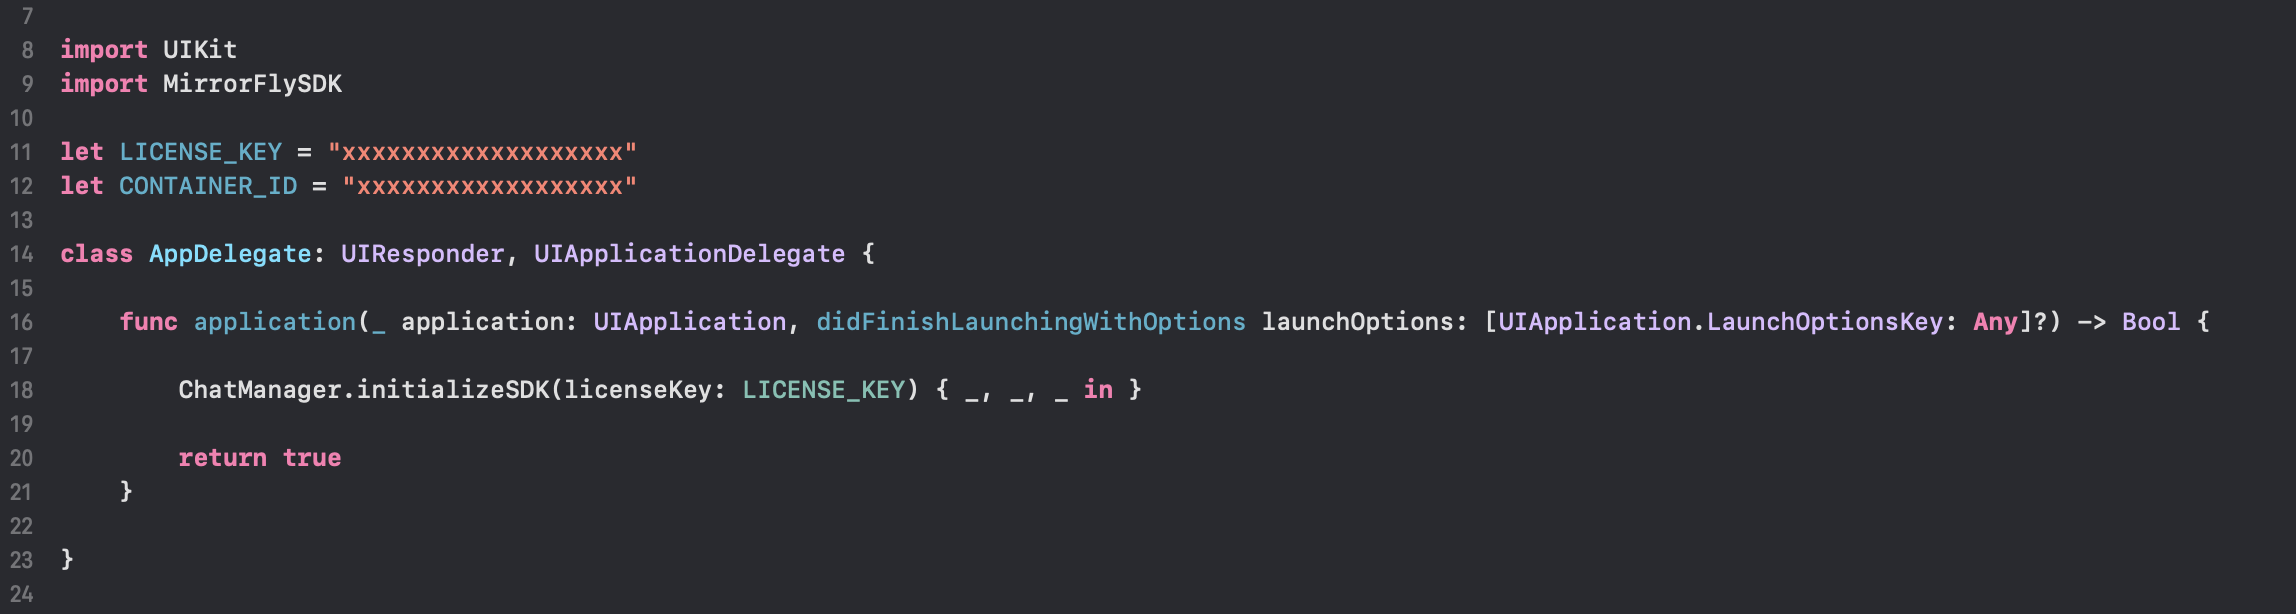
Thus, we utilize the usage of the initializeSDK function to validate the license key and to fetch critical data from server for SDK initialization.
Furthermore, in your project you must use the AppDelegate class within the didFinishLaunchingWithOptions method call the initialization method by passing the license key. Let's have a look at the example given below.
| Argument | Type | Description |
|---|---|---|
| LICENSE_KEY | String | Used to proceed with Registration |
| CALLBACK | FlyCompletionHandler | FlyCompletionHandler is implemented and expressed as lambda expression |
Registration#
The below method should be called to register a new user. This method will take care of both Sandbox mode registration as well as Live mode registration based on isTrialLicense provided in the ChatSDK.Builder class.
info
Unless you logged out of a session, make sure that you have called the Registration method only once in an application
Note: While registration, the below
registerApiServicemethod will accept the additional params required for notification processing on server andIS_FORCE_REGISTERas an optional param for maintaining sessions,USER_TYPEas an optional param to provide type of user andMETA_DATAas an optional param to provide MetaData of user.
| Argument | Type | Description |
|---|---|---|
| USER_IDENTIFIER | String | Unique Id to Register the User. User identifiers can only contain lowercase alphanumeric characters, hyphens (-), and underscores (_). |
| APNS_DEVICE_TOKEN | String | Token to register APNS device (optional) |
| VOIP_DEVICE_TOKEN | String | Token to register VoIP device (optional) |
| IS_EXPORT | Bool | true for production(apns certificate) builds and false for sandbox(apns certificate)builds |
| IS_FORCE_REGISTER | Bool | default value true provide true to force the logout of the old session If the registered user has reached the maximum no of multi-sessions or provide false to allow registration till the maximum no of multi-sessions |
| USER_TYPE | String | Type of the user (optional) |
| META_DATA | [MetaData] | list of key - value pair of metadata object. Maximum size is 3 (optional) |
| CALLBACK | FlyCompletionHanlder | FlyCompletionHanlder is implemented and expressed as lambda expression for easy reading |
To know more about
FlyCompletionHanlderclickhere
caution
If IS_FORCE_REGISTER is false, and it reached the maximum no of multi-sessions then registration will not succeed it will throw a 405 exception, Either IS_FORCE_REGISTER should be true or one of the existing session need to be logged out to continue registration.
Note: If you want to use your own Id, you can use the
userJidin theRegisterresponse.
Connect to the Chat Server#
In order to transfer the initial call data payload, we can make use of Chat server.Once Registration was successful, ChatSDK automatically attempts to connect to the Chat Server and ChatSDK also observe the changes in application state, and accordingly it will try to connect and disconnect the Chat Server.
Observe Connection Events#
The connection status can be observed and tracked by confirming the ConnectionEventDelegate. To do that you need to set ‘delegate’ in your ViewController's viewDidAppear method like below.
Once the ConnectionEventDelegate has been set, you will be able to receive the connection status in the delegate method as mentioned below.
To know more about ConnectionEventDelegate visit ConnectionEvent Delegate
Observe Call Events#
To observe Call events create and set a Singleton Class that conforms to the CallManagerDelegate of FlyCall framework, and pass that object to the below method.
| Argument | Type |
|---|---|
| CALLMANAGER_DELEGATE | CallManagerDelegate |
Setup Call UI#
To set the Call UI that has to be presented during an outgoing call, call the below method. An instantiated view controller object has to be passed in the method.
| Argument | Type | Description |
|---|---|---|
| CALL_VIEW_CONTROLLER | UIViewController | A class that conforms to UIViewController |
Presenting the call UI#
Call SDK handles the UI presentation for an outgoing call. Call the below method after declaring the Call SDK and or before making a call.The below method sets the view on top of which the call ui will be presented.
| Argument | Description |
|---|---|
| VIEW_TO_PRESENT | ViewController in which Call UI has to be presented. |
info
Setting the CallManager.setViewToPresentController is optional else the Call SDK will present the UI for an outgoing call in the project's root viewcontroller.
Preparing user jid#
To generate a JID for any user, use the below method.
| Argument | Type | Description |
|---|---|---|
| USER_NAME | String | unique username which we get from Register response. |
Make a Voice Call#
To make a one to one voice call, call the below method.
| Argument | Type | Description |
|---|---|---|
| USER_JID | String | Jid of another registered user |
| CALL_METADATA | [CallMetadata] | Optional Call metadata information(Maximum size is 3) |
| COMPLETION | (Bool,FlyError) | completion callback |
caution
To make and receive a voice/video call, Microphone and Camera usage permissions were required. Call SDK also provides method to check those permissions like CallManager.isAudioCallPermissionsGranted() and CallManager.isVideoCallPermissionsGranted(). We can also make use of these methods too.
caution
If one to one call feature unavailable for your plan then it will throw 403 exception.
Receive a call#
Call SDK will take care of receiving and processing the received call payload and triggering the CallKit if you are connected to the server in foreground state.
Once the CallKit is being presented with Accept/Reject Call buttons, we can either choose to attend or reject the call. If we attend the call the below method of the CallManagerDelegate will be triggered, and the status wil be of the case ATTENDED. Inside that method we can present the incoming call UI.
| Argument | Type | Description |
|---|---|---|
| CALLSTATUS | CALLSTATUS enum | An enum class defines the current status of the call |
| USER_ID | String | For this CALLSTATUS our own userId will be returned from SDK |