Let's Integrate our Audio/Video Call SDKs for iOS in 5 Mins
Quick Start#
warning
MirrorFly Call SDK V1 is no longer supported as a new version is released. Check out our latest Chat SDK V2 here.
To migrate from MirrorFly Call SDK V1 to V2 please follow the Migration guide steps.
Audio/Video Call SDKs for iOS#
With MirrorFly Audio & Video Call SDK for iOS App, you can easily add real-time calling features to your client app within 10 minutes.
Through our client SDK, you can initialize and configure chat into your app with minimal efforts.
Note : If you're looking for the fastest way to build your app’s UI with MirrorFly Chat SDKs, you can use our sample apps. To get our sample apps, click here
Integrate Voice & Video Call SDK into iOS App#
Requirements#
To build your iOS app with MirrorFly Audio Room & Video call SDK, you’ll need the following:
- Xcode 14.1 or later
- iOS 12.1 or later
- Swift 5.0 or later
Things To Be Noted Before You Get Started#
SDK License Key#
caution
Skip this step if you are already having your license key.
To integrate MirrorFly video & voice Call SDK into your iOS app, you will need an SDK License Key. The MirrorFly server will use this license key to authenticate the SDK in your iOS application.
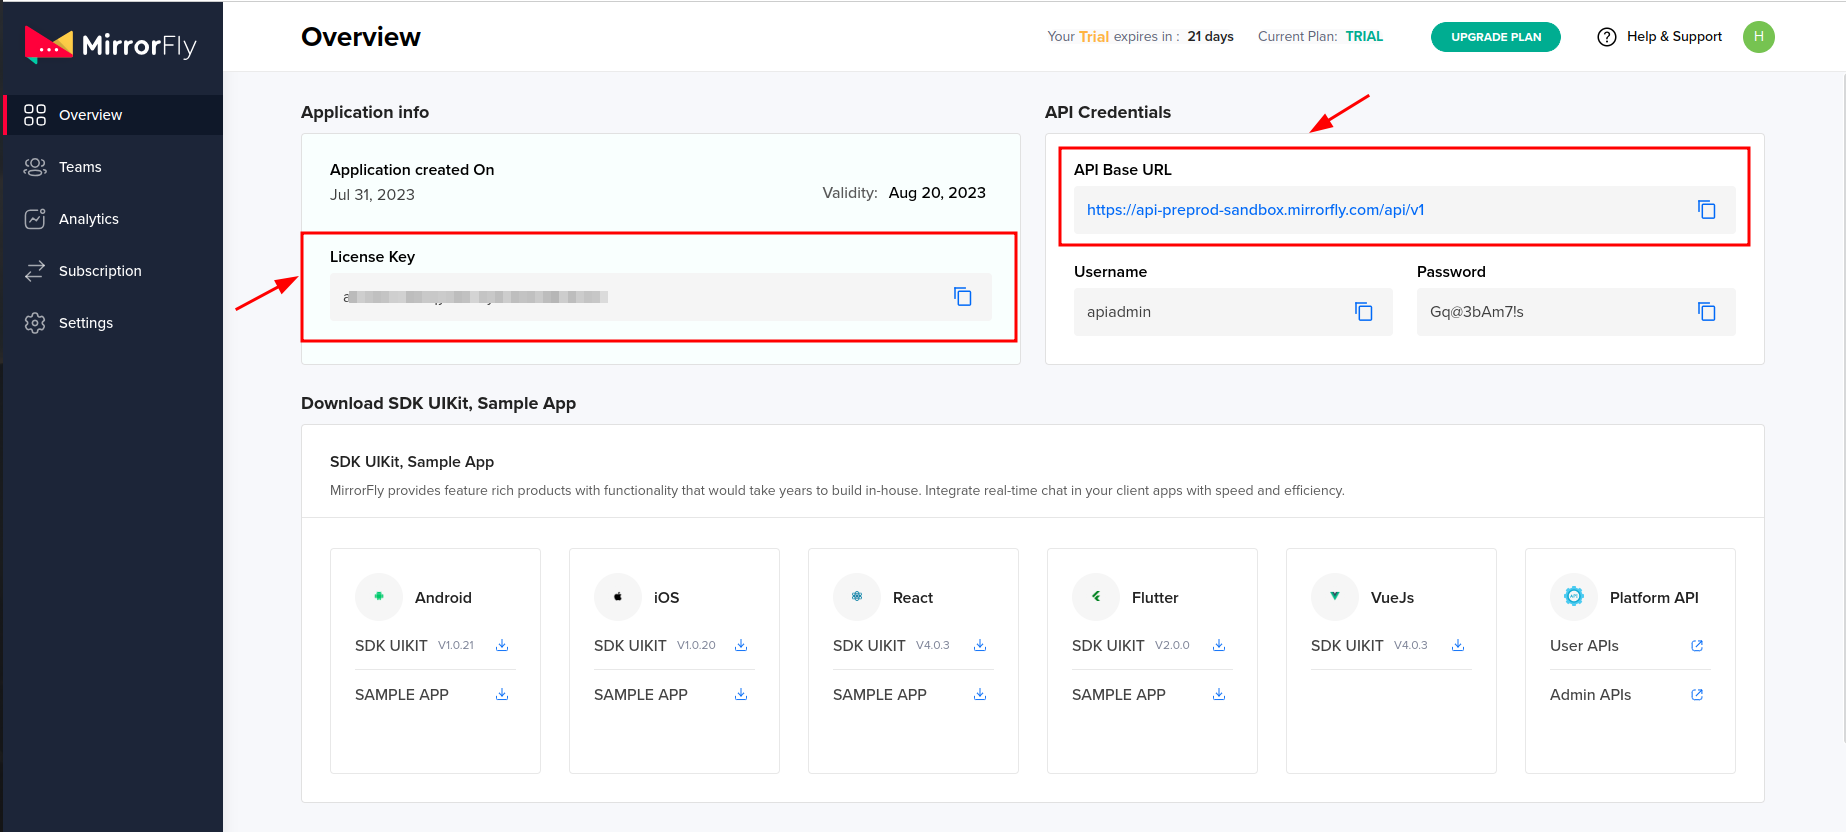
To get the License Key,#
Step 1: Register here to get a MirrorFly User account. Registration is subject to verification and would take up to 24 hours.
Step 2: Login to your Account
Step 3: Get the License key from the application Info’ section
Step 4: Download the iOS SDK
Getting Started#
Since the SDKs were compiled into multiple XCFramework binary packages you need to start with SDK integration. Thus, you have to follow the below given steps,
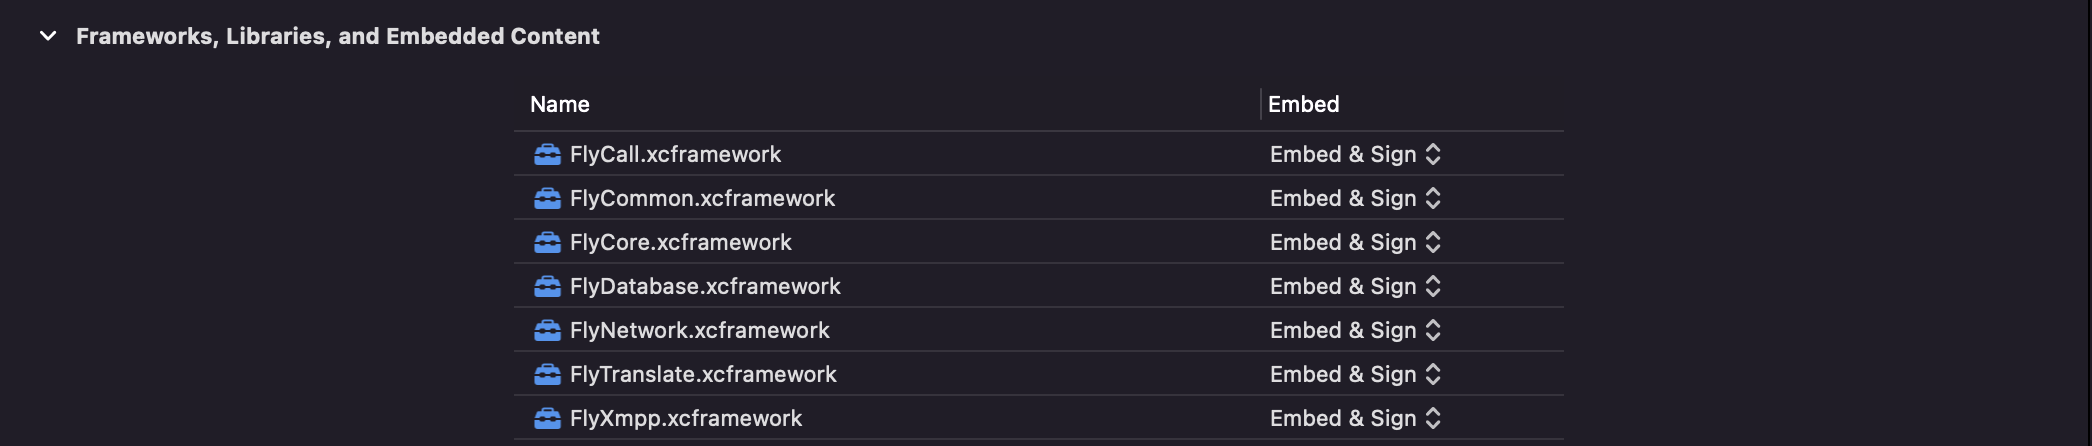
Step 1: First extract the xcframework files from the downloaded zip file that is provided at the top of this guided documentation. Once extracted you get the following xcframeworks.
- FlyCall.xcframework
- FlyCore.xcframework
- FlyCommon.xcframework
- FlyNetwork.xcframework
- FlyDatabase.xcframework
- FlyXmpp.xcframework
- FlyTranslate.xcframework

Step 2: Add all the extracted xcframeworks to your project.
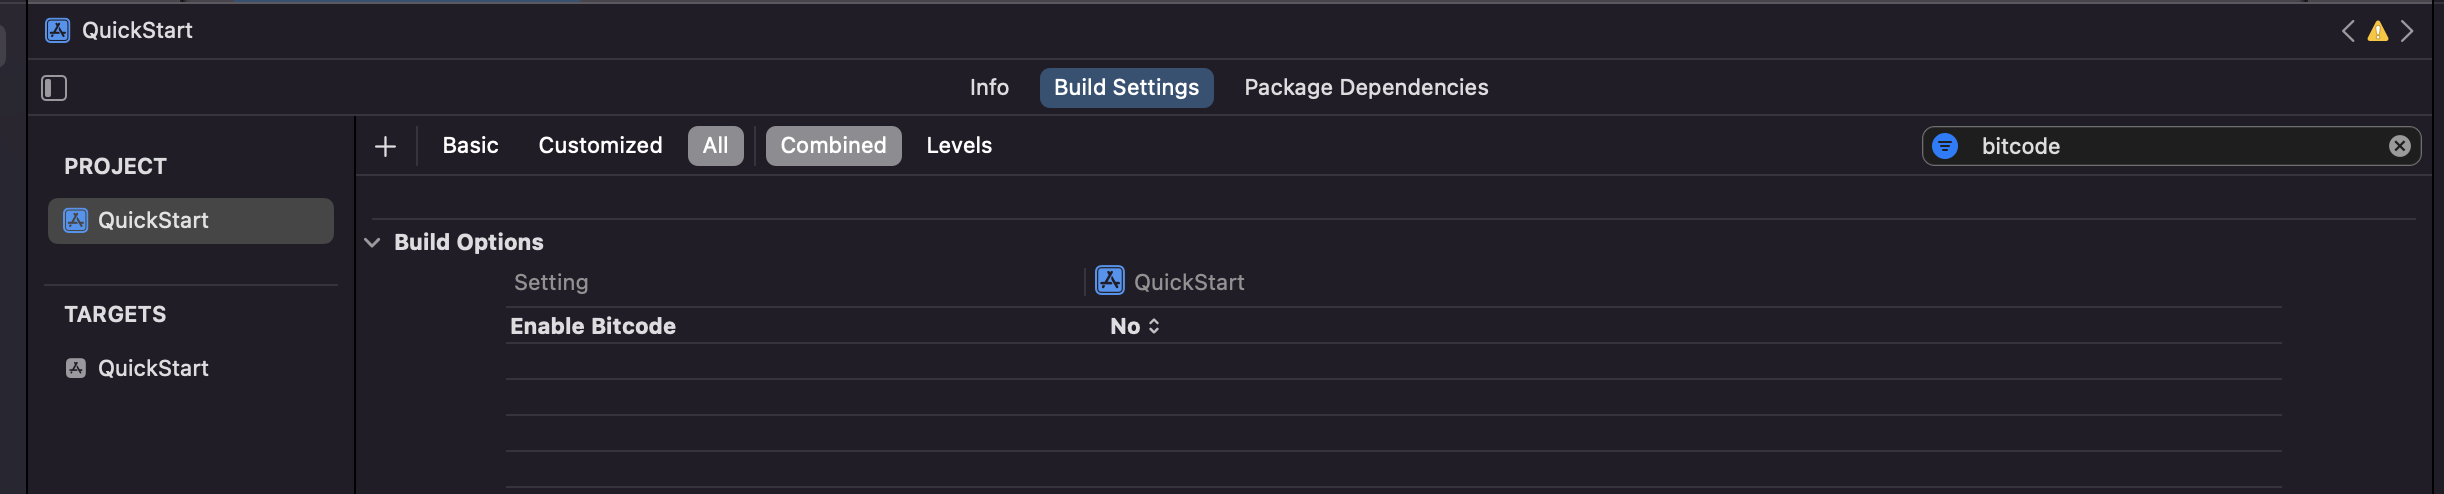
Step 3 : Now, disable the bitcodes for your project
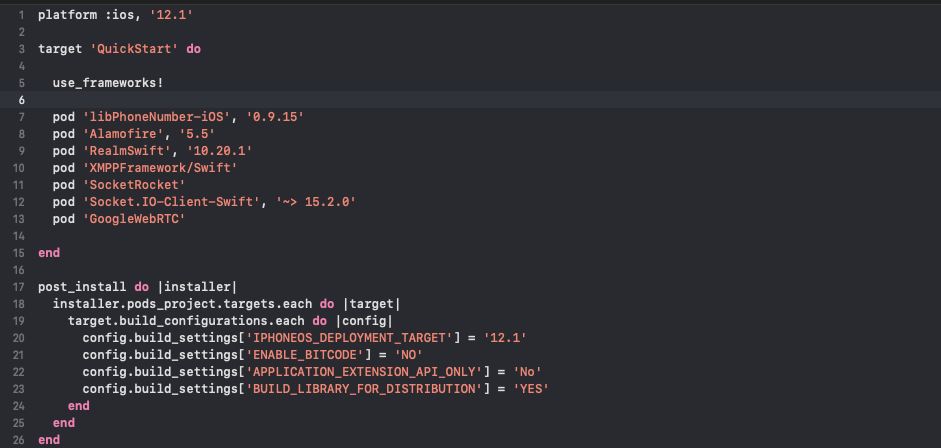
Step 4: If you have not initiated any pods project before, then initiate the one. Now, add the required pods that are necessary for the SDK to execute the process perfectly.
Step 5: Add the below given pod hook code block at the end of the pod file and thus, finally install the pods.
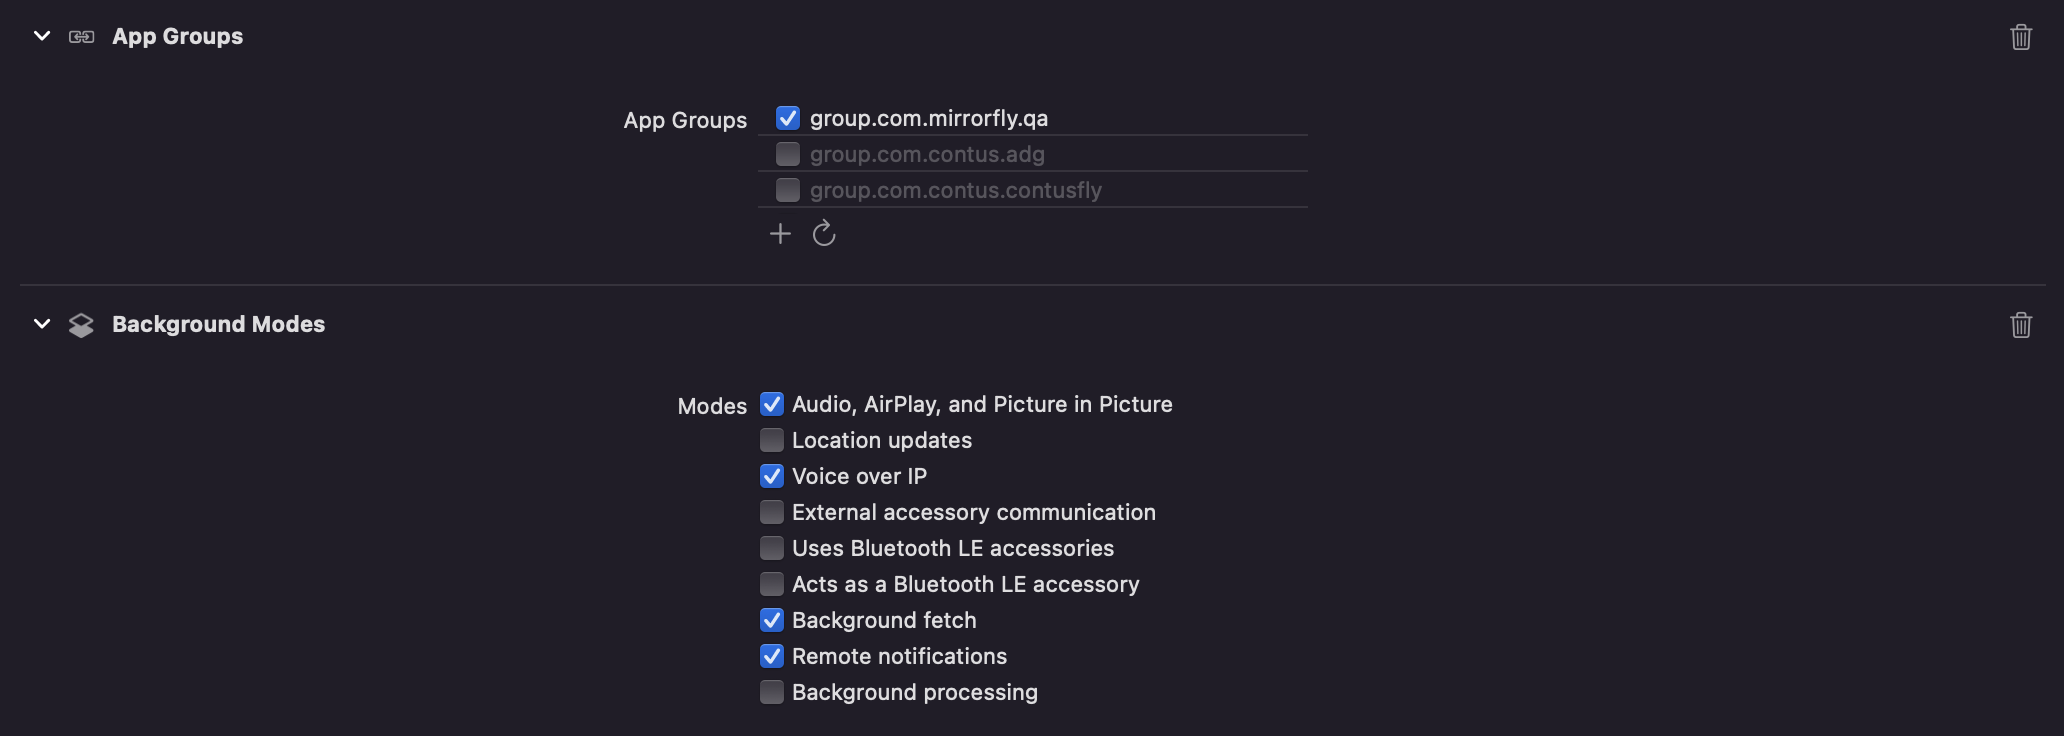
Step 6: Now, enable all the below mentioned capabilities into your project.
| Capabilities |
|---|
| App Groups |
| Background Modes |
Now, go to the background mode and enable the below given modes
| Background Modes |
|---|
| Audio,Airplay, and Picture in Picture |
| Voice over IP |
| Background fetch |
| Remote notifications |
Step 7: Enable Audio and Video record permisions.
Provide Microphone and Camera usage description in the plist file of your project.
Configure the SDK server & Data#
Now, configure the server details in SDK and access the data globally using the AppDelegate class.
Initialize Data for Calls#
To start using the sdk, there are a few basic pieces of data that must be made available for the SDKs to function perfectly.
Thus, we utilize the usage of the ChatSDK builder class making the data available for SDKs. Furthermore, in your project you must use the AppDelegate class within the didFinishLaunchingWithOptions method and also provide required data to build the ChatSDK Builder. Let's have a look at the example given below.
- Swift
- Objective-C
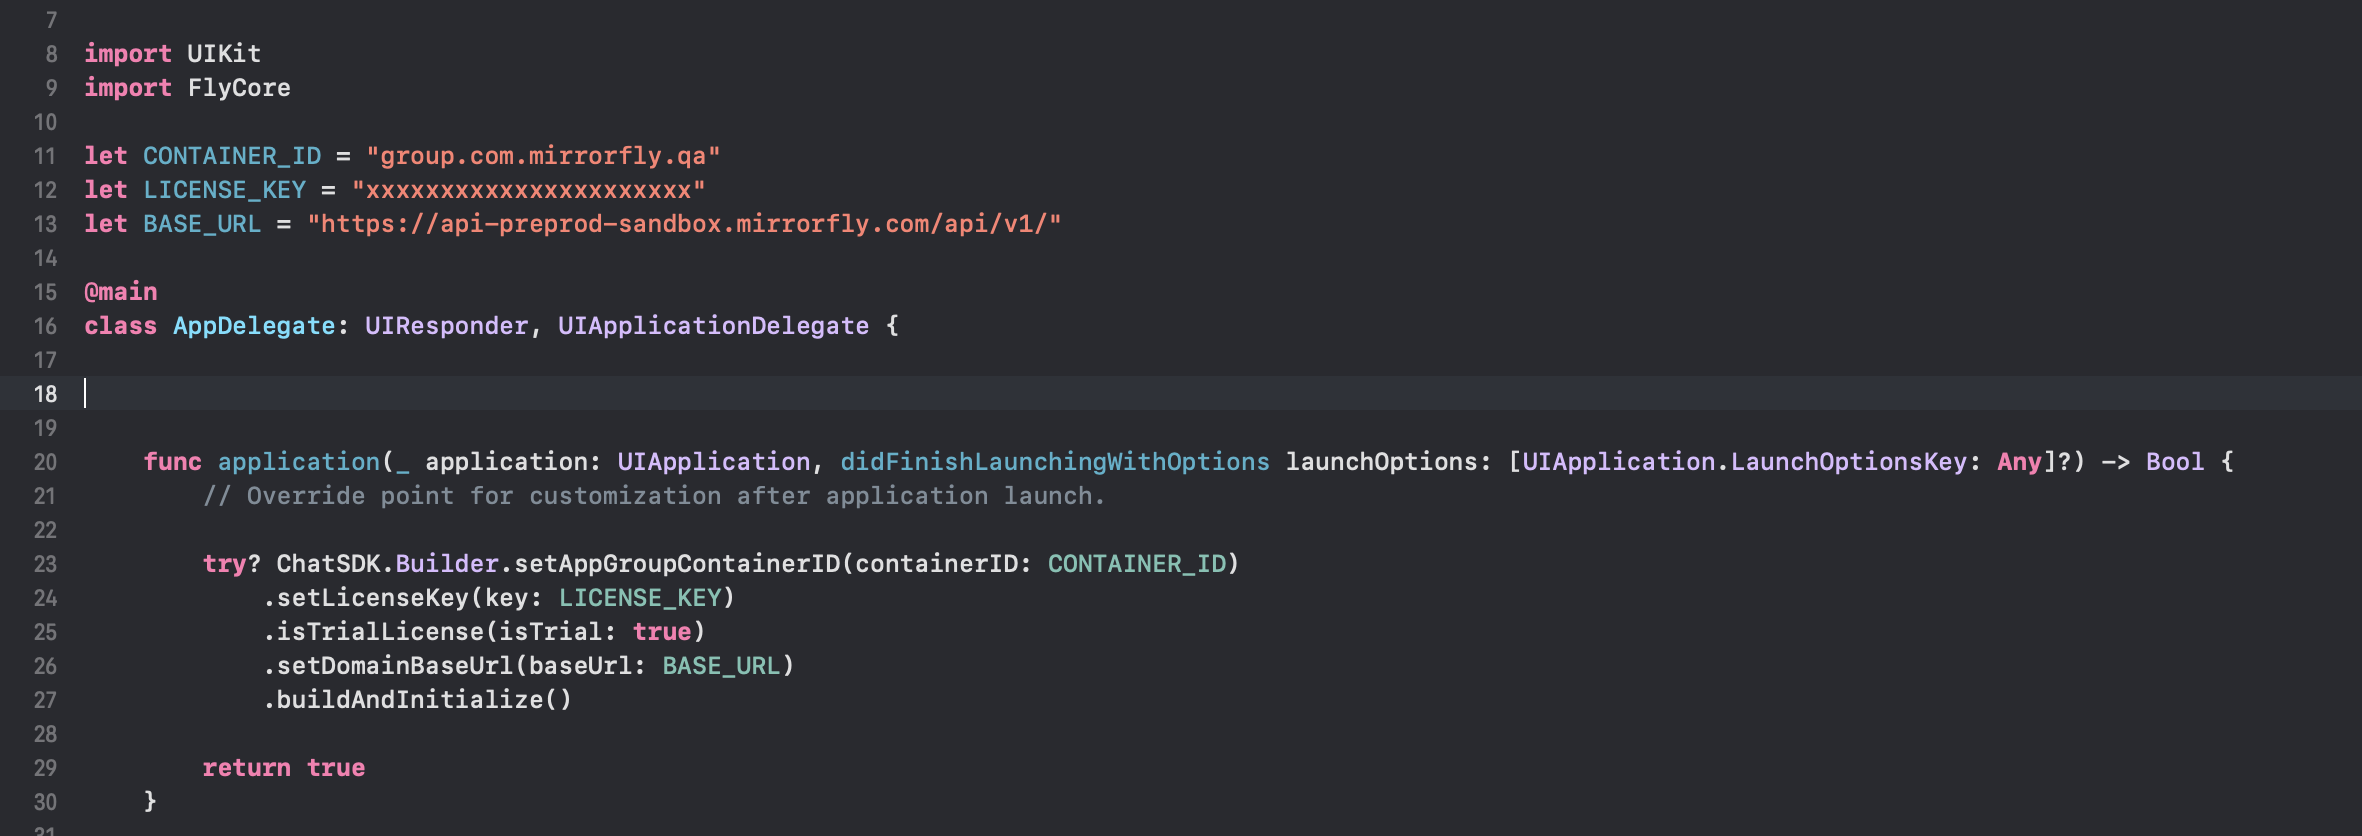
Chat Builder Function Description#
| Function | Parameter Type | Description |
|---|---|---|
| setAppGroupContainerID | String | Pass group container id of the project that stores UserDefaults and Database |
| setLicenseKey | String | Used to proceed with Registration |
| isTrialLicense | Bool | If the obtained license key is a trial license key - display the message as true else false |
| setDomainBaseUrl | String | Url required to make API calls |
| buildAndInitialize | n/a | Initialize the chat configuration |
caution
The base url must have Http/Https protocol which should be closed with a slash (/), or else will display an exception bug message.
Registration#
The below method should be called to register a new user. This method will take care of both Sandbox mode registration as well as Live mode registration based on isTrialLicense provided in the ChatSDK.Builder class.
info
Unless you logged out of a session, make sure that you have called the Registration method only once in an application
Note: While registration, the below
registerApiServicemethod will accept the additional params required for notification processing on server andIS_FORCE_REGISTERas an optional param for maintaining sessions andUSER_TYPEas an optional param to provide type of user.
- APNS_DEVICE_TOKEN
- VOIP_TOKEN
- IS_EXPORT
- Swift
- Objective-C
| Argument | Type | Description |
|---|---|---|
| USER_IDENTIFIER | String | Unique Id to Register the User. We accept only the AlphaNumeric String |
| APNS_DEVICE_TOKEN | String | Token to register APNS device (optional) |
| VOIP_DEVICE_TOKEN | String | Token to register VoIP device (optional) |
| IS_EXPORT | Bool | true for production(apns certificate) builds and false for sandbox(apns certificate)builds |
| IS_FORCE_REGISTER | Bool | default value true provide true to force the logout of the old session If the registered user has reached the maximum no of multi-sessions or provide false to allow registration till the maximum no of multi-sessions |
| USER_TYPE | String | Type of the user (optional) |
| CALLBACK | FlyCompletionHanlder | FlyCompletionHanlder is implemented and expressed as lambda expression for easy reading |
To know more about
FlyCompletionHanlderclickhere
caution
If IS_FORCE_REGISTER is false, and it reached the maximum no of multi-sessions then registration will not succeed it will throw a 405 exception, Either IS_FORCE_REGISTER should be true or one of the existing session need to be logged out to continue registration.
Initialize Call SDK#
After successful registration, call the below method to initialize the Call SDK.
- Swift
- Objective-C
info
Also call the above method in the AppDelegate's didFinishLaunchingWithOptions with a condition of isLoggedin
or isUserId available logic based on your app.
Connect to the Chat Server#
In order to transfer the initial call data payload, we can make use of Chat server for that you have to establish a connection to the chat server using the below given method.
- Swift
- Objective-C
Disconnect Chat Server#
Use the below given method to disconnect from the chat server call.
- Swift
- Objective-C
Observe Connection Events#
The connection status can be observed and tracked by confirming the ConnectionEventDelegate. To do that you need to set ‘delegate’ in your ViewController's viewDidAppear method like below.
- Swift
- Objective-C
Once the ConnectionEventDelegate has been set, you will be able to receive the connection status in the delegate method as mentioned below. Learn more about this method @ ConnectionEventDelegate.
- Swift
- Objective-C
Terminology#
The below given are some of the common keyword/terminologies used in the Chat SDK with description
| Keyword | Description |
|---|---|
| userID/userBareID | Unique ID assigned for each user Ex: 12345678 (any alphanumeric). The below characters is not allowed in userId: U+0022 (") U+0026 (&) U+0027 (') U+002F (/) U+003A (:) U+003C (<) U+003E (>) U+0040 (@) userID should follow below specification: https://xmpp.org/extensions/xep-0106.html |
| userJid (or) JID | userID+@+domain of the chat server Ex. 12345678@xmpp.chatsystem.dev.contus.us |
| groupID/groupBareID | Unique ID assigned for each group Ex: group123456 (any alphanumeric). GroupJID = groupID +@mix.+domain of the chat server Ex: group123456@mix.xmpp.mirrorfly.dev.contus.us` |
info
SDK here provides the built-in functions to prepare the JID and Group JID.
Observe Call Events#
To observe Call events create and set a Singleton Class that conforms to the CallManagerDelegate of FlyCall framework, and pass that object to the below method.
- Swift
- Objective-C
| Argument | Type |
|---|---|
| CALLMANAGER_DELEGATE | CallManagerDelegate |
Setup Call UI#
To set the Call UI that has to be presented during an outgoing call, call the below method. An instantiated view controller object has to be passed in the method.
- Swift
- Objective-C
| Argument | Type | Description |
|---|---|---|
| CALL_VIEW_CONTROLLER | UIViewController | A class that conforms to UIViewController |
Presenting the call UI#
Call SDK handles the UI presentation for an outgoing call. Call the below method after declaring the Call SDK and or before making a call.The below method sets the view on top of which the call ui will be presented.
- Swift
- Objective-C
| Argument | Description |
|---|---|
| VIEW_TO_PRESENT | ViewController in which Call UI has to be presented. |
info
Setting the CallManager.setViewToPresentController is optional else the Call SDK will present the UI for an outgoing call in the project's root viewcontroller.
Make a Voice Call#
To make a one to one voice call, call the below method.
- Swift
- Objective-C
| Argument | Type | Description |
|---|---|---|
| USER_JID | String | Jid of another registered user |
caution
To make and receive a voice/video call, Microphone and Camera usage permissions were required. Call SDK also provides method to check those permissions like CallManager.isAudioCallPermissionsGranted() and CallManager.isVideoCallPermissionsGranted(). We can also make use of these methods too.
caution
If one to one call feature unavailable for your plan then it will throw 403 exception.
Transfer Initial Call Payload#
Since we are making use of Chat Server to transfer initial call payload from caller to callee. Once the above make call function was processed successfully. The following delegate method of CallManagerDelegate will be triggered. There we can make use of the ChatSDK method to send the initial calling payload to the callee.
- Swift
- Objective-C
Receive a call#
Call SDK will take care of receiving and processing the received call payload and triggering the CallKit if you are connected to the server in foreground state.
Once the CallKit is being presented with Accept/Reject Call buttons, we can either choose to attend or reject the call. If we attend the call the below method of the CallManagerDelegate will be triggered, and the status wil be of the case ATTENDED. Inside that method we can present the incoming call UI.
- Swift
- Objective-C
| Argument | Type | Description |
|---|---|---|
| CALLSTATUS | CALLSTATUS enum | An enum class defines the current status of the call |
| USER_ID | String | For this CALLSTATUS our own userId will be returned from SDK |
info
To know more about the CallManagerDelegate protocol and its delegate methods visit here
Push and Voip Notifications#
To receive calls in the background and in killed state, kindly register for remote as well for voip notification by conforming to the following delegates in the AppDelegate UNUserNotificationCenterDelegate PKPushRegistryDelegate.
Call the below methods when an APNS token or VOIP token gets updated.
- Swift
- Objective-C
| Argument | Description |
|---|---|
| TOKEN | Apns or Voip Token |
In class that extends the UNNotificationServiceExtension after validating whether the received payload is for call or not, call the below method
to process the call further.
- Swift
- Objective-C
| Argument | Type | Description |
|---|---|---|
| NOTIFICATION_CONTENT | UNMutableNotificationContent | Notification request content |
| COMPLETION_BLOCK | (UNMutableNotificationContent?) -> Void | Completion Block |
Send the payload received through VOIP from the method didReceiveIncomingPushWith to the method below to process the call further.
- Swift
- Objective-C
| Argument | Description |
|---|---|
| PAYLOAD | Payload Dictionary |